In this guide, I’m going to show you how to install Keymaster, which is an addon for Home Assistant that lets you add new door programming codes to your z-wave locks.
Whenever you purchase a z-wave enabled lock, typically they come with default pins to unlock the door from the outside. To reset or change the code, you often have to go through a series of very specific button presses to add or reset codes.
Wouldn’t it be easier if you could simply add new pin codes from within Home Assistant? With the Keymaster integration in HA, you can!
Estimated setup time: 30 minutes
The instructions below will be for my zwave-js integration but should be very similar for openzwave or the deprecated zwave integration. I am using a Schlage BE469 zwave lock.
Preinstallation Steps: IMPORTANT!
Before I get started, here’s a link to the developer instructions. I’m expanding on those to make the guide even more user-friendly (including screenshots), but should you need to configure something I didn’t cover (such as child locks or notifications), then you’ll want to check it out.
The very thing you’ll need to do is add the below code to your configuration.yaml file (if it doesn’t already exist).
- Navigate to File Editor > Configuration.yaml. Add the code below.
homeassistant:
packages: !include_dir_named packages
2. Then, create a packages
directory in the same directory as your configuration.yaml file. To do this, just click the “New Folder” button and name it packages.
Step 1: Install HACS
The supported method of installing keymaster is using HACS, or the Home Assistant Community Store. If you don’t already have HACS installed, you’ll want to do that by following this guide. While you technically can do this manually, it’s recommended by the devs to use HACS for this particular integration.
Step 2: Install Keymaster Repository
Navigate to HACS > Explore & Add Repository. Search for “keymaster“
Click through the default prompts to complete the install.
**You will need to reboot Home Assistant afterwards. (Supervisor > System > Reboot Host)
Step 3: Add keymaster Integration
Now that the required keymaster files have been added to Home Assistant via HACS, and you’ve restarted Home Assistant, you need to add the keymaster integration.
Navigate to Configuration > Integrations > Add Integration.
Search for ‘keymaster‘.
Note: You will need to install the integration for each lock you have. If you have a frontdoor and backdoor lock, you’ll set up two keymaster integrations.
Step 4: Configure Your Locks
A screen will pop up asking you to select your lock. The dropdown should select the correct entities, but if you have multiple locks just make sure to select the correct one. I have a separate door sensor on my front door, so I am also selecting that.
It should look something like this once filled out:
If completed successfully, you see a message like this:
To confirm everything is setup correctly, you should see a new directory for each door in <your config directory/packages/keymaster/>.
Step 5: Copy Lovelace Text from file
Navigate to the config/packages/keymaster/frontdoor/ directory (or whatever you named your door, if not frontdoor like I did).
Find the frontdoor_lovelace file.
Copy everything to clipboard by clicking the empty space > CTRL+A to highlight all, and then CTRL+C to copy.
Next, go to your Lovelace dashboard. Click the 3 dots > Edit Dashboard > Raw Configuration Editor. Scroll to the bottom and then paste the contents (CTRL+V). Then click Save.
This will now create a new “view”. You should see a lock icon at the very top of your lovelace dashboard like this:
Step 6: Install Additional Modules for Lovelace
For the lovelace ui to work correctly, there are a few additional items you need to download. The easiest way to do this is from HACS.
HACS > Frontend > Explore & Add Repositories.
Search for and add these 4. After clicking each, scroll to the bottom and click Install this repository in HACS.
Step 7: Create New Lock Codes
If all goes well – you should now see several empty cards under your Lockscreen view. If you don’t see these cards, be sure to read over the troubleshooting steps to see if you missed anything.
There’s a lot you can configure here. You can set pin length, specify certain days or times that the door will lock, and much more.
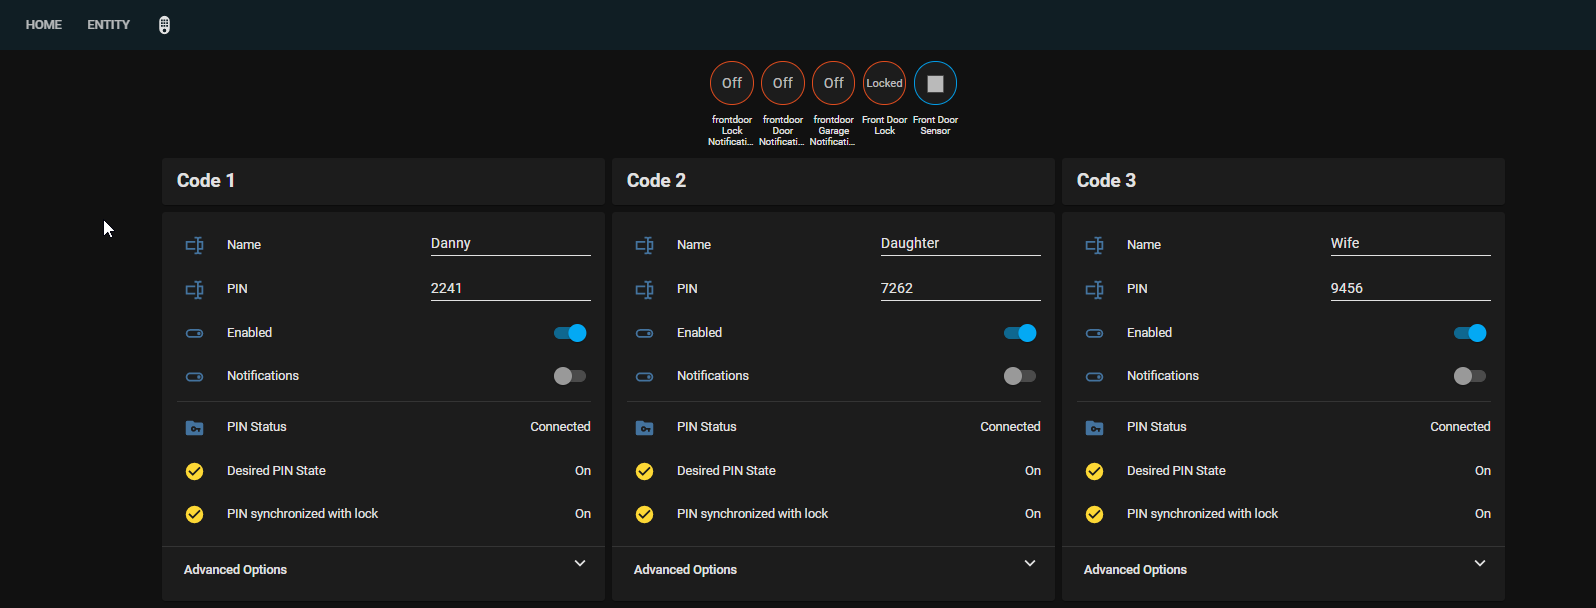
For this example, I am creating a simple 4-digit lock pin. My card now looks like this:
Testing it Out!
The last step is to simply test it out!
During my testing, I successfully added 5 new lock codes. One for me, my daughter, my wife, and our parents.
If you change the lock code from an existing card, it deletes the old lock code (as expected) and only allows the new one to work.
I did notice that our old lock codes still work (the ones that we manually programmed into the lock). So, I just added those existing codes under each card for each member in my family. If I wanted to delete those, I believe I’d have to look at the instruction manual that came with my lock. Or, simply that that code to someone, let it synchronize, and then change it to something else.
I haven’t had a chance to test out some of the other features, such as day/time, notifications, or enforcing a pin limit, but I’m assuming those will work as expected also.
Wrapping Up
All in all, I am extremely happy with the keymaster integration. This was something I loved having in SmartThings, so I’m really happy to see an integration that works well in Home Assistant.
Hopefully this step by step guide helps you get it setup yourself!
My Favorite Home Assistant Devices
Below are some of the Home Assistant-compatible devices I personally use in my home. I highly recommend each of them.
- Zwave/Zigbee hub: Nortek GoControl HUSBZB-1
- Smart Plugs: Sonoff S31 Lite Zigbee
- Motion Sensors: Hue Indoor Motion
- Outdoor Camera: Amcrest IP5M Turret
- Robot Vacuum: Roborock S7
The full list of all Home Assistant compatible & recommended devices I use can be found on my Equipment List page.
Awesome guide – very helpful!
Happy to help! It was a fun project for me, and figured someone else out there could benefit from a step-by-step guide.
Great instructions. Do you know how this interacts with alarmo?
Thanks! I haven’t set up Alarmo yet, so I’m not sure what all can be done with it yet.
Hi Danny, great job! I’ve followed another one of your guides, and it helped me solve an issue I was stuck on and couldn’t figure out from the developer’s documentation. I’m back again with another problem. I have 2 Z-Wave smart locks. I successfully set up the first one following your guide. However, I want the codes to synchronize between the locks. I can’t find a description of the “child locks” feature. Do you know if multiple lock synchronization is what the “child locks” feature is supposed to be used for? -Thanks, Ben
Thank you! I’m glad my guides could help you out.
Yes, you are correct – child locks are used to share lock PINS across multiple doors. I only have 1 zwave lock so I haven’t been able to test this out, but reading through this forum post might help you out if you search for “child lock”: https://community.home-assistant.io/t/keymaster-z-wave-lock-manager-and-scheduler/166419/1749
Awesome documentation Danny; thank you!
I am fearly new with HA and I cannot figure out what went wrong.
HACS installed without issues.
Lovelace addons looks like they where installed ok.
Keymaster installed without any errors and created the Yaml under “/config/packages/keymaster/garage_outer_door/garage_outer_door_lovelace” but I am getting the error:
“This entity (“binary_sensor.pin_synched_garage_outer_door_1”) does not have a unique ID, therefore its settings cannot be managed from the UI.
The door is working perfectly for locking/unlocking from the HA.
Any thoughts?
Many Thanks,
Nikos
Test
You’re welcome! I’m glad it helped you out. It sounds like you are almost there which is awesome.
The first thing I recommend trying is renaming the door without spaces (i.e. – GarageOuterDoor1 instead of Garage Outer Door 1. I didn’t run into that issue whenever I set mine up, but hopefully it’s as simple a fix as that.
This was very helpful. I have the same lock and while my initial attempt resulted in my successfully connecting to the lock, the PIN Status and Desired PIN State entities were missing and the codes wouldn’t update. I reset the lock, wiped all remnants of keymaster from HA, and followed your directions, and everything appears to be working.
That’s great! I’m glad my guide helped you get your lock setup correctly.
Danny, Thank you for the tutorial. I followed everything but i’m getting an error after adding to lovelace for entity not available in the pin status section and none of those items are showing. I made sure all lovelace items are installed, the txt in confirgration.yaml and didn’t use spaces in the name. I’m using kwikset 910 and 912 and both the same issue on 2 different home assistant instances.
I think the issue you are referring to is Step 5 of the guide. If you door has spaces, you could try renaming it (i.e. – if Front Door, change to frontdoor).
I have the same issue as Landi and I cant find the reason! If anyone knows the solution please let us know.
If you see an “Entity Not Found” when looking at your door lock in lovelace, the issue may be the fake door sensor. That was the problem for me. Luckily, I have door sensors on my doors so after changing it to the appropriate sensor, I now have the appropriate keymaster icon.
Working great now and I appreciate the tutorial!
Thanks for the extra info Ryan! Hopefully it helps others if the fake sensor doesn’t work for them.
I was able to fix the issue by adding 2 more spaces to the config file txt below. So instead of 2 spaces before packages add 4. If your still having issue add the door name at the end of each entity for the door.
homeassistant:
packages: !include_dir_named packages
So I was following along just fine and got HACS installed and running. But when I go to add the repository, Keymaster is not there. I search for “key” as shown, and “Bravia TV PSK” is there, but keymaster is not. Any ideas?
Sorry, not sure why it wouldn’t still be in HACS! Is your HACS up to date? You can still copy the files in manually; I believe there is a section on the keymaster wiki on how to do that if you have to resort to that.
I went back in and it was there. My HACS was up to date because I just installed it as per your instructions. Anyway, it’s all working now. Thanks!
Almost got this working! However when I add a new code my Pin Status says Adding and never finishes. If I disable the code it goes back to Deleting. I never seem to get the addition of the code to finish. Editing the card the Pin status entity mentions that this entity doesn’t have a unique ID, therefore it’s settings cannot be managed from the UI. Any tips for getting the Unique ID of my lock?
Keymaster has always been a little weird for me too (at least for my Schlage BE469). I have 2/5 keyslots that have that exact same behavior, but the others work fine. I only need 3 slots anyway so while it’s slightly annoying, it is still working for me so I haven’t revisited it in a while.
Hi there – I know this is old, but hoping you can still help!
After installing this I ended up with like 20 new automations in my list (all beginning with “keymaster”). Can I delete these? Or, at least hide them since I can’t edit them…