How To Install Nginx Proxy Manager in Docker on Ubuntu 20.04
In this tutorial, I'm going to show you how to install Nginx Proxy Manager in Docker on a Ubuntu 20.04 VM. This guide was created in January of 2021, so all of the info here should be up to date.
The main goal of this post is install Nginx Proxy Manager so my Plex users can access my Overseerr instance remotely.
What is Nginx Proxy Manager?
Nginx Proxy Manager is a Docker application that lets you quickly and easily expose your selfhosted services to the outside world. NPM includes a free Letsencrypt SSL certificate as well, which is an absolute must if you are opening up anything to the entire internet.
When to use Nginx Proxy Manager?
You should setup Nginx Proxy Manager if there are any sites and services located within your home network that you'd like to be able to access remotely without the use of a VPN.
Keep in mind, while you can add all your services to NPM, you probably don't want to for security purposes. Sonarr and Radarr, for example, don't require a username and password to log into. You wouldn't want to add these to NPM, as anyone in the world can start downloading media to your server, changing settings, or viewing your log files.
However, if you'd like to access Bitwarden_rs, Overseerr, Bookstack, Homer dashboard, or a Wordpress site you have hosted at home from anywhere - then it might make sense to add those to Nginx Proxy Manager.
Prerequisites:
This guide assumes you already have Docker and Docker-Compose installed. If you don't have those setup yet, you can follow these step by step guides I've created. I have Docker and Docker-Compose running a Ubuntu 20.04 VM.
- How To Install Docker On Ubuntu
- How To Install Docker-Compose and Portainer (just follow step 1)
Setup Time: 30 minutes
Step 1: Register a Domain Name
The first thing you'll need to do is register a domain name. If you already have a domain name, you can skip this step.
The domain I'm using dannyhosted.com and was purchased from Namecheap for less than $8/year.
Step 2: Set Up DNS
The next thing we need to do is set up your DNS for your domain. You can either use Namecheap's built-in DNS or Cloudflare. For this guide, I'll be using using Cloudflare.
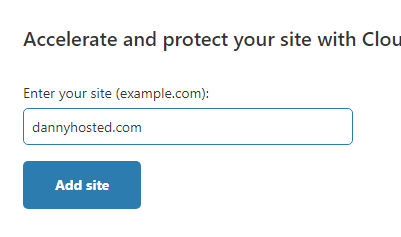
Head over to Cloudflare.com and register or sign in. Click Add A Site.
Add the site you just purchased or the domain you already own. You can stick with the Free Cloudflare plan for this.
After a few moments, it'll pull in the existing DNS information from Namecheap. Click Continue.
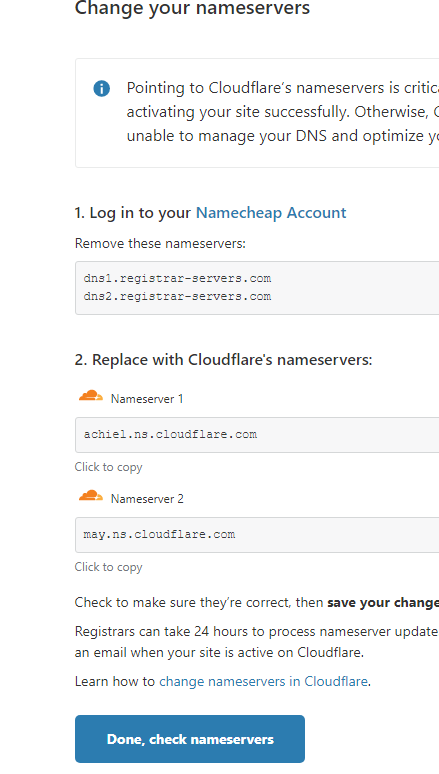
The next screen will show you what nameservers you'll enter into Namecheap.
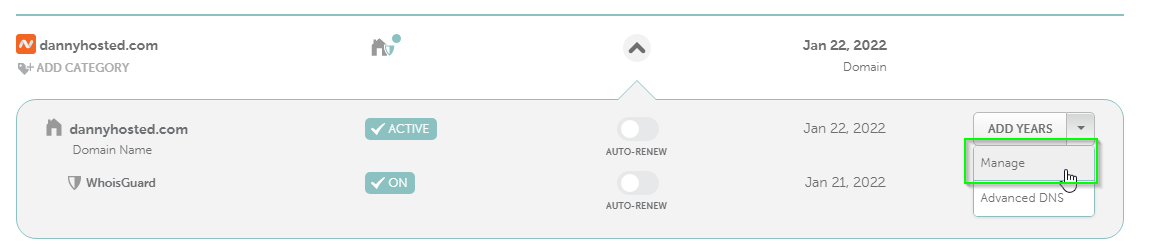
Navigate to the DNS settings in your registrar. For Namecheap, go to your Account Dashboard. Click the dropdown arrow > Manage.
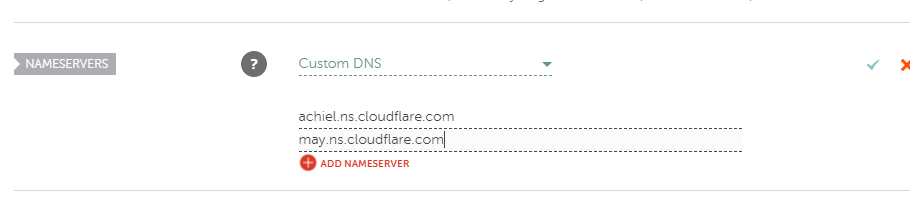
Under Nameservers, change from Namecheap Basic DNS to Custom DNS. Then add the two nameservers given to you from Cloudflare. After pasting those in, click the green checkmark.
A message will pop up stating that it may take 48 hours for DNS to replicate across the internet. In my experience, it's usually less than 5 minutes, but keep in mind that it can sometimes take a while.
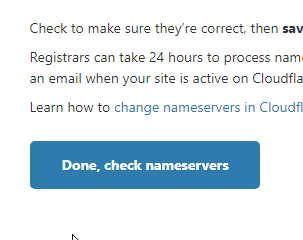
Navigate back to the Cloudflare page and click Done, check nameservers.
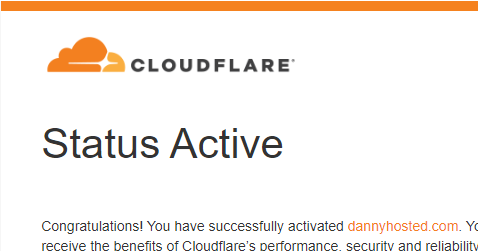
Once Active in Cloudflare, you'll receive an email letting you know.
Step 3: Create Nginx Proxy Manager directory
Open Putty to SSH into your docker server.
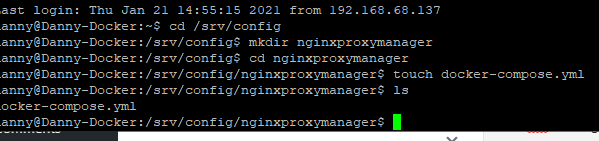
The first thing we need to do is make a directory for Nginx Proxy Manager. I keep all of my containers in /srv/config/, so I'll creating a nginxproxymanager directory there.
First, navigate to the directory.
cd /srv/config/Then make a new folder.
mkdir nginxproxymanagerThen navigate to the newly created directory.
cd /nginxproxymanagerStep 4: Create Docker-Compose.yml file
Enter this command to create a new docker-compose file inside the directory.
touch docker-compose.ymlTo verify the file was created successfully, type ls.
Next, we need to edit the docker-compose.yml file. To do this, we are using the nano file editor.
nano docker-compose.yml
Paste in the file below. Since we are opening Nginx Proxy Manager to the world, you will definitely want to change the default user and password as well as the paths. If you already have something running on port 81, you should change that as well.
version: '3' services: app: image: 'jc21/nginx-proxy-manager:latest' ports: - '80:80' - '81:81' - '443:443' environment: DB_MYSQL_HOST: "db" DB_MYSQL_PORT: 3306 DB_MYSQL_USER: "npm" # Change mysql user DB_MYSQL_PASSWORD: "npm" # Change mysql password DB_MYSQL_NAME: "npm" volumes: - /srv/config/nginxproxymanager:/data - /srv/config/nginxproxymanager/letsencrypt:/etc/letsencrypt db: image: 'jc21/mariadb-aria:10.4' environment: MYSQL_ROOT_PASSWORD: 'npm' # Change mysql user MYSQL_DATABASE: 'npm' MYSQL_USER: 'npm' # Change mysql user MYSQL_PASSWORD: 'npm' # Change mysql user volumes: - /srv/config/nginxproxymanager/db:/var/lib/mysqlThen, click CTRL+X > Y for yes > and Enter to save.
Then start the containers with this command.
sudo docker-compose up -dYou should see two Done messages once complete.
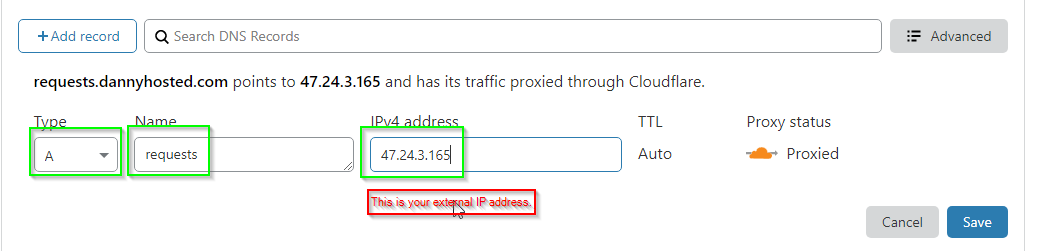
Step 5: Add DNS A Record to Cloudflare
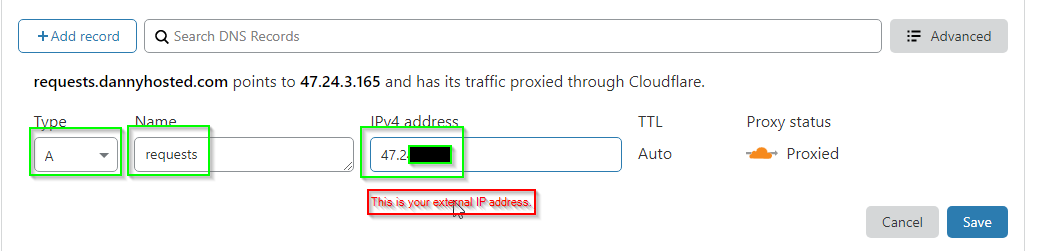
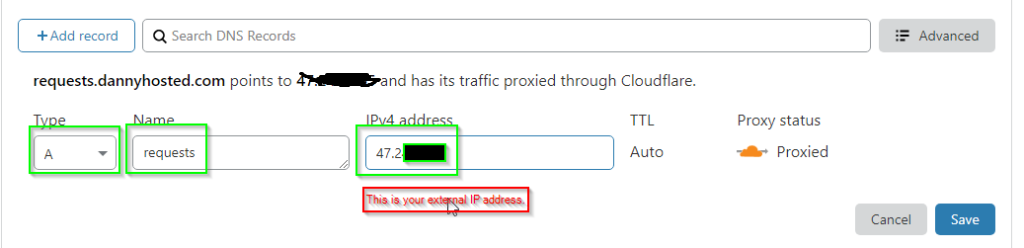
Next, go back to Cloudflare.com > DNS. Click + Add record.
Add a new A record, enter your subdomain, and your home's external IP address. If you don't know what yours is, just type "what's my IP" into Google and paste it here.
Tip: You can also just add a * instead of a subdomain if you want any unspecified domains to go directly to your server IP. Then you can simply add subdomains in Nginx Proxy Manager.
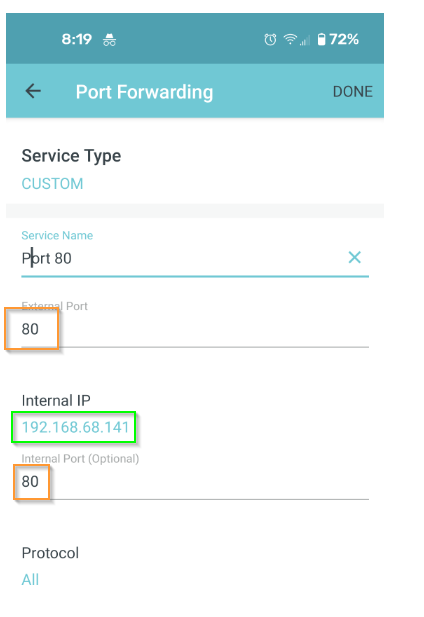
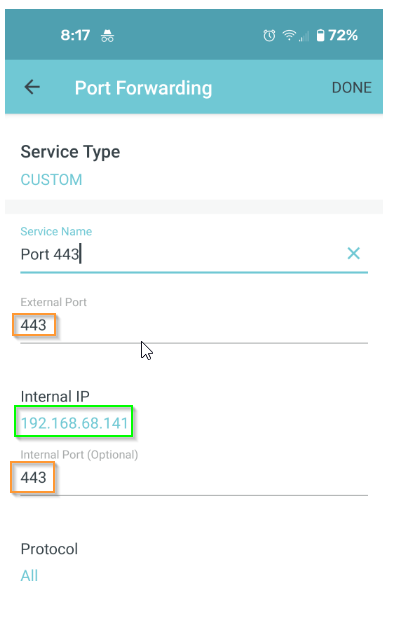
Step 6: Port Forward ports 80 and 443 in your router
I can't show you exactly how to do this step as each router has a different interface and menu items.
Basically, you need to log into your router and port forward two ports: 80 and 443. I'm using a TP Link Deco m5 so I have to access this from the mobile app. The port forwarding option is usually located under the Advanced settings of your router.
If you can't find the port forwarding option, you can Google search you router model + port forwarding to find where it's located.
Port #1: 443
Add 443 to both the internal and external port. Add the internal IP of your docker server.
Port #2: 80
Add 80 to both the internal and external port fields. Add the internal IP of your docker server.
Step 7: Open Nginx Proxy Manager WebUI
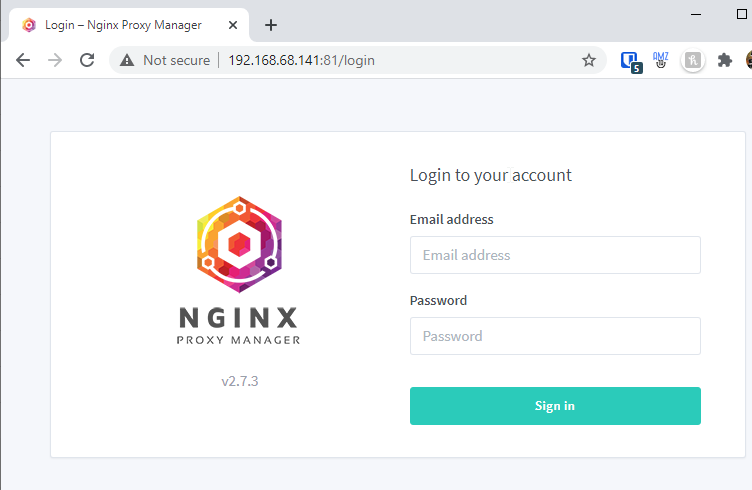
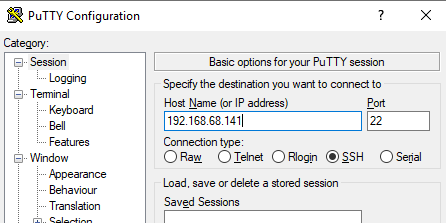
In the docker-compose file above, I used port 81. Enter your docker server IP and use port 81 to open the webpage. Mine would be 192.168.68.141:81.
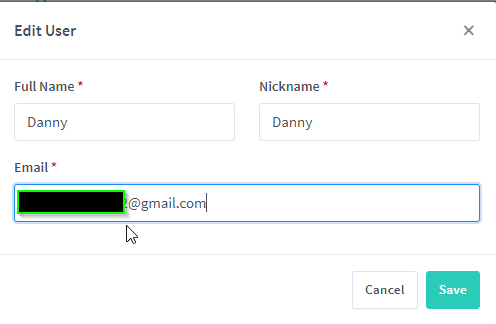
The default login credentials are admin@example.com and the password is changeme. After signing in you'll be prompted to create a user account.
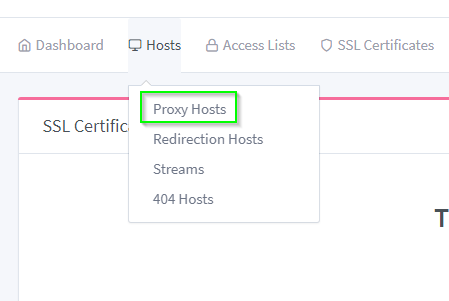
Click the hosts tab, then click Proxy Hosts.
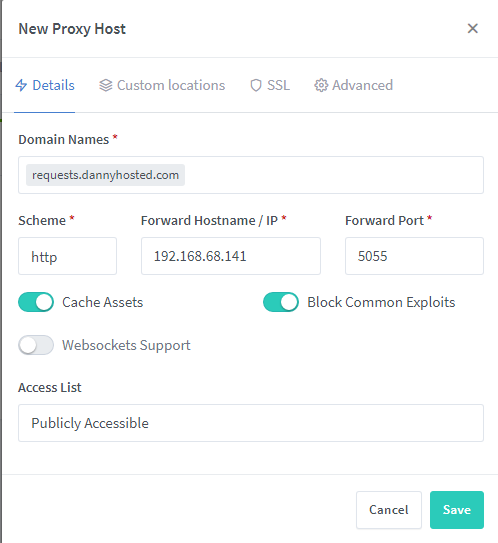
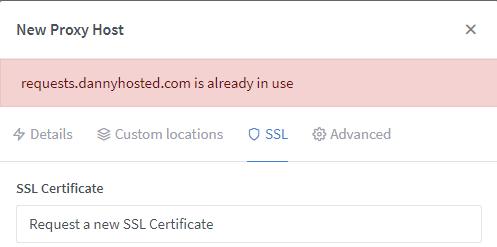
Add a Proxy Host. For the domain name, choose the subdomain you want to use. For this example, I am going to be proxying Overseerr, which is an application that lets my Plex users request new TV shows and movies to automatically get downloaded to my Plex server. The subdomain I'm going to use requests.
- Domain Names: requests.dannyhosted.com. Make sure to click Add.
- Scheme: http
- Forward Hostname/IP: The internal IP of your Docker server (192.168.68.141)
- Forward Port: The internal port number for your your service. Overseerr is using 5055.
- Turn on cache assets and block common exploits
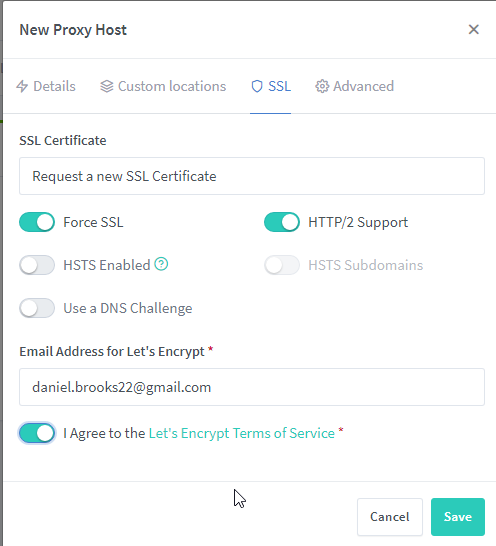
Then switch to the SSL tab.
- Request a new SSL Certificate
- Force SSL: enabled
- HTTP/2 Support: Enabled
- Agree to the ToS
In Nginx Proxy Manager, your proxy host should now up Online:
Step 8: Test it out!
The final step is to simply go to https://requests.dannyhosted.com in a web browser.
If everything worked correctly, the webpage should load both on your internal network as well as a remote network. The easiest way to check if it works externally is by turning off the wifi on your phone and using your mobile data.
Note: During testing, you may have cached webpages causing it to look like it's not working correctly. I recommend using different browsers or an incognito browser to test.
Now that you have it working with 1 application, the same steps apply for each selfhosted application you want to add. Just create a new DNS A record in Cloudflare and then add the proxy host in Nginx Proxy Manager.
Wrapping Up
Hopefully this guide helps you get Nginx Proxy Manager setup quickly and easily! I scoured the internet looking for a step-by-step guide or video tutorial, but ultimately ended up documenting everything myself as most of what I found was slightly out of date or was geared towards OMV.
Let me know in the comments section if this guide worked for you or if there's anything I need to edit or change.