In this guide, I’ll show you how to add some quality-of-life improvements to your Roborock S7 integration in Home Assistant.

In Part 1, I’ve shown you how to:

  • Unbox and setup your Roborock S7 vacuum cleaner
  • Connect it to your MiHome App
  • Extract the cloud token
  • Add Roborock S7 integration to Home Assistant
  • Create a few Lovelace cards to manage your vacuum

In Part 2 (this guide), I’ll showed you how to:

  • Create clickable zones on your Vacuum Map Card
  • Add text room names to your Vacuum Map Card
  • Select rooms from a Lovelace dropcard to schedule individual room cleanings

In Part 3, I’ll show you how to:

  • Create automations & notifications
  • Clean rooms or zones on a schedule
  • Create Google Assistant voice commands to clean zones or rooms

In Part 4, I’ll show you:

  • How to control the roborock s7 mop in Home Assistant

In Part 5, I’ll show you:

  • How to vacuum multiple rooms in an automation (by calling each script.vacuum_xyz script). This allows you to select the order and schedule vacuuming for as many rooms as you’d like.

In Part 6, I’ll show you:

  • A compact, simple vacuum & mop control card

Let’s get started!

roborock S7 Robot Vacuum and Mop, 2500PA Suction & Sonic Mopping, Robotic Vacuum Cleaner with Multi-Level Mapping, Works with Alexa, Mop Floors and Vacuum Carpets in One Clean, Perfect for Pet Hai...
$649.99
  • Sonic Mopping Technology. Roborock S7 robot vacuum mops with the power of sound, scrubbing up to 3,000 times per minute. Fed by a 300 ml electronic water tank, stains from coffee to mud and more can...
  • Intelligent Mop Lifting. S7’s VibraRise mop lifts when a carpet is detected, so you can mop hard floors and vacuum carpets in a single clean. It also raises when cleaning is finished to avoid...
We earn a commission if you make a purchase, at no additional cost to you.
11/28/2023 02:02 am GMT

Overview

With the Vacuum Map Card, you can already instruct your vacuum to go to a certain point (Pin & Go) and also drag over an area of your house to have it clean a specific zone (zone cleanup).

We are going to take it a step further and define actual zones. This will let you click a specific room on the map card and tell your vacuum to clean just that room without having to drag it over the area.

Once the zones/points are defined, we are going to add that to an input select helper. We can then add that to an entities card, so in a dropdown, you can choose a room, and then click Start Cleaning.


Step 1: Get coordinates for a specific location

Before we define a specific zone (or a room), we are going to get the coordinates for a certain point. A point might be your trash can or your sink. These points will instruct your vacuum to go directly there.

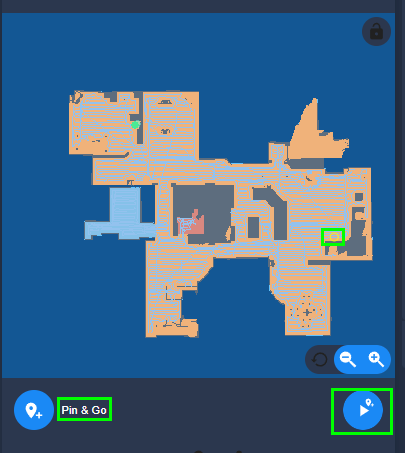
On your card, choose Pin & Go. Drop the pin at a specific location.

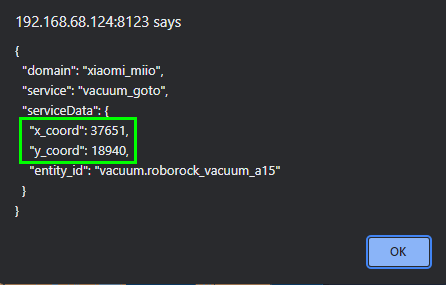
Then, click and hold the Play button. A box will popup displaying the coordinates of that predefined location in X and Y coordinates

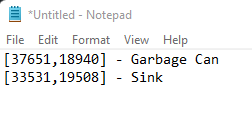
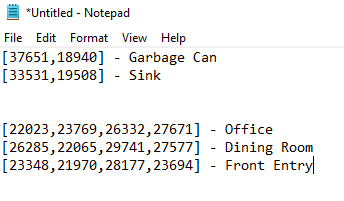
Copy the value to clipboard for quick reference and paste in Notepad. Format it is [X,Y].

37651,18940

Do this for as many points as you want. It may help to add a label to Notepad so you remember which coordinates are which.


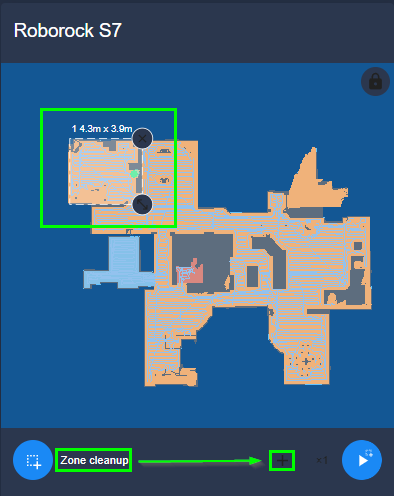
Step 3: Get Coordinates for Zone

Next, switch from Pin & Go to Zone cleanup. Click the “+” button and then move the zone over a specific room.

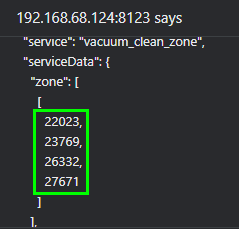
Click and hold the Play button like before. This time, it’ll show 4 coordinates.

Copy and paste those to your Notepad file as well:

[22023,23769,26332,27671]

Define as many zones as you want:


Step 5: Add Permanent Zones & Points to Map Card

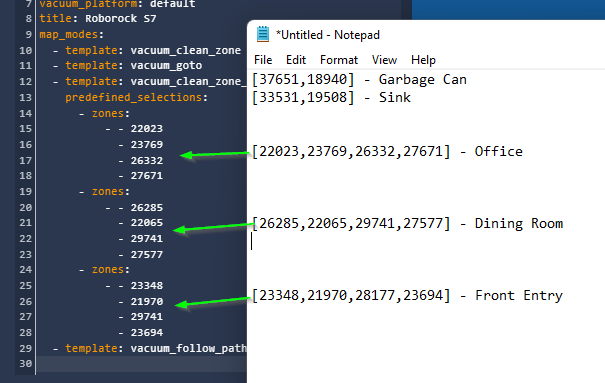
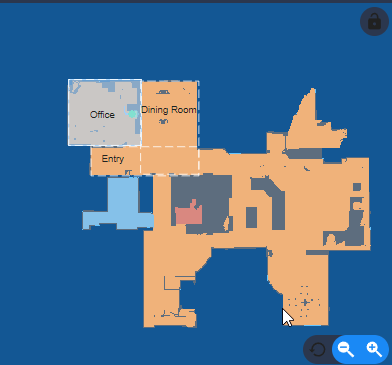
Now that you have defined boundaries for your zones, we can add those as permanent zones to the card itself. (zones:) We will also add the points to the map (position:)

This will let you click the Office for example, and it’ll automatically start cleaning there. No more needing to manually drag over that area each time.

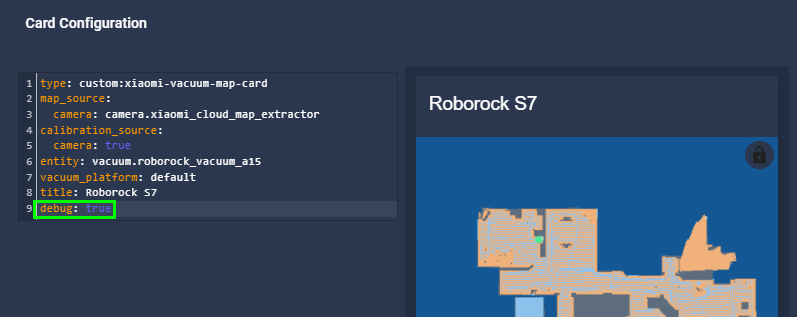
To do this, edit your existing map card.

Then, add zones and points to your card like this:
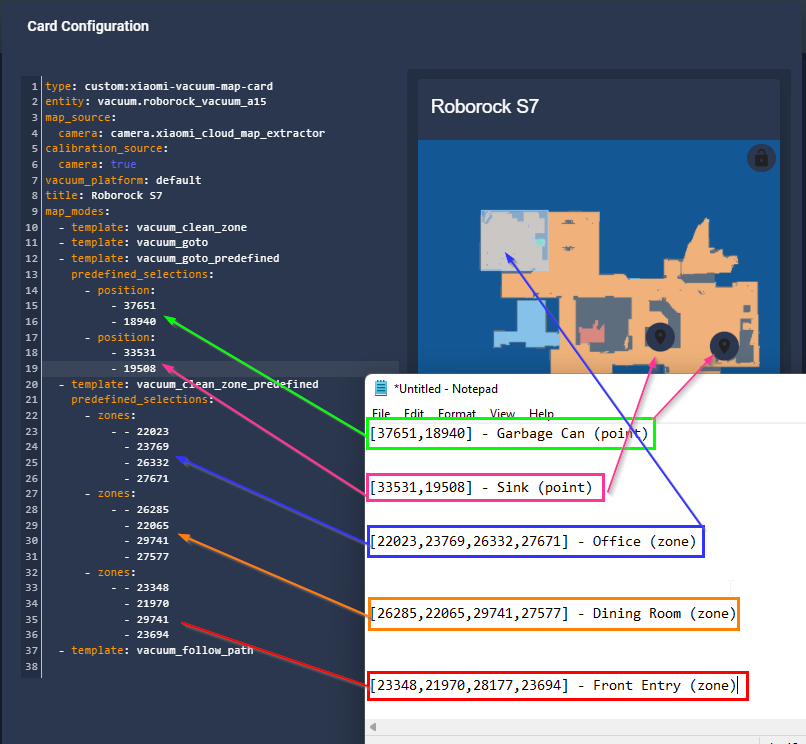
Here’s the yaml for my card – you can copy and paste this into a Manual card and just change entity name and coordinates.

type: custom:xiaomi-vacuum-map-card
entity: vacuum.roborock_vacuum_a15
map_source:
  camera: camera.xiaomi_cloud_map_extractor
calibration_source:
  camera: true
vacuum_platform: default
title: Roborock S7
map_modes:
  - template: vacuum_clean_zone
  - template: vacuum_goto
  - template: vacuum_goto_predefined
    predefined_selections:
      - position:
          - 37651
          - 18940
      - position:
          - 33531
          - 19508
  - template: vacuum_clean_zone_predefined
    predefined_selections:
      - zones:
          - - 22023
            - 23769
            - 26332
            - 27671
      - zones:
          - - 26285
            - 22065
            - 29741
            - 27577
      - zones:
          - - 23348
            - 21970
            - 29741
            - 23694
  - template: vacuum_follow_path

Step 6: (Optional) Adding Names to Zones

If you would like names or icons to appear on your Zone list and Points, here’s what you’d do.

Add Name & Icon to Points

For points, add the following code under each points. Where X and Y are the same as what you used in the position.

        label:
          text: Trash
          x: 37651
          'y': 18940
          offset_y: 35
        icon:
          name: mdi:trash-can
          x: 37651
          'y': 18940

Add Text to Zones

For zones, since there are 4 coordinates of the bounding box, you can’t use the X,Y,X,Y values you’ve already grabbed, as those are for the 4 corners.

Instead, click Pin & Go on the map and click and hold the play button get the coordinates of the middle of the room.

It will now look like this:

Full Example YAML for points, zones, icons, and text overlays for each zone.

type: custom:xiaomi-vacuum-map-card
entity: vacuum.roborock_vacuum_a15
map_source:
  camera: camera.xiaomi_cloud_map_extractor
calibration_source:
  camera: true
vacuum_platform: default
title: Roborock S7
map_modes:
  - template: vacuum_clean_zone
  - template: vacuum_goto
  - template: vacuum_goto_predefined
    predefined_selections:
      - position:
          - 37651
          - 18940
        icon:
          name: mdi:trash-can
          x: 37651
          'y': 18940
      - position:
          - 33531
          - 19508
        icon:
          name: mdi:water
          x: 33531
          'y': 19508
  - template: vacuum_clean_zone_predefined
    predefined_selections:
      - zones:
          - - 22023
            - 23769
            - 26332
            - 27671
        label:
          text: Office
          x: 24012
          'y': 25523
      - zones:
          - - 26285
            - 22065
            - 29741
            - 27577
        label:
          text: Dining Room
          x: 27942
          'y': 25807
      - zones:
          - - 23348
            - 21970
            - 29741
            - 23694
        label:
          text: Entry
          x: 24627
          'y': 22965
  - template: vacuum_follow_path

Step 7: Create Input Select for each Zone

Now that you’ve got your Vacuum Map Card customized to your liking, we are going to create an input_select. This will give you a dropdown list of zones you can click to start cleaning. This is also optional, but it’s nice to simply view the name of a room and tell it to start cleaning there rather than having to find it on the map card.

Here’s what that looks like:

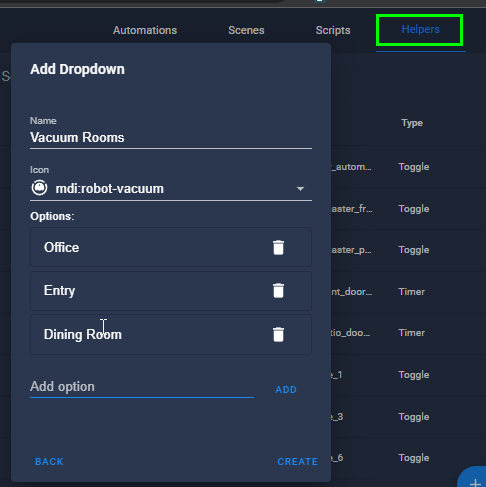
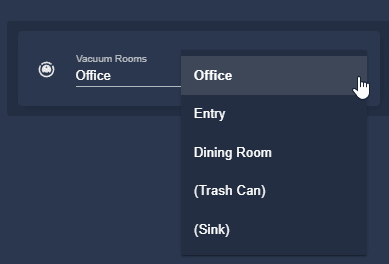
Configuration > Automations & Scenes > Helpers. Then click Add Helper > Dropdown.
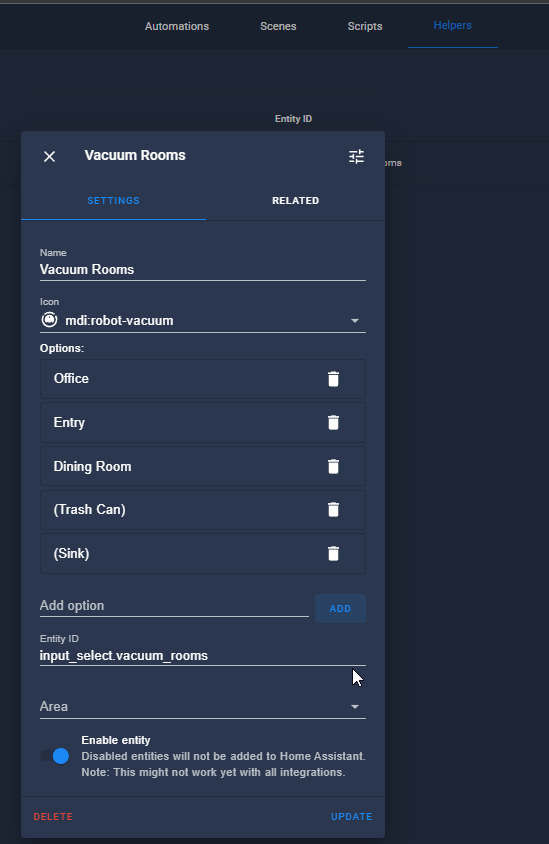
Give your dropdown a name like “Vacuum Rooms”, and then add as many rooms as you’d like to be able to point-and-click to vacuum or go to. I added parenthesis to specific points so they are quicker to find.

Your entity name is now called:

input_select.vacuum_rooms

Step 8: Create Scripts

Next, we need to create individual scripts to call for each option we added to the input select. In my example, I’ll need to create 5 scripts.

Configuration > Automations & Scenes > Scripts.

Note: We will be creating two different types of scripts: one for a specific point and one for a zone.

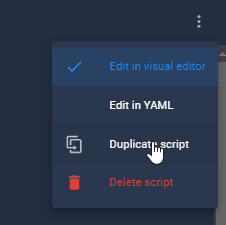
Tip: After completing 1 script for a point and 1 for zone, just duplicate it and change the Name, entity name, and coordinates:


Script to Go To Specific Point

Create a new script like my screenshot below or copy my YAML and just change out the coordinates with your own.

The target is your vacuum (Rosie) and the parameters are the X and Y coordinates of the point. This will tell the vacuum to go that specific point and stop; it won’t tell it to vacuum there.

Repeat this process for as many points as you have.

Zone cleanup parameters look like this:

  params:
    - - 37651
      - 18940

Specific point cleanup parameters look like this:

  params:
      - 37651
      - 18940

alias: 'Vacuum: Trash Can'
sequence:
  - service: vacuum.send_command
    target:
      entity_id: vacuum.roborock_vacuum_a15
    data:
      command: app_goto_target
      params:
          - 37651
          - 18940
mode: single
icon: mdi:trash-can

Script to Vacuum Zone

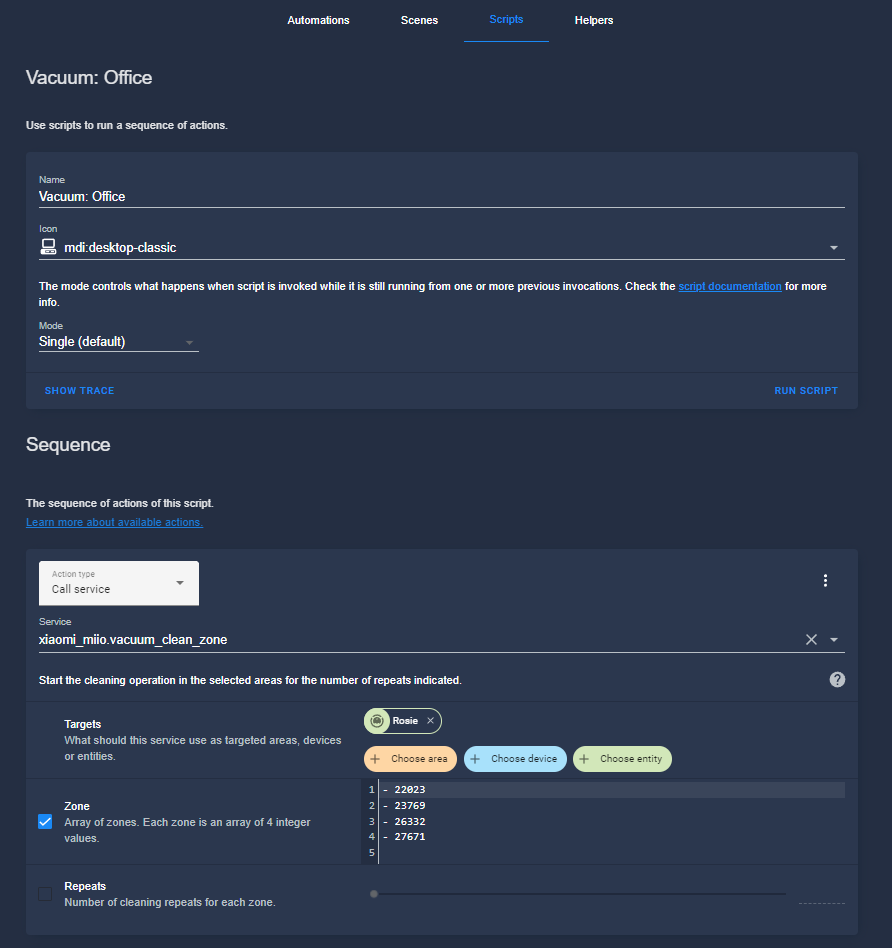
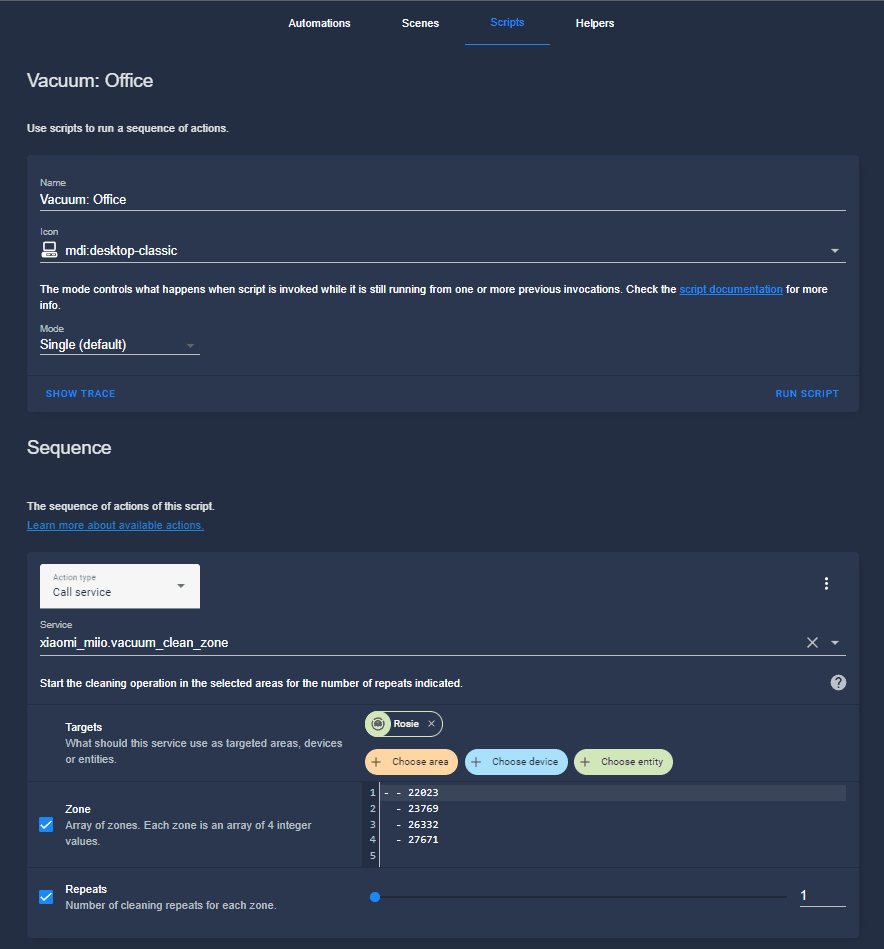
Create a new script like my screenshot below. Instead of going to a point, we are using the service xiaomi_miio.vacuum_clean_zone.

Add the 4 coordinates for that zone. Set the number of repeats to 1.

Repeat this process for as many zones as you have.

alias: 'Vacuum: Office'
sequence:
  - service: xiaomi_miio.vacuum_clean_zone
    target:
      entity_id: vacuum.roborock_vacuum_a15
    data:
      repeats: 1
      zone:
        - - 22023
          - 23769
          - 26332
          - 27671
mode: single
icon: mdi:desktop-classic

Step 9: Create Automation to call each script when triggered from input select

Go to Automations > Add Automation. Start with an empty automation. Go into the YAML editor of the automation and paste in the code below.

Under the data_template section, change the Input Select name (input_select.vacuum_rooms) you created in Step 7 and match it up with the corresponding script you created in Step 8.

We are adding a Stop command and 3 second wait timer to this automation. The reason I’m doing this is because you can’t stop a script once it’s already been triggered from input_select. For example, if you accidentally click Office but meant to tell your roborock to go to dining room, it won’t listen.

alias: Run Vacuum Zone
description: ''
trigger: []
condition: []
action:
  - service: vacuum.stop
    target:
      entity_id: vacuum.roborock_vacuum_a15
  - delay:
      hours: 0
      minutes: 0
      seconds: 3
      milliseconds: 0
  - service: script.turn_on
    data_template:
      entity_id: >
        {% if states.input_select.vacuum_rooms.state == "Office" %}
        script.vacuum_office  {% elif states.input_select.vacuum_rooms.state ==
        "Dining Room" %} script.vacuum_dining_room  {% elif
        states.input_select.vacuum_rooms.state == "Front Entry" %}
        script.vacuum_front_entry {% elif states.input_select.vacuum_rooms.state
        == "(Trash Can)" %} script.vacuum_trash_can {% elif
        states.input_select.vacuum_rooms.state == "(Sink)" %} script.vacuum_sink
        {% endif %}
mode: single

Step 10: Add Input Select to Lovelace

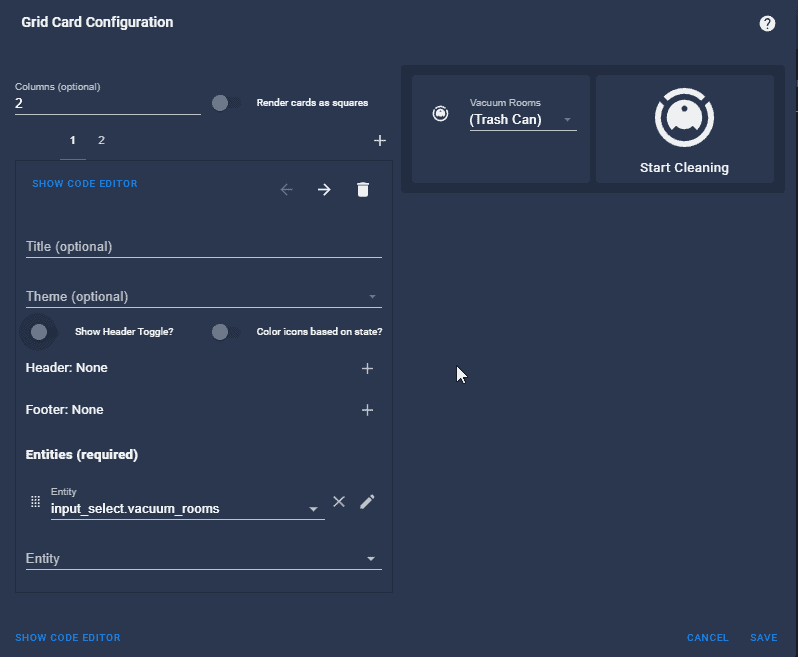
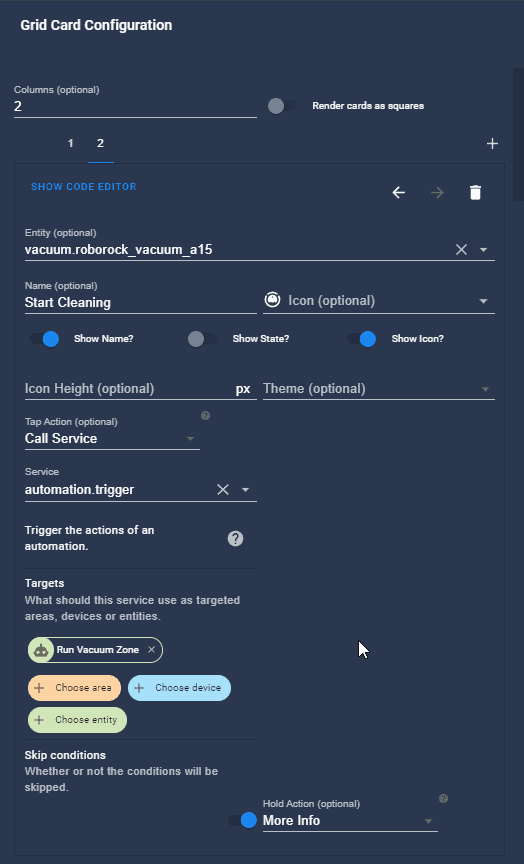
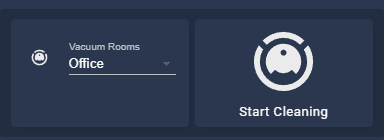
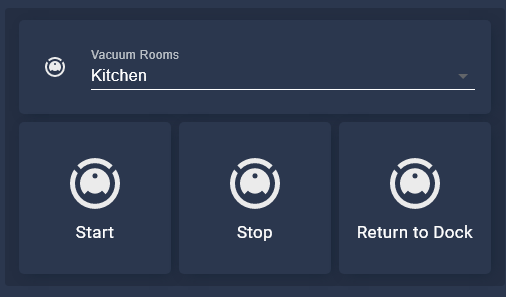
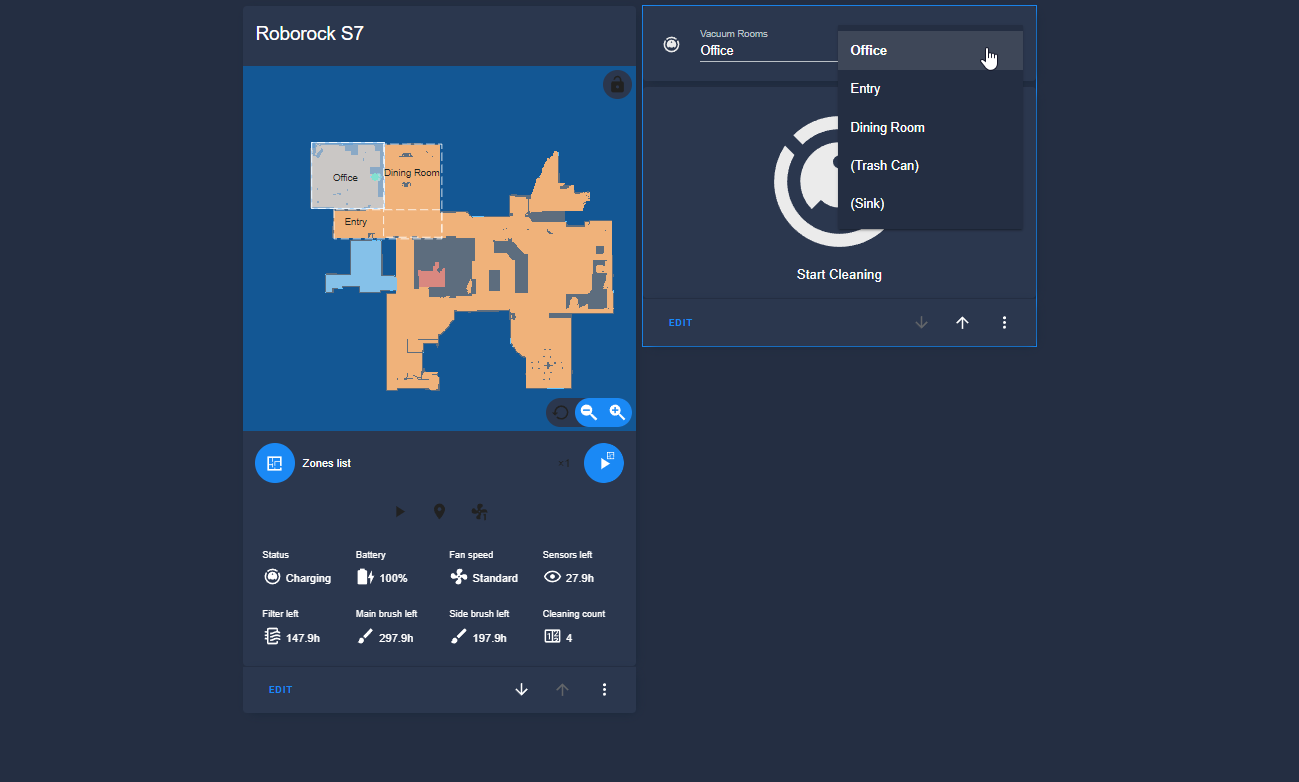
And lastly, we need to add the input select to Lovelace as well as a “Start Cleaning” button to trigger the zone or point we want the vacuum to go.

Once the card is added, just choose a room and click Start!

Add a Manual Card to Lovelace (Start Cleaning button)

Just change out the input_select name, automation name, and entity.

type: grid
cards:
  - type: entities
    entities:
      - entity: input_select.vacuum_rooms
  - type: grid
    cards:
      - type: button
        tap_action:
          action: call-service
          service: automation.trigger
          service_data: {}
          target:
            entity_id: automation.run_vacuum_zone
        entity: vacuum.roborock_vacuum_a15
        name: Start
      - type: button
        tap_action:
          action: call-service
          service: vacuum.stop
          service_data: {}
          target:
            entity_id: vacuum.roborock_vacuum_a15
        name: Stop
        entity: vacuum.roborock_vacuum_a15
      - type: button
        tap_action:
          action: call-service
          service: vacuum.return_to_base
          service_data: {}
          target:
            entity_id: vacuum.roborock_vacuum_a15
        name: Return to Dock
        entity: vacuum.roborock_vacuum_a15
square: false
columns: 1

Wrapping Up

Hopefully this guide helped you out! I wanted to give a shout out to This Smart House’s Youtube channel for the inspiration.

Make sure to check out all 4 parts of my Roborock S7 series (links at the top of this guide), I’ll show you how to configure Google Assistant voice commands using these scripts we’ve already created and learn how to create some useful scheduled cleanings and automations!


My Favorite Home Assistant Devices

Below are some of the Home Assistant-compatible devices I personally use in my home. I highly recommend each of them.

The full list of all Home Assistant compatible & recommended devices I use can be found on my Equipment List page.

Similar Posts

30 Comments

  1. Jedi Hammond says:

    thank you for this walkthrough! was great to be able to get HA and Google Assistant to clean by room.

    one heads up, in my instance on step 9, I had to go get the script id because the entity ID was a random number vs the script.vacuume_office that you have above. not sure if maybe that was because of an update in HA or something, but all worked out once I updated with the right entity ids for example

    {% elif states.input_select.vacuum_rooms.state == “Laundry” %} script.1645667016405
    {% elif states.input_select.vacuum_rooms.state == “Kitchen” %} script.1645667032077

    1. Sorry for the late reply on this! Yes, displaying the script ID would work as well. However, I simply go to the scripts.yaml and rename them. So if ‘1645783’ is in your scripts.yaml, delete than and add vacuum_office and re-save. Makes it much easier to find or edit later on.

  2. Chirpy Turnip says:

    Excellent guide! Only snag I hit was that in finding the coordinates of my first zone I didn’t press ‘play’ long enough and the vacuum cleaner deployed. This however has left a permanent blue ‘zone’ drawn on the map over the kitchen that I cannot select to either use or delete. It doesn’t show up in the app…..any ideas as to how I can rid of it?

    Also, if you want an odd shaped zone you can combine multiple shapes into one definition:

    – zones:
    – – 22357
    – 16940
    – 23359
    – 24067
    – – 19851
    – 16899
    – 22357
    – 18220
    label:
    text: Hallway
    x: 21500
    ‘y’: 17500

    I haven’t tried it, but I presume that you can also make any shape by just finding the corners of the area you want to select….

    1. You’re welcome, glad it was easy enough for you to follow! I have definitely triggered accident cleanings as well. I have a “Stop Vacuum” button I click whenever that happens.

      As for getting rid of that blue box, I’m pretty sure that has happened to me before as well. It eventually goes away, but that could’ve been because I restarted HA. You could try that and see.

      Thanks for the suggestion for odd corners – I’ll have to try that. My first thought is that any overlapping areas will probably get vacuumed again. Just as an FYI – Roborock will treat each double-dash as a new “zone” and supports a maximum of 5 zones per script. So if you have 6 sets coordinates for a hallway, and plan on creating a “Vacuum Hallway” script, it’ll only vacuum the first 6.

      I have a workaround in my Part 5 guide, where you can sequentially call room scripts, though.

  3. Hey Danny,

    awesome walkthrough – got it working, with the exception that I get an error with the input_select, which I’ve not seen on other input_selects.

    Error while executing automation automation.run_vacuum_downstairs_zone: not a valid value for dictionary value @ data[‘entity_id’]

    Any ideas?

    1. When you open File Editor and locate your automations.yaml file, do your automations have names or numbers like this? ‘6858282648’

      If they have numbers, you could try renaming that automation to run_vacuum_downstairs_zone.

      1. Ended up being a very rookie error (given I’ve been using Home Assistant for about 5 years)… I had a typo in the automation name🤦🏼‍♂️

  4. Hi, thanks for this great walkthrough. I ran into the issue that I am not able to get the Lovelace Card “Return to Dock”-Button working. everything else works. Error Message is “Error calling the service: vacuum/return_to_base. must contain at least one of entity_id, device_id, area_id. I copied the yaml and replaced the device entity ID

    1. I’m glad you got everything else working by following my guide! As for the Return to Dock, you were correct that it wasn’t working. I just fixed the code in the Step 10 and tested it out, it should work now.

  5. Hey!
    I can’t figure out how to get the coordinates.
    I put a point on the map and hold the play button. But the window with the coordinates does not appear in the browser. What’s the problem?

    1. Does it show a point on the map when you click? If not, try using the Pin & Go section instead of Points to get the coordinates.

      Have you tried another browser?

      1. Christiaan says:

        Hi, I have the same problem in both Safari and Chrome. I am using the Pin & Go section, but it doesn’t matter how long I click, no coordinates show.

  6. Excellent tutorial, thank you! I have had the map and my two Roborocks up and running for a while now with Home Assistant but I’ve been wondering how to get those zone coordinates for them.

    Instead of dropdown menu, I’m planning to put zone cleaning switches alongside with my light switches that are organized by rooms. Do you know if it’s possible to do it like this:

    When I tap a switch, the vacuum starts vacuuming the zone. If I want it to return to the dock before it’s finished, I just turn off the switch. That way the behaviour would be the same as with lights.

    1. Thanks! I’m glad you found it useful.

      It sounds like the tap switch behavior would be doable. You’d probably have to look at creating an automation that looks for a state change from “cleaning” to “stopped”, and then would call the return_to_dock service.

      1. Ok, thanks! Will look into that.

  7. ManUnited10 says:

    Funny minor problem as I’m lazy. On step 3 you mentioned to copy/past the coordinates of the zone. But my browser (chrome, opera) does not allow copying and I have to type it. What am I missing?

  8. Hi, the tuto is well made but as a beginner I manage to get stuck.
    My control stop return to dock are working but I can not start when selecting a room ( step 10)
    If i run my scripts by hand they are working but I can not figure out if the issue come from the automation or the Lovelace interface.
    I would love some help if possible.

    Script:
    https://ibb.co/NrNCk4D

    Automation:
    https://ibb.co/BCR7fcQ

    Lovelace Interface
    https://ibb.co/93LVTpw

  9. Is there no way to pull the already defined rooms from the map/vacuum? The “zones” above sort of work but are a pain to setup and don’t work for non rectangular shaped rooms unless I am doing something wrong,

    1. have you figured out a solution to the non-rectangular shaped rooms?

      1. Sort of. I DID figure out how to pull the rooms from the vacuum so I didn’t have to go through and define them all by hand. In f act I now have a drop down I can just select the rooms from which is awesome.

        However the map still displays them with a rectangular dashed outline. It is just a visual thing though so while ugly, I just ignore it. The vac actually does the proper rooms as they were originally defined.

        Note however this works only if you defined rooms on the app directly. In my case I had done all that in the Roborock app before I ever hooked it up to HA.

        For room setup see here: https://github.com/PiotrMachowski/lovelace-xiaomi-vacuum-map-card/discussions/317

        1. Thank you for this. Works great!

          Any idea how to know which room is which though. The template pulls in Room xx to Room xx without the actual name itself, so a little confused. But it’s a great start!

  10. So the link I gave you, you basically put the code into the Template editor then copy/paste the output into the yaml for the card. When you do that, you can just change the “Room NN” title to whatever you want it to say. Once you see it on the card it is rather easy to figure out which is which so I just went through and changed them to the proper room names

    1. Another question on this John,

      I was able to get the rooms to pull in as well, but not getting any outlines on the map. I was able to figure out how rename them so they weren’t numbers as well.

      However, I tried creating a script for the zone cleanup based on the information above, but it wasn’t working as I was only giving it 2 coordinates versus 4. Where do I find the 4 coordinates for that room without going through the process of finding them for each “zone” as described above? Or, do I need to do a “segment” cleanup to clean that room and if so, what parameters do I enter for the segment?

  11. You shouldn’t be needing to give it any coordinates at all. You just tell it to clean a room by ID and it does that room. That’s why this works with non square rooms.
    Instead of “Zones” like in this tutorial, it should show up as “Rooms” in the card. Here is a snippet of the code for my rooms.

    – template: vacuum_clean_segment
    predefined_selections:
    – id: 18
    outline:
    – – 13150
    – 23350
    – – 13150
    – 25200
    – – 15000
    – 25200
    – – 15000
    – 23350
    label:
    text: Laundry Room
    x: 14075
    ‘y’: 24275
    offset_y: 35
    icon:
    name: mdi:broom
    x: 14075
    ‘y’: 24275
    – id: 16
    outline:
    – – 21000
    – 23350
    – – 21000
    – 28500
    – – 26500
    – 28500
    – – 26500
    – 23350
    label:
    text: Living Room
    x: 24450
    ‘y’: 27950
    offset_y: 20
    icon:
    name: mdi:broom
    x: 24450
    ‘y’: 27950

    1. Thanks John,

      I meant to write back last evening and I figured that might be the case. Once I created a script calling the segment clean call and set the parameter to the room id, it worked perfectly.

      Thanks for responding and sorry I didn’t update it this after I got it working!

      1. No worries, glad you got it working 🙂

  12. I am getting the following error when saving the Run Vacuum Script (Step 9): “Message malformed: extra keys not allowed @ data[‘trigger’].” Any ideas what I am doing wrong? I copied your yaml example exactly, and renamed the rooms. Thanks for the great tutorial!

  13. Has something changed? In step 8 when creating the Vacuum Zones Script, I can not select the target entity.

  14. Thanks! great guide. One things thats missing is how to call spot cleaning, it does go to the spot but article fails to mentions how to call vacuum to clean that spot.

Leave a Reply

Your email address will not be published. Required fields are marked *