NFC Tags and Home Assistant: Setup & 8 Automation Ideas
In this guide, I'm going to show you how to add and use NFC tags in Home Assistant. Once you purchase a few NFC tags or stickers, you can do all sorts of things with such as unlock doors, turn on lights, run automations, and much more. I'll include a few ways I use NFC tags at the end of this guide.
But first, let's get into the setup process.
The official Home Assistant Mobile Companion apps have all been updated with NFC support, so as long as you have the mobile app, you can NFC tags.
Let's get started!
Best NFC Tags for Home Assistant
The NFC stickers I am using are these Timeskey 215 NFC stickers. I wouldn't say there is a "best" NFC sticker on the market for Home Assistant, as just about any of them will work. Some of them are stickers and can be applied to semi-permanent locations, others are cards that you may stick in your wallet, while others may be tags that can be moved around.
There are all really inexpensive. For example, the stickers I purchased are less than $6 for a 10-pack.
How do I use NFC tags with Home Assistant?
Step 1: Purchase NFC tags or stickers
This is pretty self-explanatory, but you just need to purchase a tag and have the Home Assistant iPhone or Android app installed.
Step 2: Open Tag Config in Phone App
Open your Home Assistant mobile app.
Click the 3 lines to open your sidebar.
Then, go to Settings > Tags.
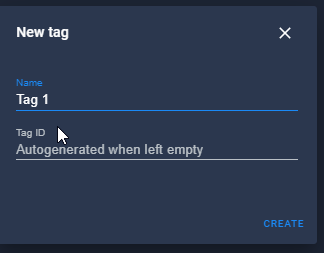
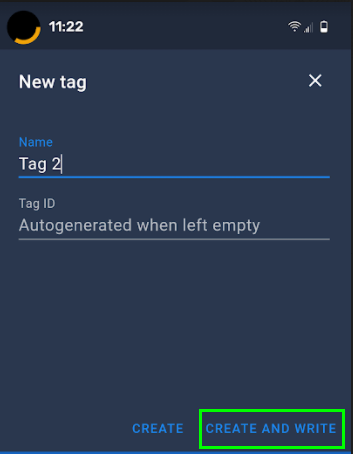
Step 3: Add A New NFC Tag
Click Add Tag and give it a name, like Tag 1. (I've found it's better to give your tags generic names like Tag 1, Tag 2, etc rather than specifying the area, since tags may be shifted around. Whenever you create automations, then you can add a helpful name or description there instead.)
Then, click Create and Write.
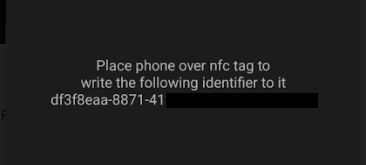
Step 4: Place phone over NFC tag
Next, just place your phone over the NFC tag. You may have to move your phone around a bit if you don't know the exact location of the NFC reader built into your phone. On my Google Pixel 5, it is located in the very center of the phone.
That's it! You have now scanned in your NFC tag and can start using them to trigger automations.
Confirm Tags Show Up in Home Assistant
Now that the tag is scanned, open Home Assistant from your computer. In your sidebar, go to Configuration > Tags to ensure the tag has been written successfully. (You can also confirm this from your phone, but since we are going to be creating automations from the computer, you may as well switch over to it)
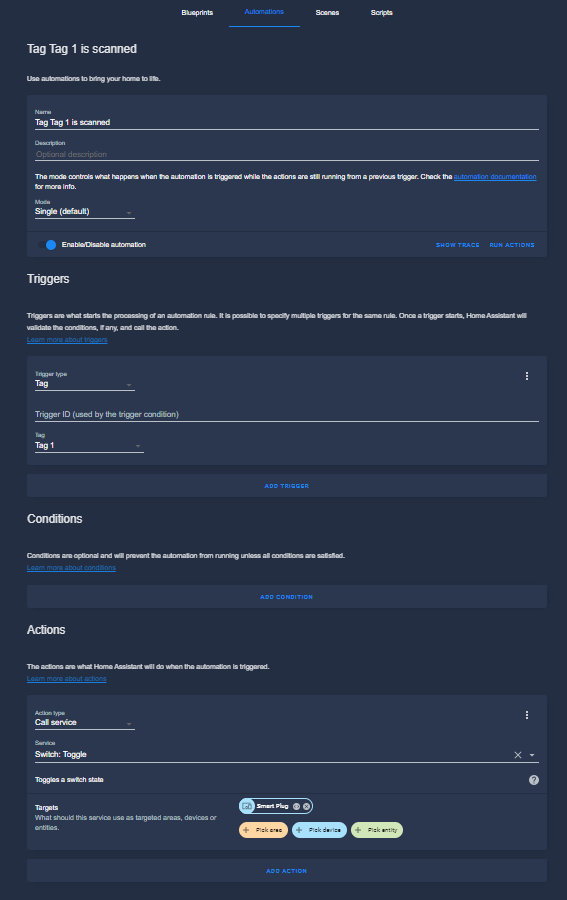
Create Home Assistant Automation using NFC Tags
To create your first automation, you don't need to go into the normal "Automations" page of Home Assistant. You can just click the little robot icon next to the tag.
For this first automation, I'm going to toggle my office lamp on and off.
- Name: Tag 1 is Scanned
- Trigger Type: Tag
- Tag: Choose your tag
- Actions: Call Service
- Service: Switch.toggle
- Device: Choose your device
You need to have your phone unlocked before scanning the tag. You don't need to have the Home Assistant app open though.
During my tests, whenever you scan an NFC tag - they run instantly. Equally as fast as buttons or when triggered from Lovelace.
Home Assistant Ideas using NFC Tags
Here's a list of 8 awesome things you can use NFC tags for. I don't use some of these ideas, but hopefully they give you some inspiration.
Basically, anything you can use a smart button for - you can use with tags. I find tags extremely useful to use especially when Lovelace buttons are on a different "view" other than your main dashboard.
A lot of these ideas can be combined together into a single automation - such as turning all the lights off at night & also arming the alarm, so feel free to get as creative as you want with these!
#1: Open Garage Door
Place an NFC Sticker in your car. Whenever you pull into your driveway, scan the tag to open your MyQ garage door opener.
#2: Turn off all lights
Place an NFC tag on your bedroom nightstand. Rather than relying on an automation to turn off all the lights in your house at a certain time, especially if you go to bed at different times, you can just scan the tag to turn all the lights off whenever you decide it's bedtime. To do this, you'll need to add all of your lights to a groups.yaml file and use that in the automation.
#3: Chore Tracking
If you've setup a chore tracker in Home Assistant for your kids, rather than having them open the Home Assistant app to toggle a chore as complete, you can have them scan the NFC tag instead! If you're kids have 5 chores to complete, then you may need to use 5 NFC tags - one for each chore. It might be a good idea to use stickers for this one and stick it on a "Chore Tracker" whiteboard as visual reminder.
#4: Media Player / Music Player
Use an NFC tag to start streaming a Spotify playlist on one of your devices. If you are using Plex Assistant to cast Plex media using your voice, you could use an NFC tag to "Start playing the next episode" of a certain TV show you are watching. if you wanted to get really creative, you can print out pictures of your kids favorite TV shows and place the NFC sticker behind those. Whenever they want to watch a certain show, they can just hold their tablet up to the picture.
You could use NFC tags to start/stop/pause your TV as well.
#5: Unlock Doors
Place an NFC sticker near your front door or inside your car. Whenever you come home, scan the tag to unlock the door. I'm sure you can think of some other cool ideas if using the Keymaster integration.
For those of you concerned about the security of this, only the authorized devices in your Home Assistant instance can trigger the usage of NFC tags. Random strangers can't scan your tag to open the door.
#6: Change RGB Bulb Color
Scan a tag, and change your Sengled RGB bulbs to a certain color.
#7: Guest Control/ Access
If you have guest over, rather than creating a user for them, granting them access to specific Lovelace dashboards, and generally teaching them how to turn things on and off, you can provide them with an old phone or tablet during their stay. Just hand them a piece of paper with each different tags on each. I find this is much easier for guests to figure out than telling them "Press the button once to turn on the light, press the button twice to turn it off, hold it down to turn on the TV", etc.
#8: Arm the Alarm
If you don't have you Alarmo alarm system setup to arm/disarm on a certain schedule, then using NFC tags work really well. Just place an NFC tag near the front door and scan it on your way out. Place another one on your nightstand to arm it whenever you leave.
Wrapping Up
NFC tags are a great way to automate things around your smarthome without the need to open your Home Assistant app. They are a great replacement for buttons, are super inexpensive.
I would say the only downside to tags is that they are only good for 1 automation per tag. For example, SmartThings buttons can be configured to run 3 automations (single, double- hold), whereas NFC tags can only be used to run 1.