How To Update Peanut Plug Firmware OTA Using Home Assistant
In this guide, I'm going to show you how to update the Peanut Plug firmware over the air (OTA) directly through Home Assistant. Without this upgrade, you won't be able to use any of the energy-monitoring capabilities this smart plug offers. Instead, it will just show 0.0 W.
The biggest motivation for me to get this working was with the release of Home Assistant 2021.8: home energy management. This update offers an awesome Energy Dashboard to view/monitor power consumption around your home with beautiful charts and cards. Energy management in general is a great way to see which devices around your house consume the most power and could eventually save you money each month on your electrical bill.
I also want to credit this Reddit post for the inspiration. I didn't figure this out myself, I'm just detailing it in a step-by-step guide with the hopes that you don't have to go down the Google rabbit hole (like I did) to figure this out. Seriously, I had to dig pretty deep to find this solution. My guides tend to rank highly on Google, so I'm hopeful this one makes it to the top and just wanted to make sure I provided credit where credit is due.
For reference, here's what the Peanut Plug looks like:
I successfully upgraded my 9 Peanut Plug outlets successfully as of 8/23/2021.
Is the Almond Hub needed to update Peanut Plug firmware?
No, the Almond Hub method is not needed to upgrade the Securifi Peanut Plug firmware to fix the power reporting issue.
Chances are if you came across this guide, you've already read numerous forum/Reddit posts (unless my guide ranks #1 on Google) that state you need the Almost router to update. Years ago that was the case, but with this new method, that is no longer required.
Step 1: Add Peanut Plug to Home Assistant
Since all of my plugs are already added to HA, I won't show you how to that in this guide. However, I have a How To Setup Peanut Plugs in Home Assistant guide you can follow if needed.
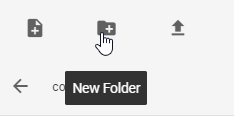
Step 2: Create New Directory
First, you'll need to create a new folder in Home Assistant. This is where you will be uploading the peanut plug firmware to.
File Editor > click the folder at the top > click New Folder. Then, name it something useful like 'peanutplugfirmware'. Click OK once the folder has been created.
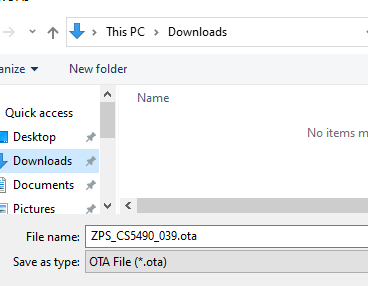
Then, download the firmware from here: https://smarthomepursuits.com/download/4823/
I uploaded the file to my own site in case it ever gets removed/taken down from the Github link below, but you can get it from either: https://github.com/Koenkk/zigbee-OTA/raw/master/images/Tuya/ZPS_CS5490_039.ota
Save it to your Downloads folder. If downloaded from my site and not Github, right-click > Extract All.
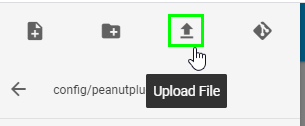
Step 3: Upload Firmware to new folder
While still in File Editor, scroll down until you locate the new folder. Click it to open.
Then, click the up arrow icon to upload the .ota file you just downloaded. Do not upload the zipped copy.
Step 4: Add ZHA & Logger Config to configuration.yaml
It may be a good idea to take a Google Drive backup or Samba Backup before this step, just in case this somehow messes up your Zigbee devices. I didn't run into any issues at all, but it's still a good idea.
Add this code to your configuration.yaml. If you created a folder exactly like I did, you can just copy and paste this without needing to make any changes.
This config also adds a ZHA logger: which enables logging for your Zigbee controller (I'm using a Nortek GoControl zwave/zigbee USB dongle). Adding the logger isn't required, but it will let you see the install percentage and whether or not the install was a success or failure so I recommend it.
zha: zigpy_config: ota: ikea_provider: false ledvance_provider: false otau_directory: /config/peanutplugfirmware logger: default: info logs: homeassistant.core: warning homeassistant.components.zha: debug bellows.zigbee.application: info bellows.ezsp: info zigpy: debug zigpy_cc: info zigpy_deconz.zigbee.application: info zigpy_deconz.api: info zigpy_xbee.zigbee.application: info zigpy_xbee.api: info zigpy_zigate: info zigpy_znp: info zhaquirks: infoThen, check your configuration changes and reboot Home Assistant from Configuration > Server Controls > Restart.
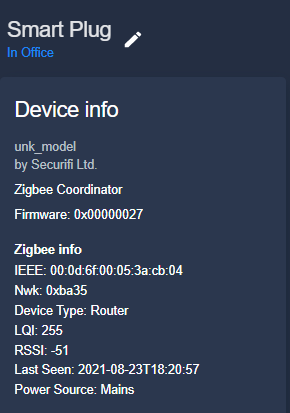
Step 5: Find Device IEEE
This setup won't automatically update all of your peanut plugs, so you will have to upgrade them 1 at a time. To update, located the IEEE address of the plug from Configuration > Devices > search for your plug > and then click on it.
The IEEE: can be found under Device Info:
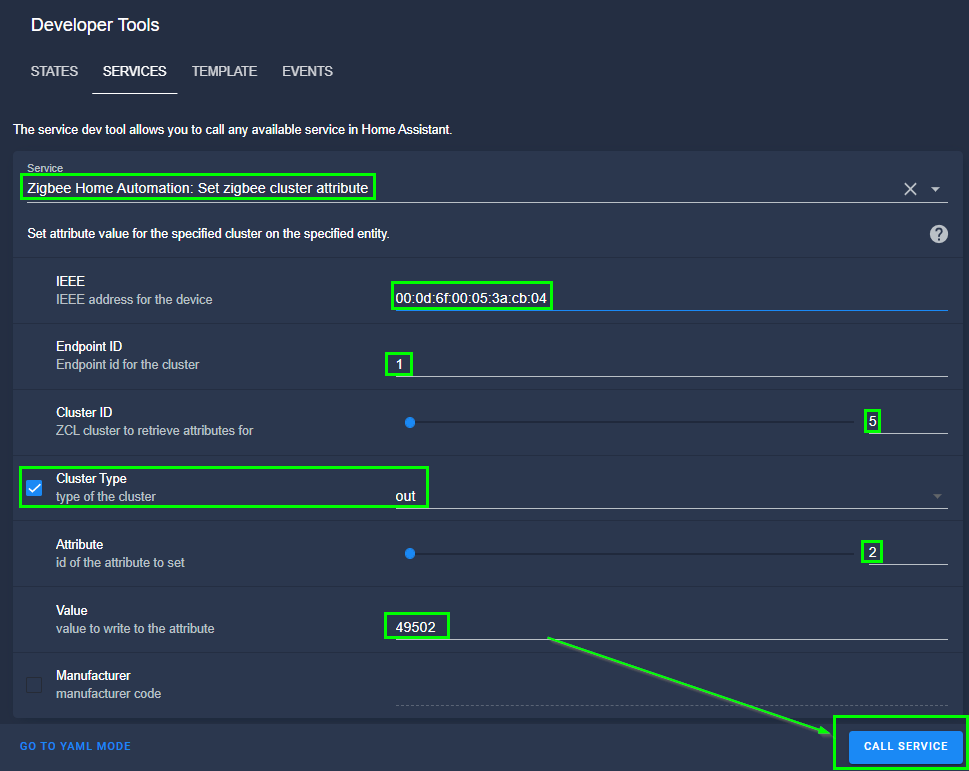
Step 6: Call Service from Developer Tools
Next, we are going to trigger the over-the-air firmware upgrade through a service call.
Go to Developer Tools > Services. Make sure you are in UI mode so you don't accidentally format the service call incorrectly.
For the Service, paste this: zha.set_zigbee_cluster_attribute. A box will then pop up. Fill it out like I have in my screenshot, except use your own IEEE.
- IEEE: You device IEEE
- Endpoint ID: 1
- Cluster ID: 5
- Cluster Type: Check the box, then change the dropdown to out
- Attribute: 2
- Value: 49502
Then, click Call Service. It could take upwards of 5-10 minutes for the update to complete. You can view the upgrade status in the next step.
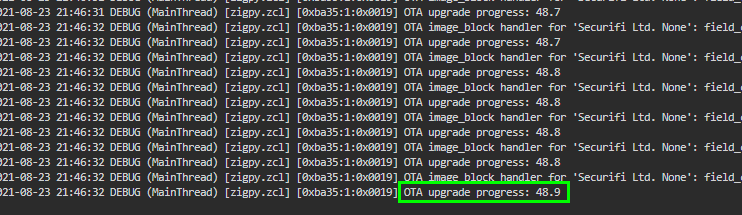
Step 7: Check Upgrade Status
If you don't like feel like waiting 5-10 minutes and would like to see what percent the install is while it's being upgraded:
Supervisor > Terminal & SSH. Click Open Web UI. Then type in this command: tail -f /config/home-assistant.log | egrep OTA
This will parse the log files and show you exactly what percent the install is at:
Once complete, you'll see a SUCCESS message like this:
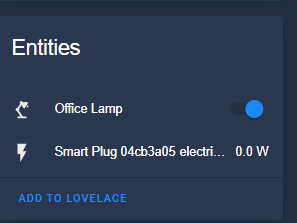
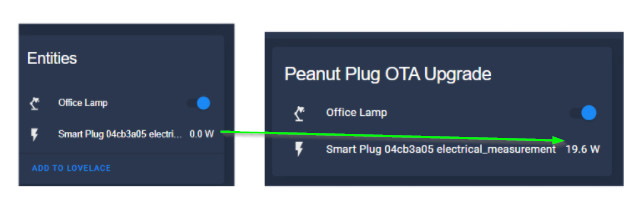
Within just a few seconds, you will now start to see data flowing into your device!
And if you view the device info again, you might also notice that it displays the firmware version 0x00000027. Before, it didn't have any info about the current version.
Troubleshooting
I didn't run into any issues at upgrading mine, and from the comments in various forums posts - no one else has either. One commenter mentioned that even after upgrading he wasn't able to see anything but 0.0W , but replied back later stating that his small lamp wasn't pulling enough power and therefore the plug wasn't detecting the power consumption.
If you run into that issue, just plug in something like a laptop, floor lamp, or your phone and it should draw enough electricity to change the value.
Wrapping Up
Hopefully this tutorial helps you start monitoring some additional things around the house that you weren't able to before!
There are some additional steps to get this integrated into the new Energy Dashboard with the latest HA update 2021.8, but I haven't done that yet. I will either update this post or create a new one and link it here once I set that portion up.