How to Store Secrets in Home Assistant
In this guide, I'm going to show you how to store and use secrets in Home Assistant. By using the secrets.yaml file, you can remove all of your personal and sensitive information from your main configuration.yaml file. The process to set this up is very similar to splitting up your configuration file.
Before I show you how to create your first secret, I'm going to answer a few of the most common questions.
Using Secrets is incredibly easy. You basically add an entry to the secrets file and then reference it in the configuration file. I updated everything in less than 5 minutes.
What is a Secrets YAML?
The secrets.yaml file is a file that is automatically created in Home Assistant. It's primary purpose is to store all of your sensitive, or "secret" information.
Rather that storing things like email addresses, passwords, API keys, tokens, addresses, latitude/longitude and other sensitive info directly in your configuration.yaml, you can reference the secrets file instead.
Where is Secrets.yaml located?
The secrets.yaml file in Home Assistant is located in the root of your configuration directory (the same directory as your configuration.yaml).
Is the secrets.yaml file secure?
Although I recommend everyone to use the secrets file, it's important to note that the secrets.yaml file is not encrypted.
Using a secrets file doesn't increase or improve the security of Home Assistant. The credentials you add to the secrets file are still visible in plain text.
Even though secrets don't inherently make your HA instance more secure, it's still best practice to use them.
Why should you use the Secrets file?
There are a number of reasons why you should hide sensitive info in the secrets file.
Often times we share snippets of code or screenshots to Reddit, Facebook, or the Home Assistant community forums to show others how we have things set up.
Sometimes we share code snippets with others for troubleshooting purposes. And for some other people (myself included), we blog or have Youtube channels where we show off cool things we've setup or automated in Home Assistant, and to do that we HAVE to share our code or includes images.
If you aren't super diligent, you could accidentally expose usernames, passwords, email addresses, postal addresses, or API keys to the public, which then becomes a security concern.
In addition, the configuration.yaml file can get very long (mine is about 414 lines, down from 1k after splitting up my config file - which I recommend you do as well). It's nice to have 1 centralized file to look at in case you ever need to update a password or replace an API key rather than sifting through hundreds of lines of code.
With that being said, let's get started!
Storing Secrets in Home Assistant
Make sure you have the File Editor or Visual Studio Code addons installed. For this tutorial, I'm using File Editor.
Open File Editor and click the folder in the top left corner to browse the filesystem.
Ensure you are in the config/ section. If not, click the back arrow until you are.
Check to see if the secrets.yaml has already been created. Unless you have a very old instance of Home Assistant installed, it should be installed by default. If it's not installed, click New File at the top and create it.
Understanding and Using Secrets
It's incredibly easy to use secrets. Let me show you how it's done.
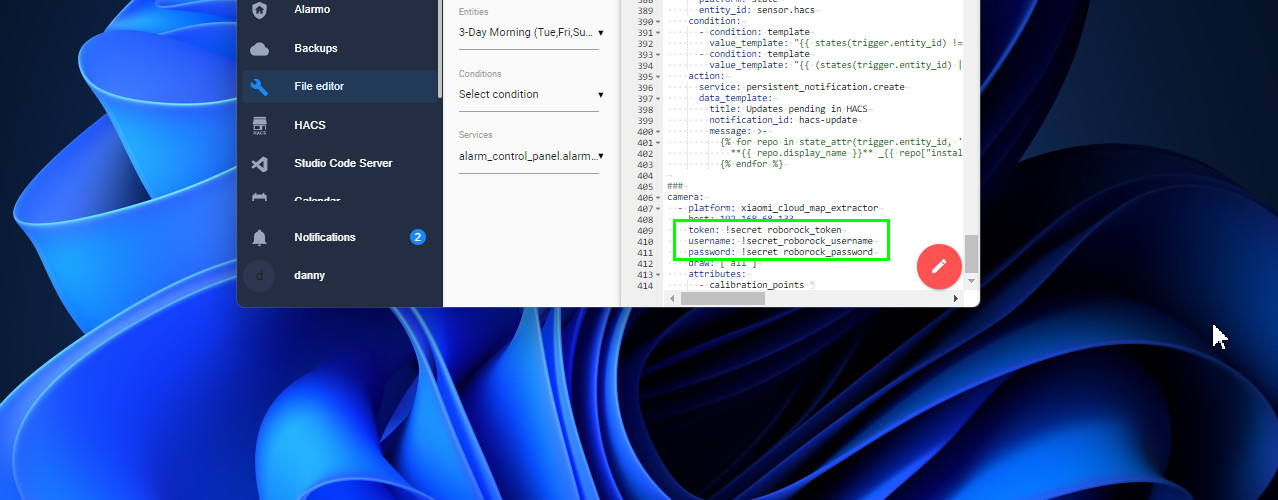
For this example, I am going to start using secrets for the Xiaomi Roborock token, username, and password used with my Roborock S7 robot vacuum cleaner. Here's the block of code I had to add my configuration.yaml file to get the Xiaomi Map Extractor Card working.
Code Before Using Secrets:
camera: - platform: xiaomi_cloud_map_extractor host: 192.168.68.133 token: 6e8g7f7d6sgfhss12345 username: 222111444 password: MyPassword draw: ['all'] attributes: - calibration_points Code After Using Secrets:
camera: - platform: xiaomi_cloud_map_extractor host: 192.168.68.133 token: !secret roborock_token username: !secret_roborock_username password: !secret roborock_password draw: ['all'] attributes: - calibration_pointsAs you can see, the first block of code clearly displays my username, password, and token in plain text. Let's change that.
Step 1: Create entry in secrets.yaml
First, you need to create entries in your secrets file.
The 'secret name' you create doesn't matter, but you should make it something easy to remember and/or reference. For example, if you create a secret called password, at a quick glance you won't really know what the password is for. google_password would be better.
Open secrets.yaml.
Create entries like this:
roborock_token: 6e8g7f7d6sgfhss12345 roborock_username: 222111444 roborock_password: MyPasswordThen save the file.
Step 2: Update configuration.yaml file
Next, update your config to use the secret.
To do this, all you have to do is add !secret, a space, and then add the name you gave your secret (roborock_token, roborock_username, roborock_password)
The configuration now looks like this:
camera: - platform: xiaomi_cloud_map_extractor host: 192.168.68.133 token: !secret roborock_token username: !secret_roborock_username password: !secret roborock_password draw: ['all'] attributes: - calibration_points Save your configuration file once complete. Then, test the integration to make sure it still works correctly.
Step 3: Add Remaining Secrets
Secrets aren't limited to just the configuration.yaml file, either.
If you have sensitive info in switch.yaml, binary_sensor.yaml, automations.yaml, etc - you can use secrets there as well.
Be sure to check all the places you might've added sensitive data to!
Wrapping Up
That's really all there is to it! I hope this step by step guide helped you understand the importance of using secrets in Home Assistant and how to quickly update your config to use them.


