How To Create SmartThings Voice Automations using Google Home
Have you ever wanted your Google Home devices to announce when a door was opened, doorbell was pressed, or if a leak was detected?
Let me answer that for you. Of course you have!
In this guide, I'm going to show you how to control Google Home devices with SmartThings to create verbal alerts when something happens. To do this, we will be installing the cast-web api & integrating it with WebCore.
Even if you've never programmed anything before (or used Webcore), you can literally follow my guide step-by-step to get this setup. I wanted to give a huge shoutout to The Bearded Tech Guy for his inspiration!
Pre-Requisites:
In order to set this up, you will need the following:
- Webcore installed using the Community Installer
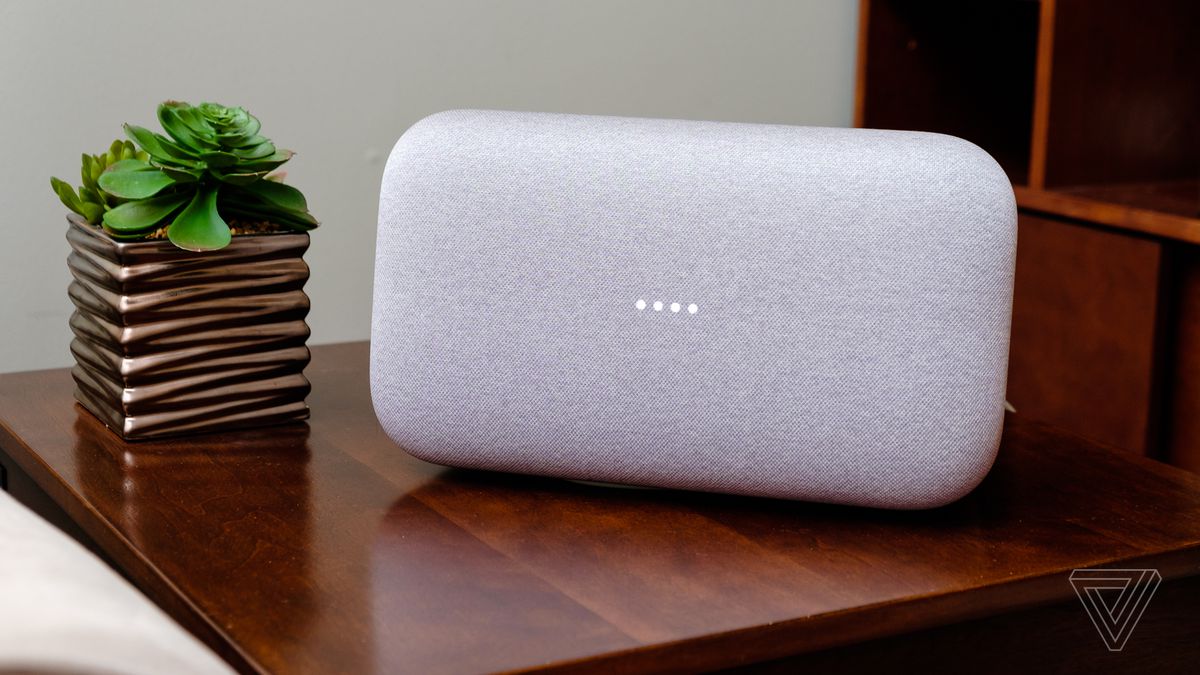
- At least 1 Google Home speaker (Either Google Home Hub, Google Mini, or Google Nest Hub)
- Samsung SmartThings Hub
For this guide, I am installing it on Windows 10. There are also Windows, Linux, Mac, or Docker images available here: https://vervallsweg.github.io/cast-web/installation-cast-web-api/ The setup is basically the same no matter which option you choose.
Ideally, the device you choose should be on the same subnet as your SmartThings hub and stay on 24/7. If I were to do this setup again, I'd probably configure it on a raspberry pi, since my desktop PC gets rebooted much more frequently.
Step 1: Download & Install Cast-Web-Api for Windows
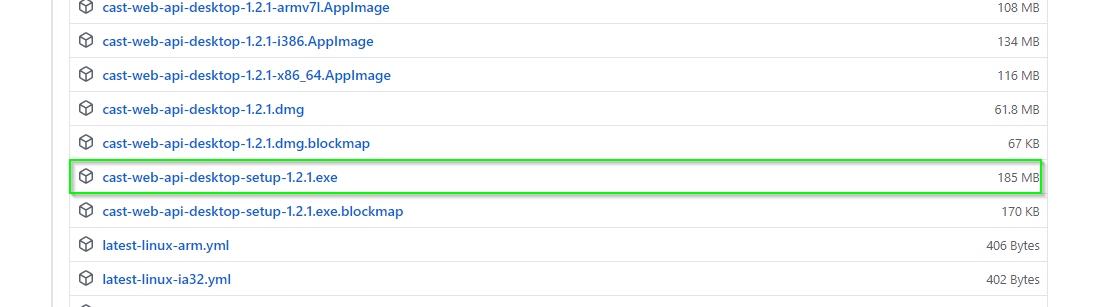
Download the Cast-Web-api from here: https://github.com/vervallsweg/cast-web-api-desktop/releases/tag/v1.2.1
Click the cast-web-api-desktop-setup-1.2.1.exe
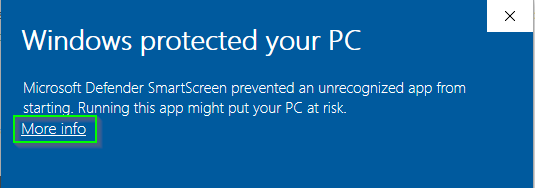
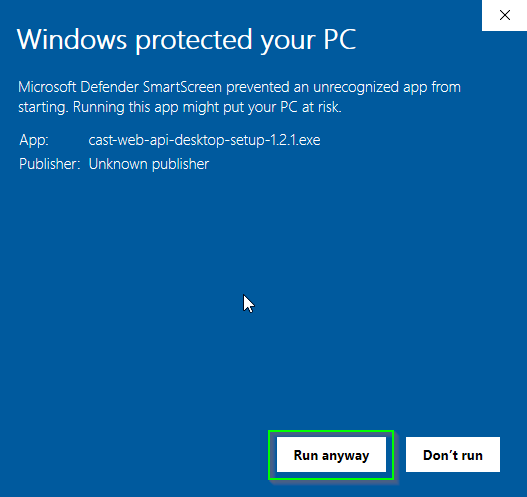
After downloading, double-click the .exe to install it like you would any other program.
On the blue Windows SmartScreen popup, click More Info > Run Anyway. This is expected behavior as the app is not code-signed.
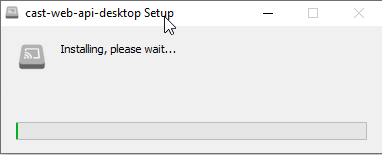
It will take a few minutes for the program to finish installing. Once it's finished, it will launch the cast-web api window but state that it is offline.
Step 2: Download Node.JS
Download the Node.js Windows installer from here: https://nodejs.org/en/download/
Install it with all default settings.
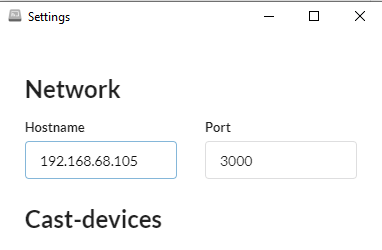
Step 3: Add IP Address to Cast Web API Settings
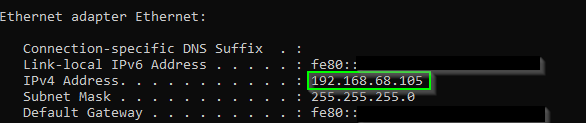
Open Command Prompt and type this to find your computer's IP address. You will need that IP address for Step 4.
ipconfigStep 4: Add IP Address to Cast Web API Settings
Search your computer for cast-web-api-desktop. Once it launches, click the gear to access the settings.
Next, add your IP address to the settings of Cast Web API and save.
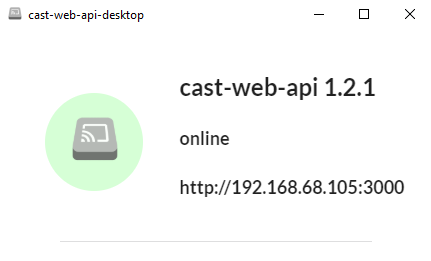
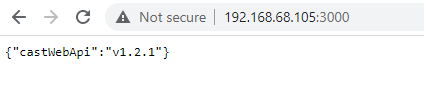
The app should now to connected. To confirm, go to 192.168.68.105:3000 in a web browser. It should load like this:
If you receive an error on this step, verify that:
1. Node.js is installed
2. Hostname has been changed from 172.0.0.1 to your computer's IP address
3. Stop/Start and/or relaunch cast-web-api-desktop.
Step 4: Add 2 Device Handlers & 1 SmartApp
Open the Samsung SmartThings IDE: https://account.smartthings.com/
Device Handler 1: cast-web-device
Click My Device Handlers > Create New Device Handler > From Code tab. Copy & paste the code from here.
Click Publish > For Me. Then Save.
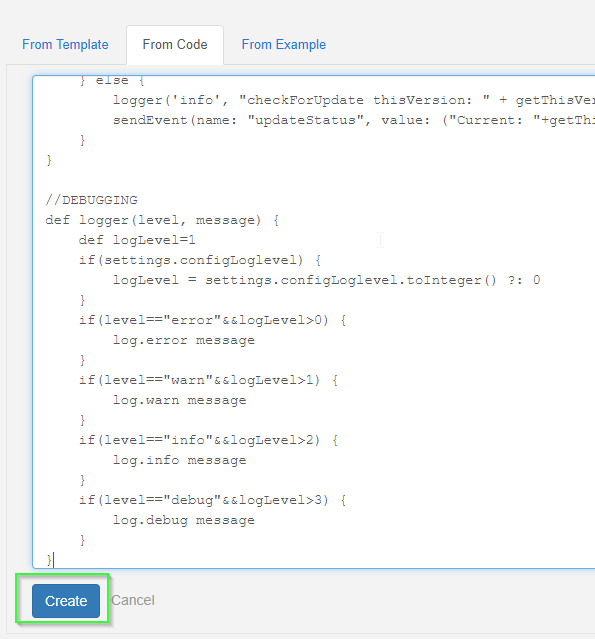
Device Handler 2: cast-web-api
Click My Device Handlers > Create New Device Handler > From Code tab. Copy & paste the code from here.
Publish > For Me. Then Save.
SmartApp 1: Cast-web service manager
Click My SmartApps > New SmartApp > From Code tab.
Copy & paste the smartapp code from here.
Do not save and publish just yet. You'll need to edit 1 line of code.
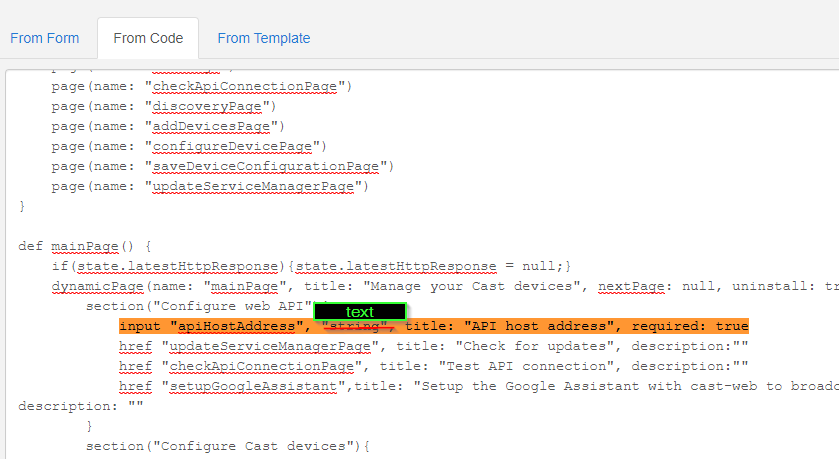
Edit ApiHostAddress Line
Locate the line of code below. Replace the word "string" with "text". This change is needed in order for it to work in the new SmartThings app.
input "apiHostAddress", "text", title: "API host address", required: trueNext, click Create > Publish > For Me.
And then save your changes. You should now see the cast-web service manager published.
Step5: Add SmartApp to Phone
Now that we've successfully installed cast-web api on Windows 10, and added the two required device handlers and smartApp, it's time to add the SmartApp!
Grab your phone and open the new Samsung SmartThings app.
Add SmartApp
Click the hamburger menu on the left to open the menu > SmartApps.
Click the + sign to add a new smartapp. Scroll to the bottom and locate the cast web - service manager.
Click the app to open the settings.
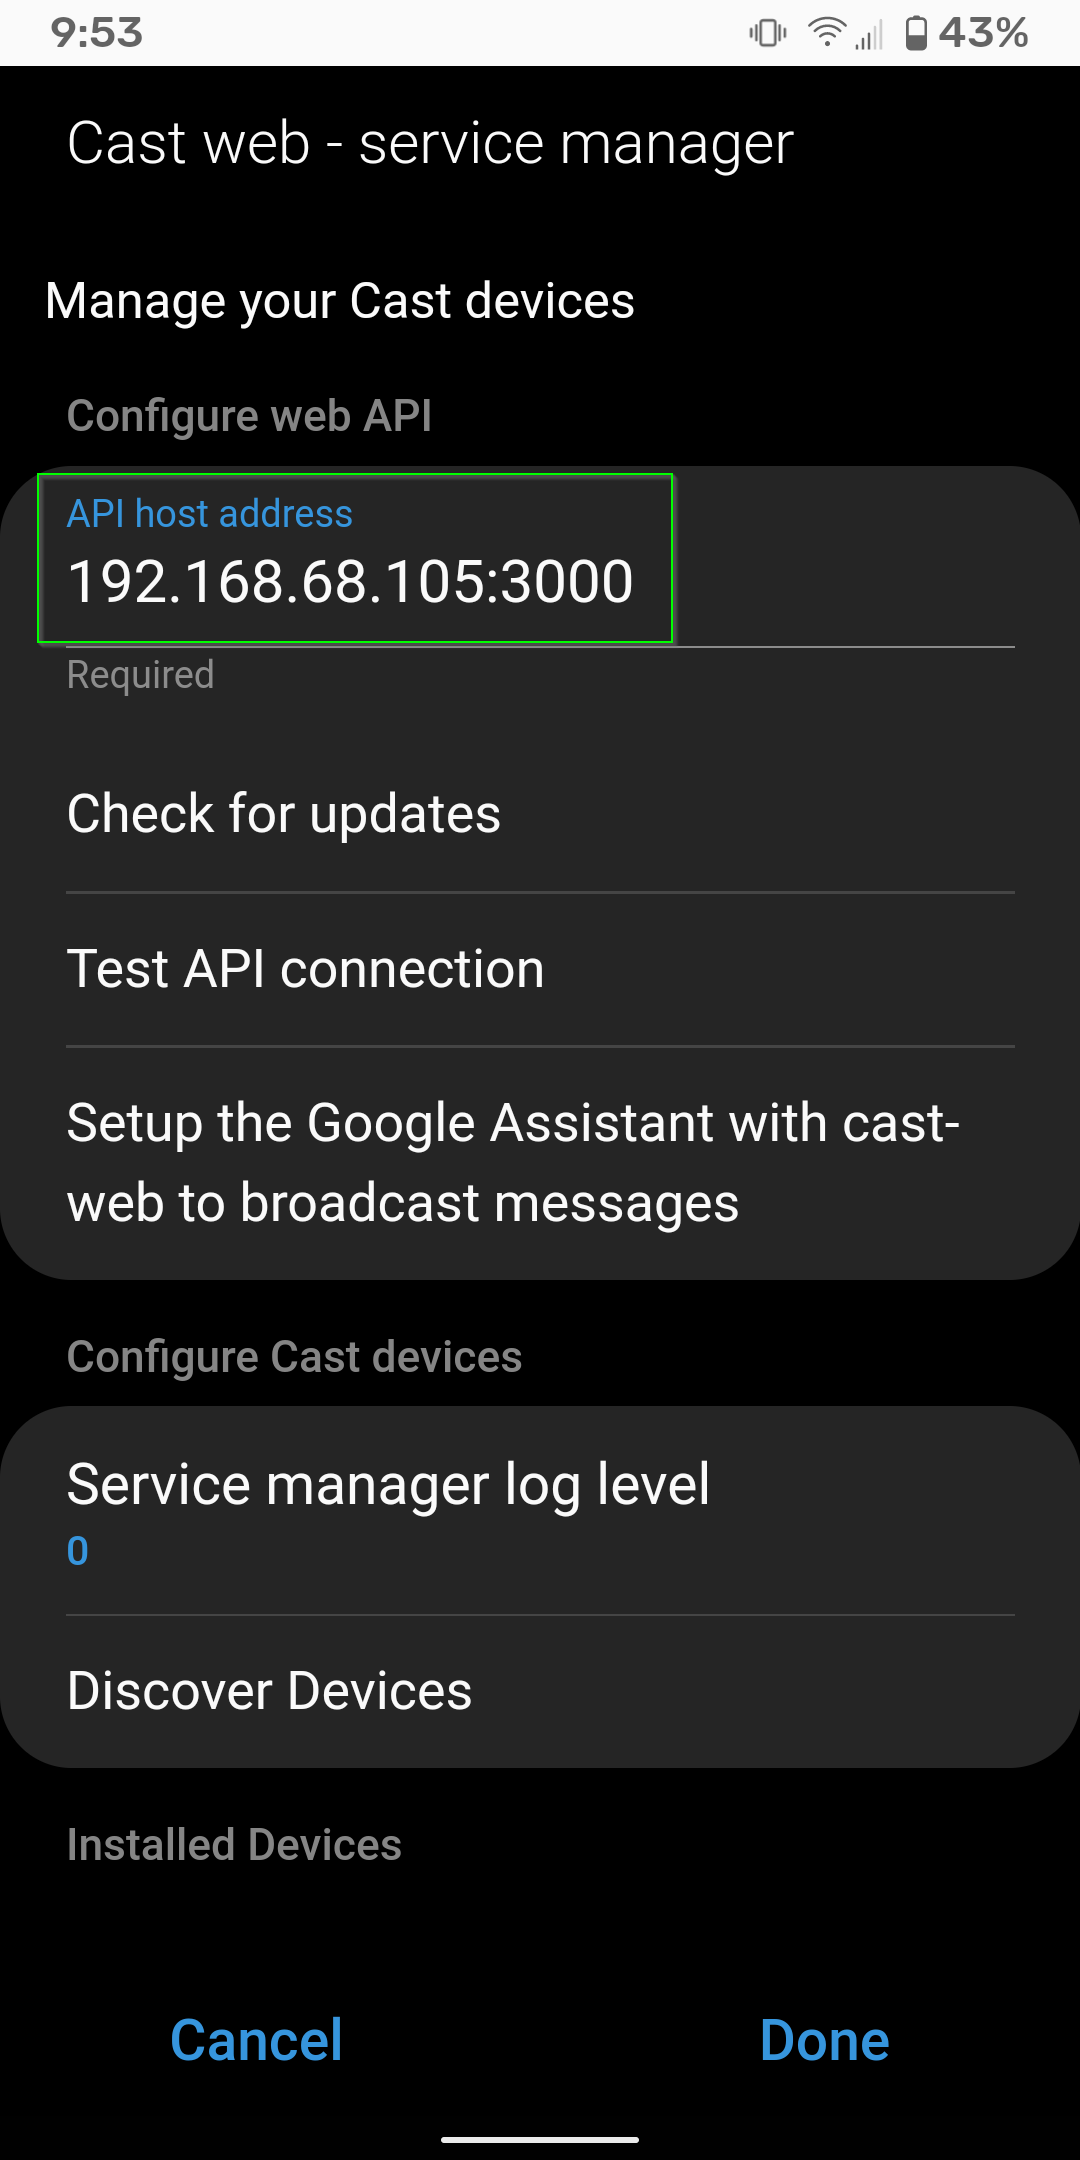
Step 6: Edit SmartApp Settings
If the API host address field doesn't show up at this step, verify that you've changed the line of code in Step 4. (Scroll up until you find the green box.)
Enter API Host Name & Test
Enter your API Host address info from Step 3. Make sure to include the port number 3000
192.168.68.105:3000
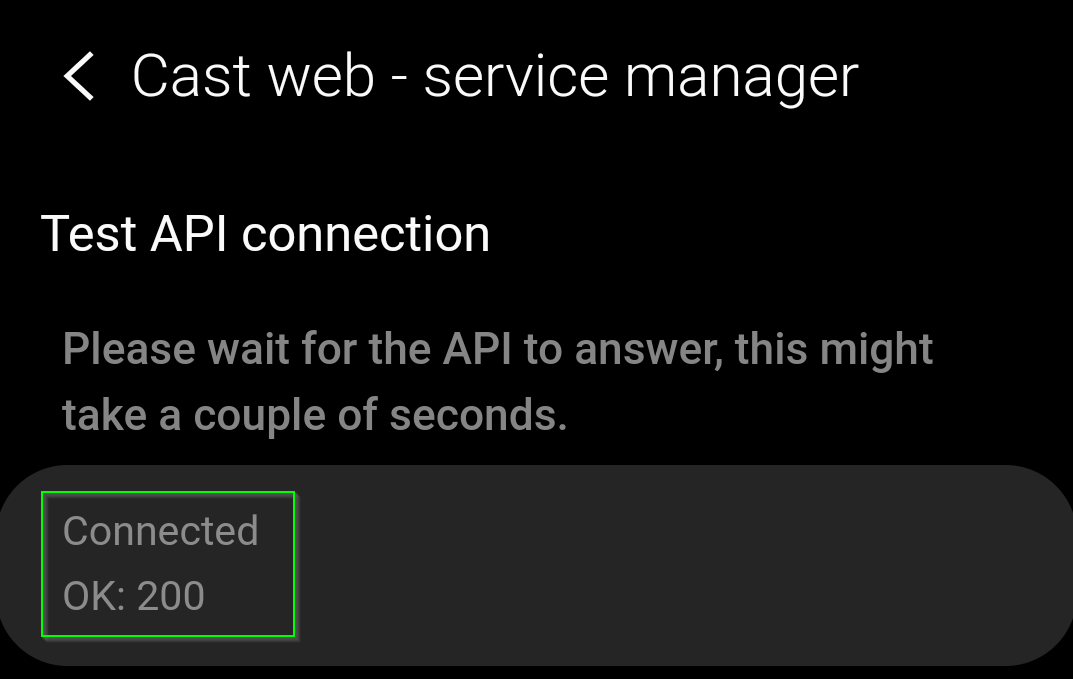
Click Test API Connection to verify the connection works. If you see Connected OK:200, you can continue.
Change Service Manager Log Level
Change the Service Manager log level to 0 so you don't get a bunch of unnecessary log files. (You'd only want to change this to 4 for troubleshooting.)
Step 6: Discover Devices
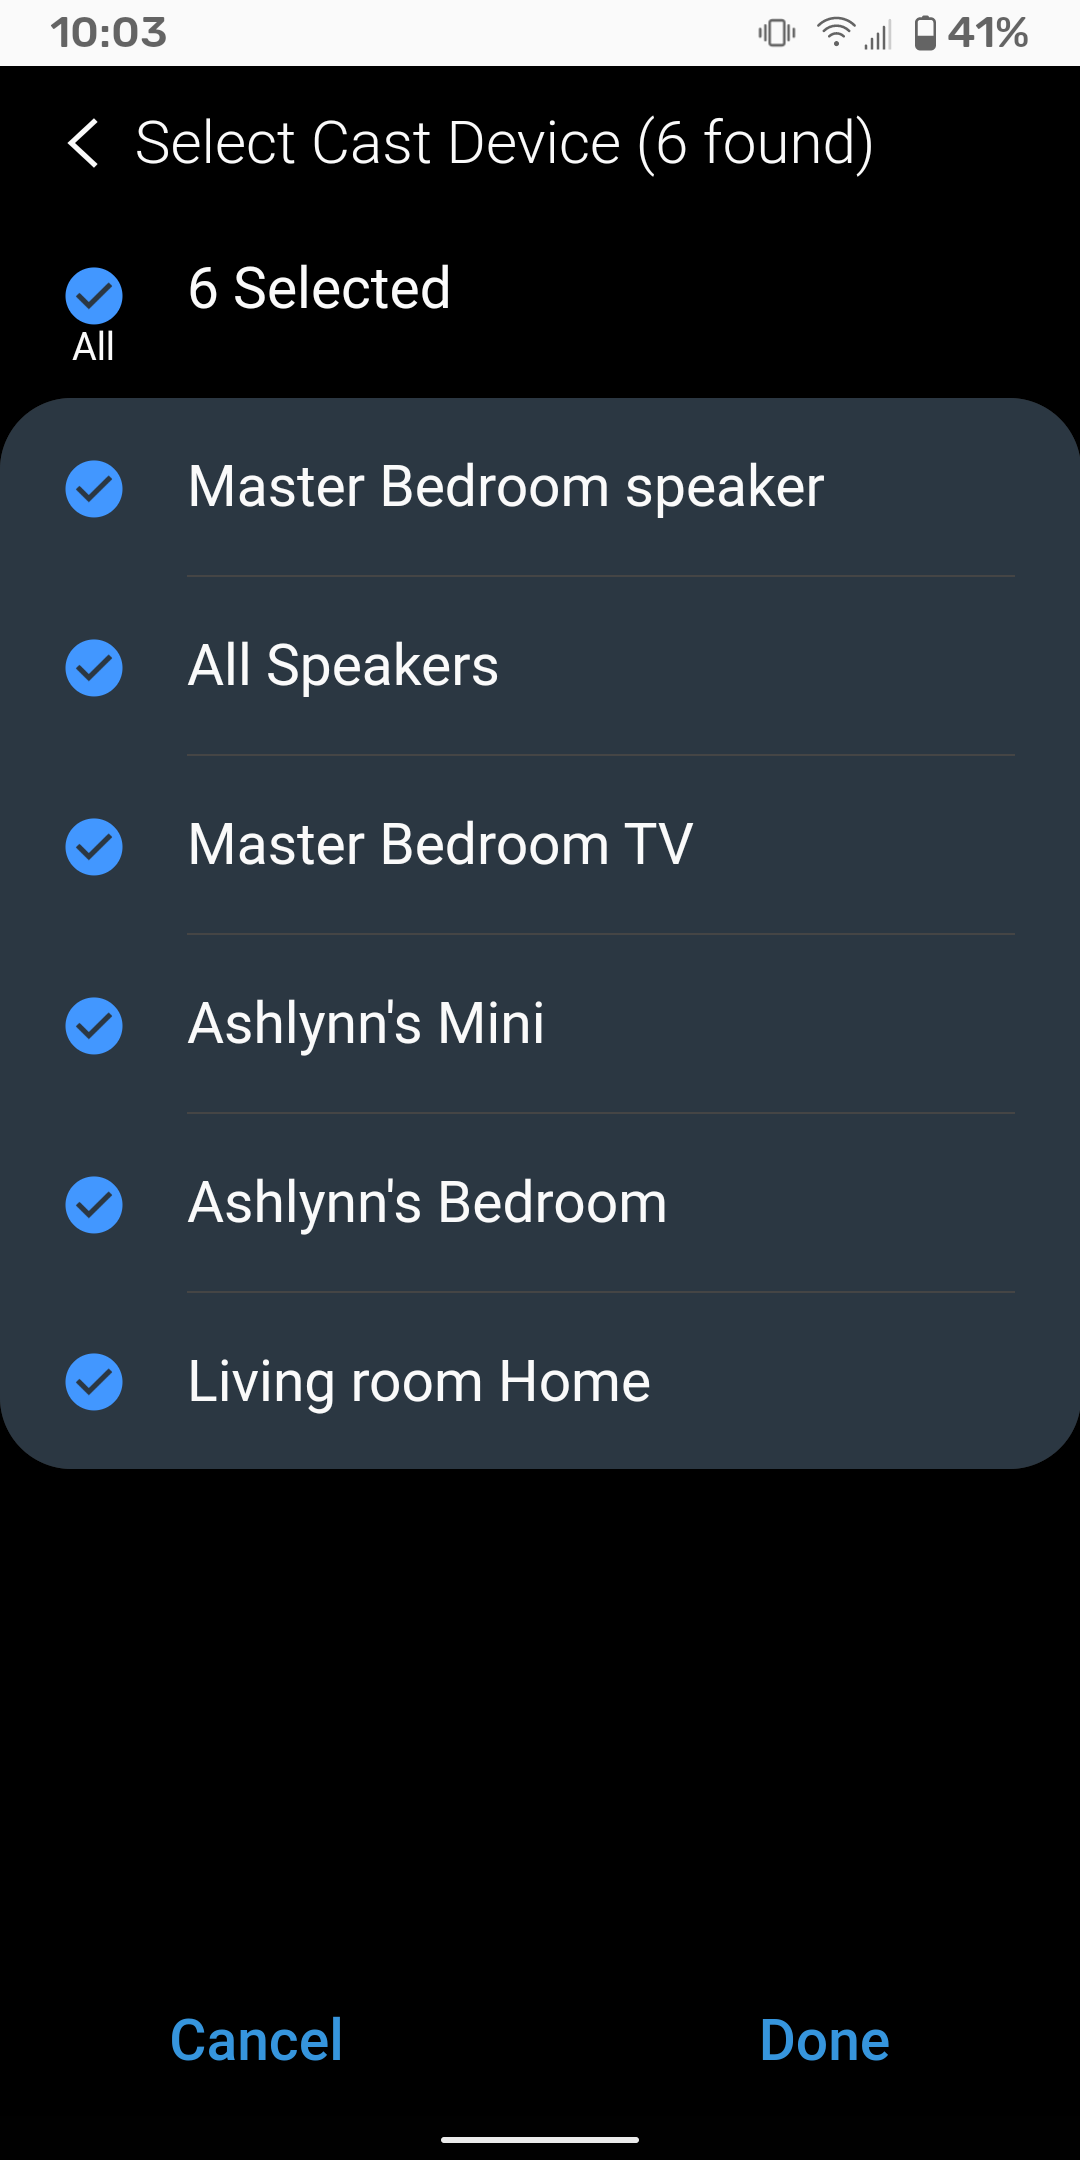
Click Discover Devices. It could take up to 5 minutes to discover all of your Google Home devices, so just sit back and relax.
Select all the Google Home devices you want to add to SmartThings. (You can also add speaker groups during this step.) Once you've added the devices, click Next. Then, click Done to return to main SmartApps page.
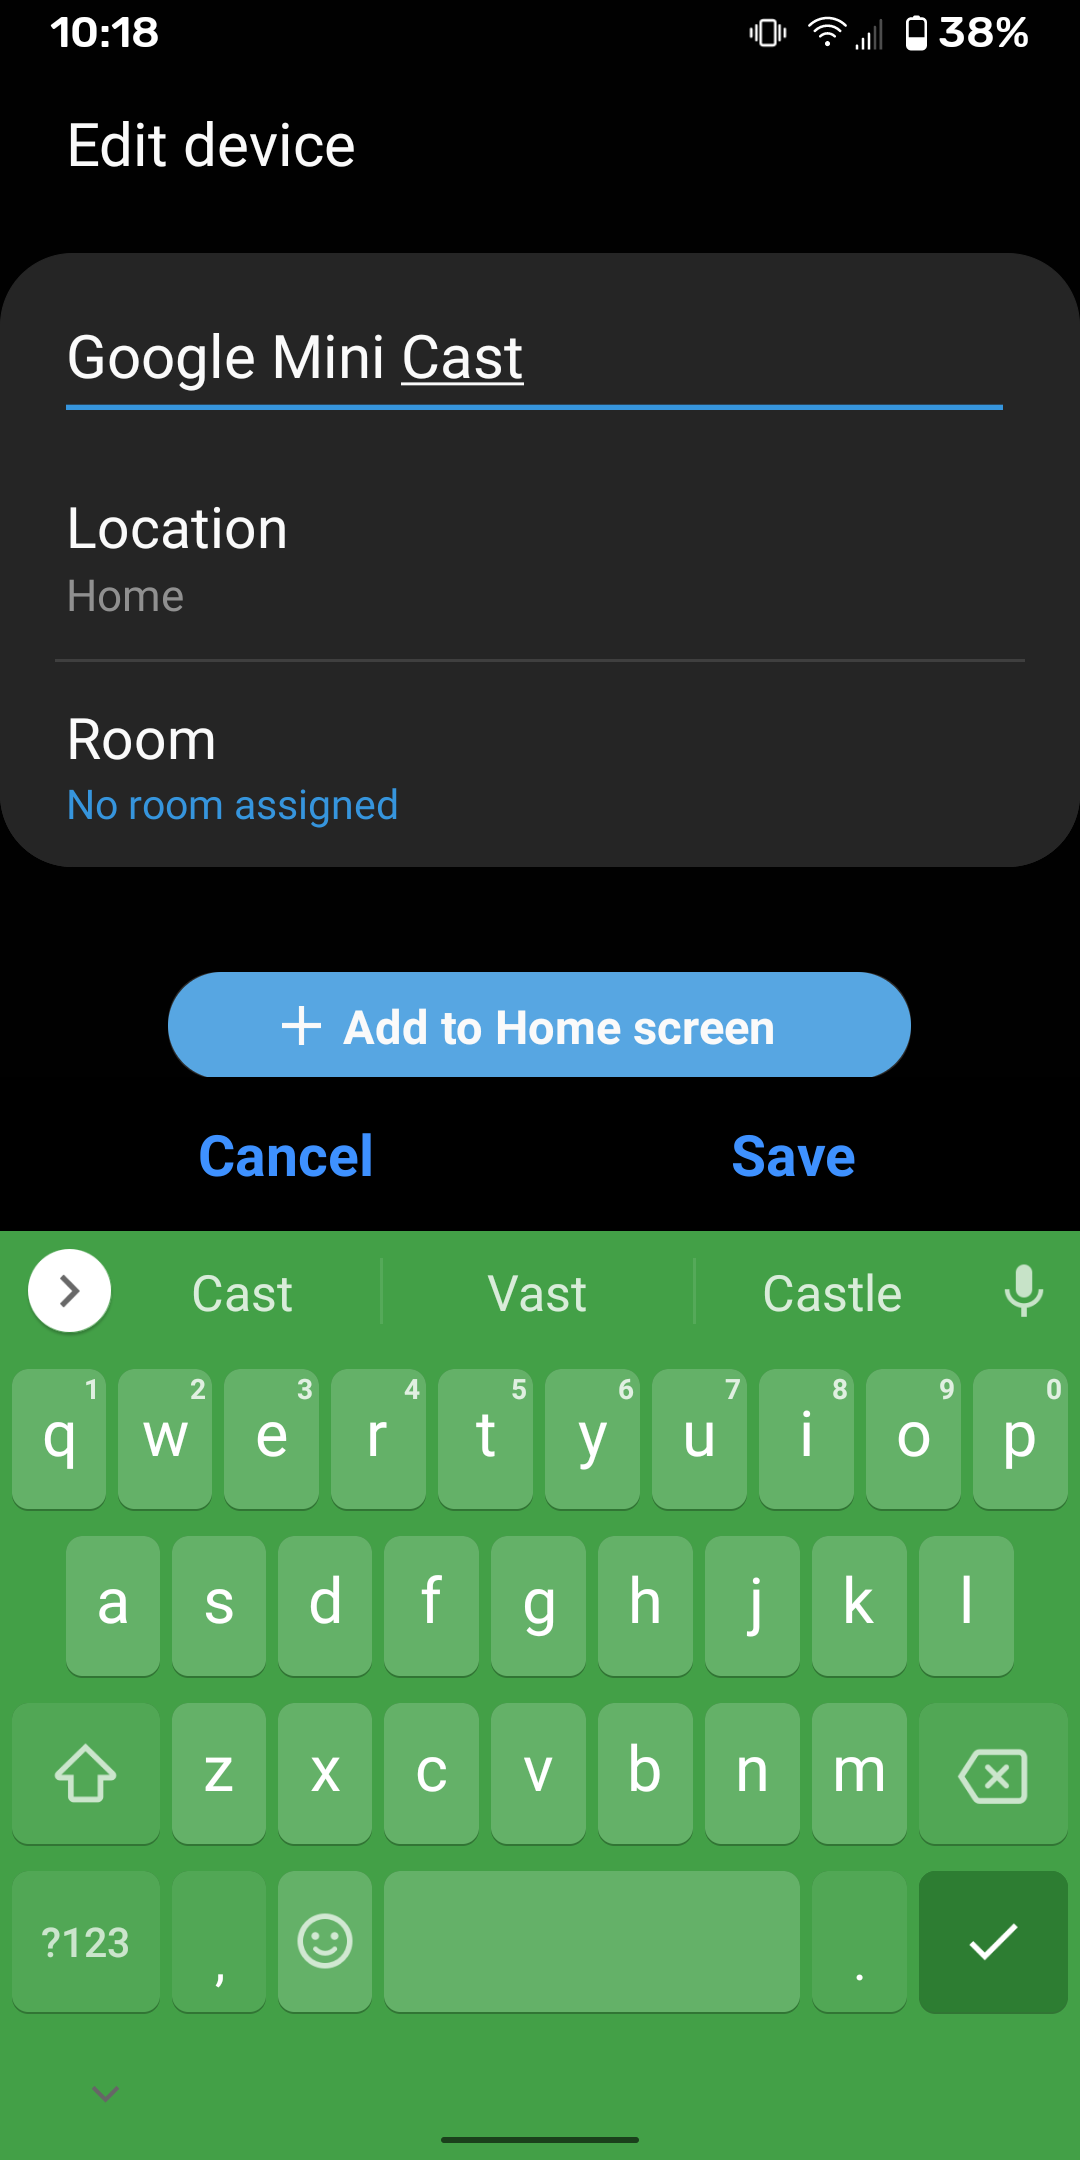
Step 7: Change Device Names
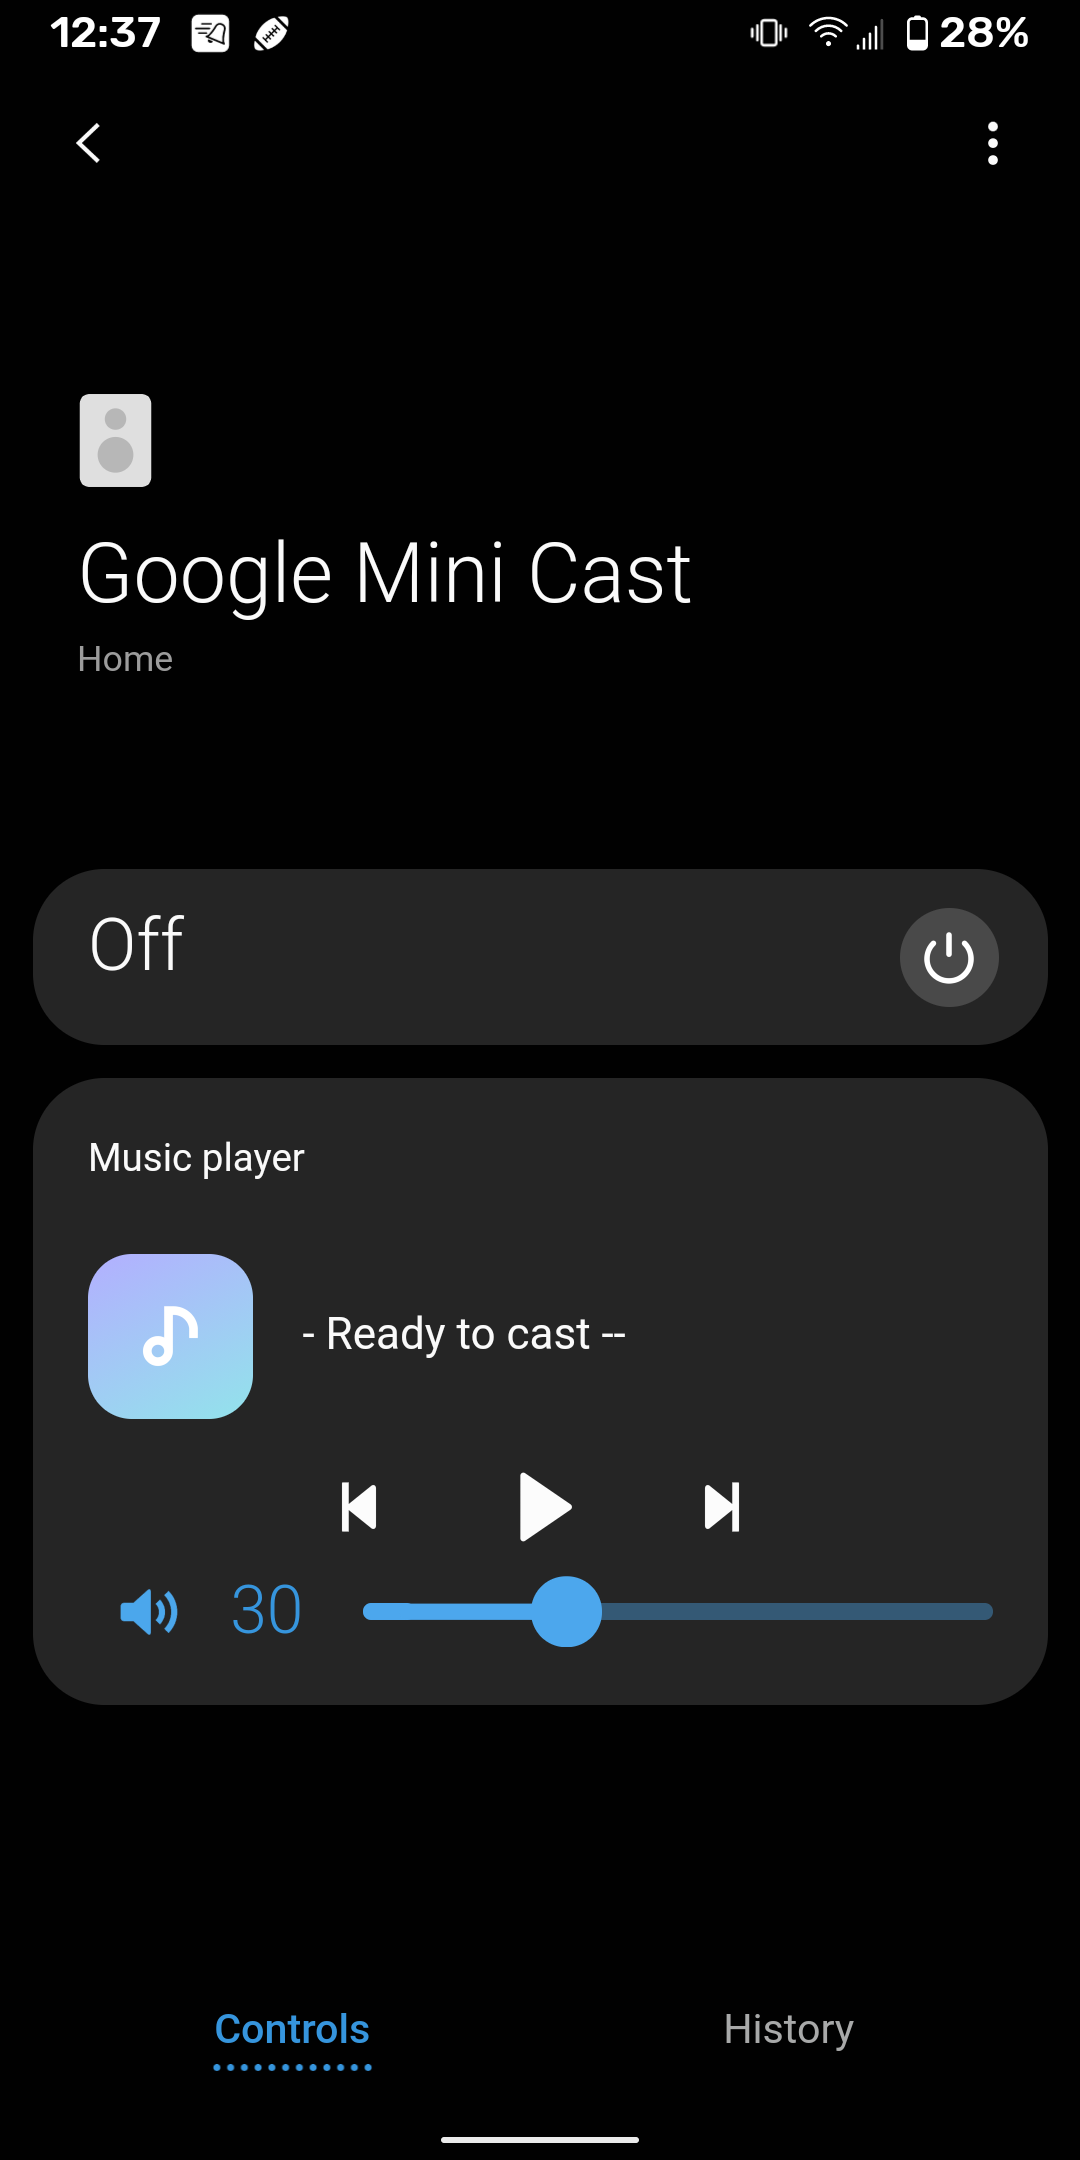
On the SmartThings Home Screen, you'll see a bunch of new devices + the Cast-Web api. You'll notice they all have the same name which makes it hard to identify which device is which.
Wait a few minutes to see if they populate the room info automatically. (I waited about 15 minutes but they didn't autopopulate for me.)
If you don't want to wait, simply click a device and drag the slider volume up or down. You'll hear the audible "volume click" sound.
The easiest way to do this for all your devices is to stand next to one of your Google speaker devices and scroll the volume up from the app. If you hear the volume click, you've found the correct device! Keep changing volumes on the different cast-web-api devices from the SmartThings home screen until you have them all labeled.
Then just edit their name manually.
Step 8: Install Webcore
For the rest of this guide, we are going to be using Webcore to create some simple automation rules for things such as "If front door opens, then speak a message aloud".
Note: You can also use other rule engines such as SharpTools if you'd like.
If you've already installed Webcore, you can skip to Step 9.
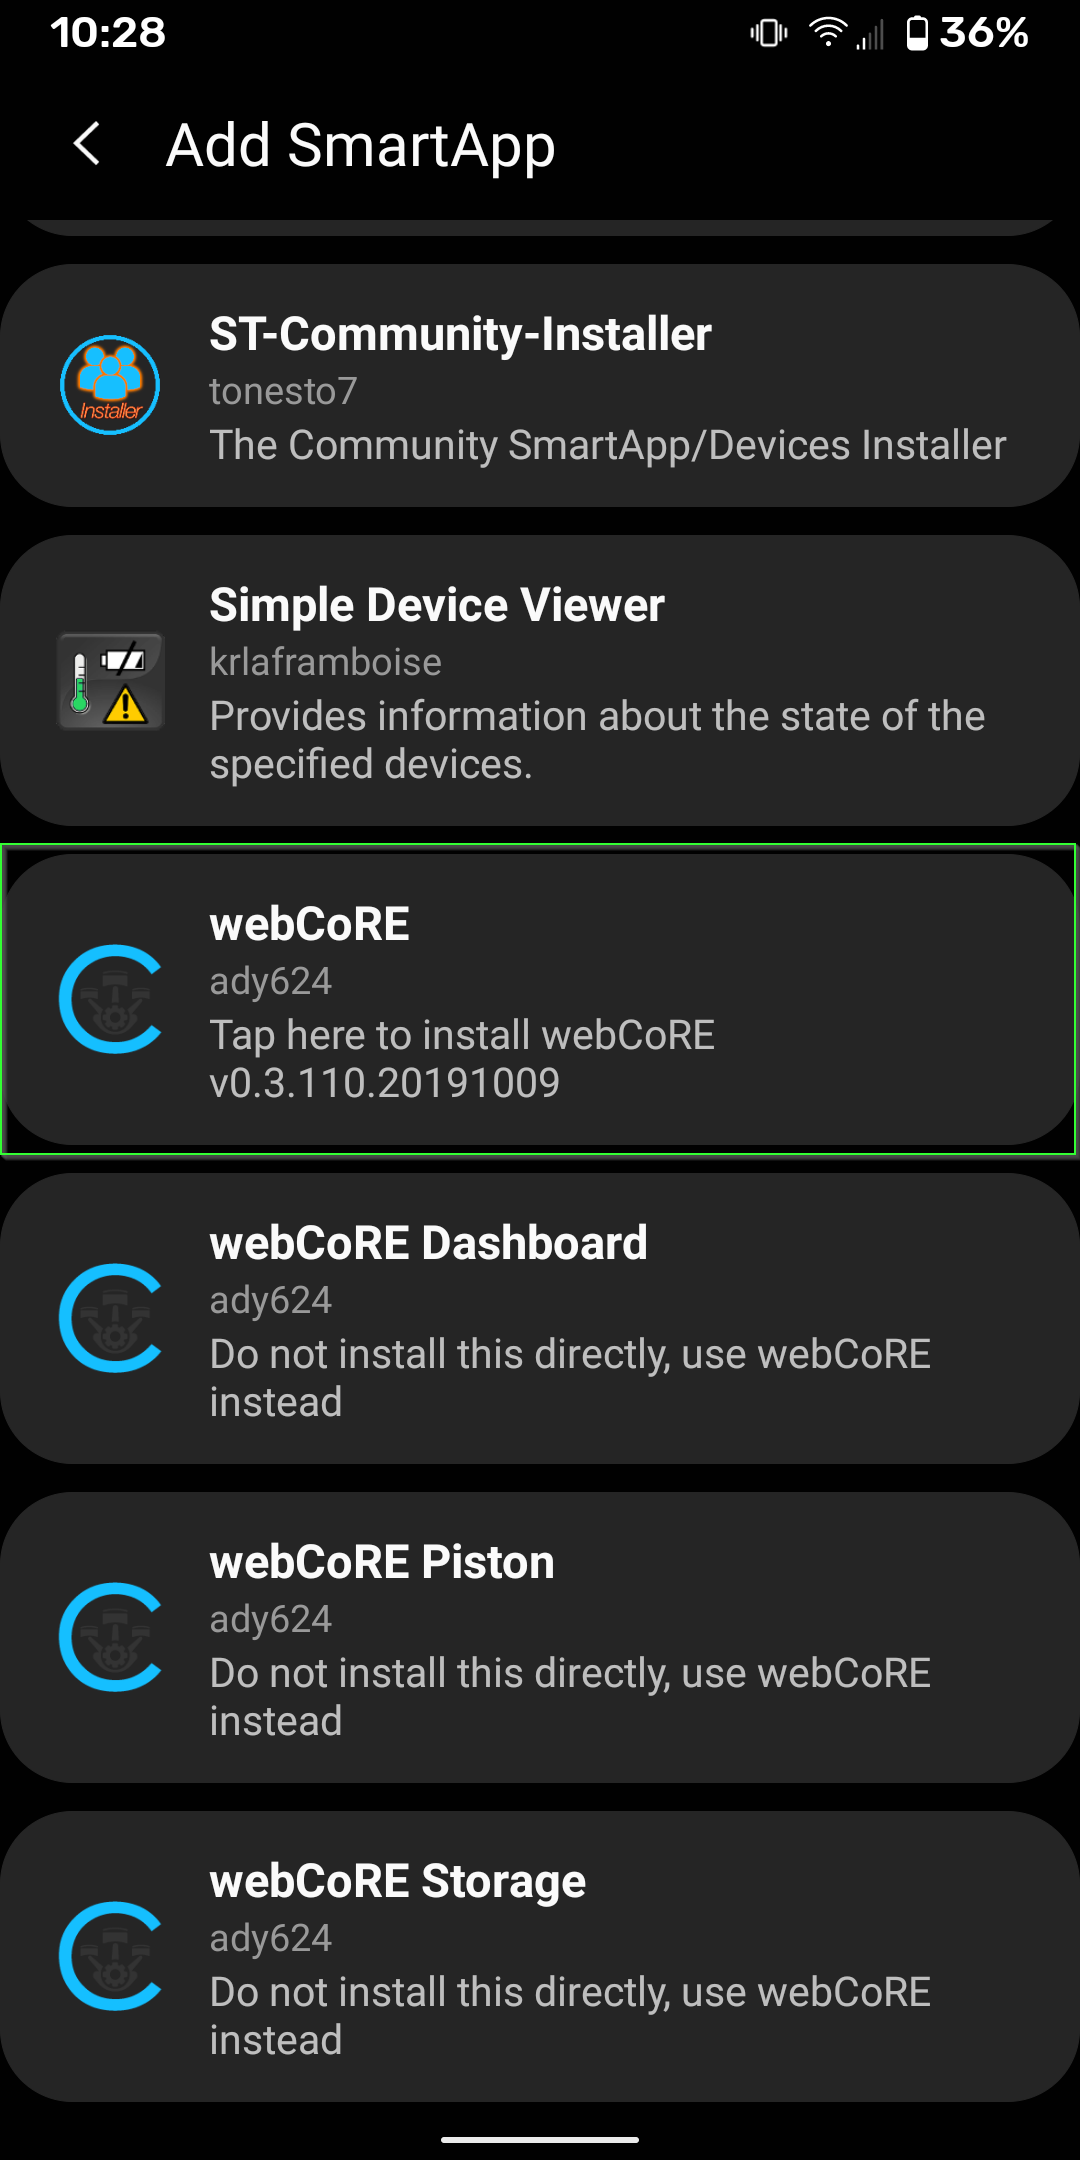
If you haven't, I recommend following the community installer instructions in Step 2 of my SmartThings garage door opener guide.
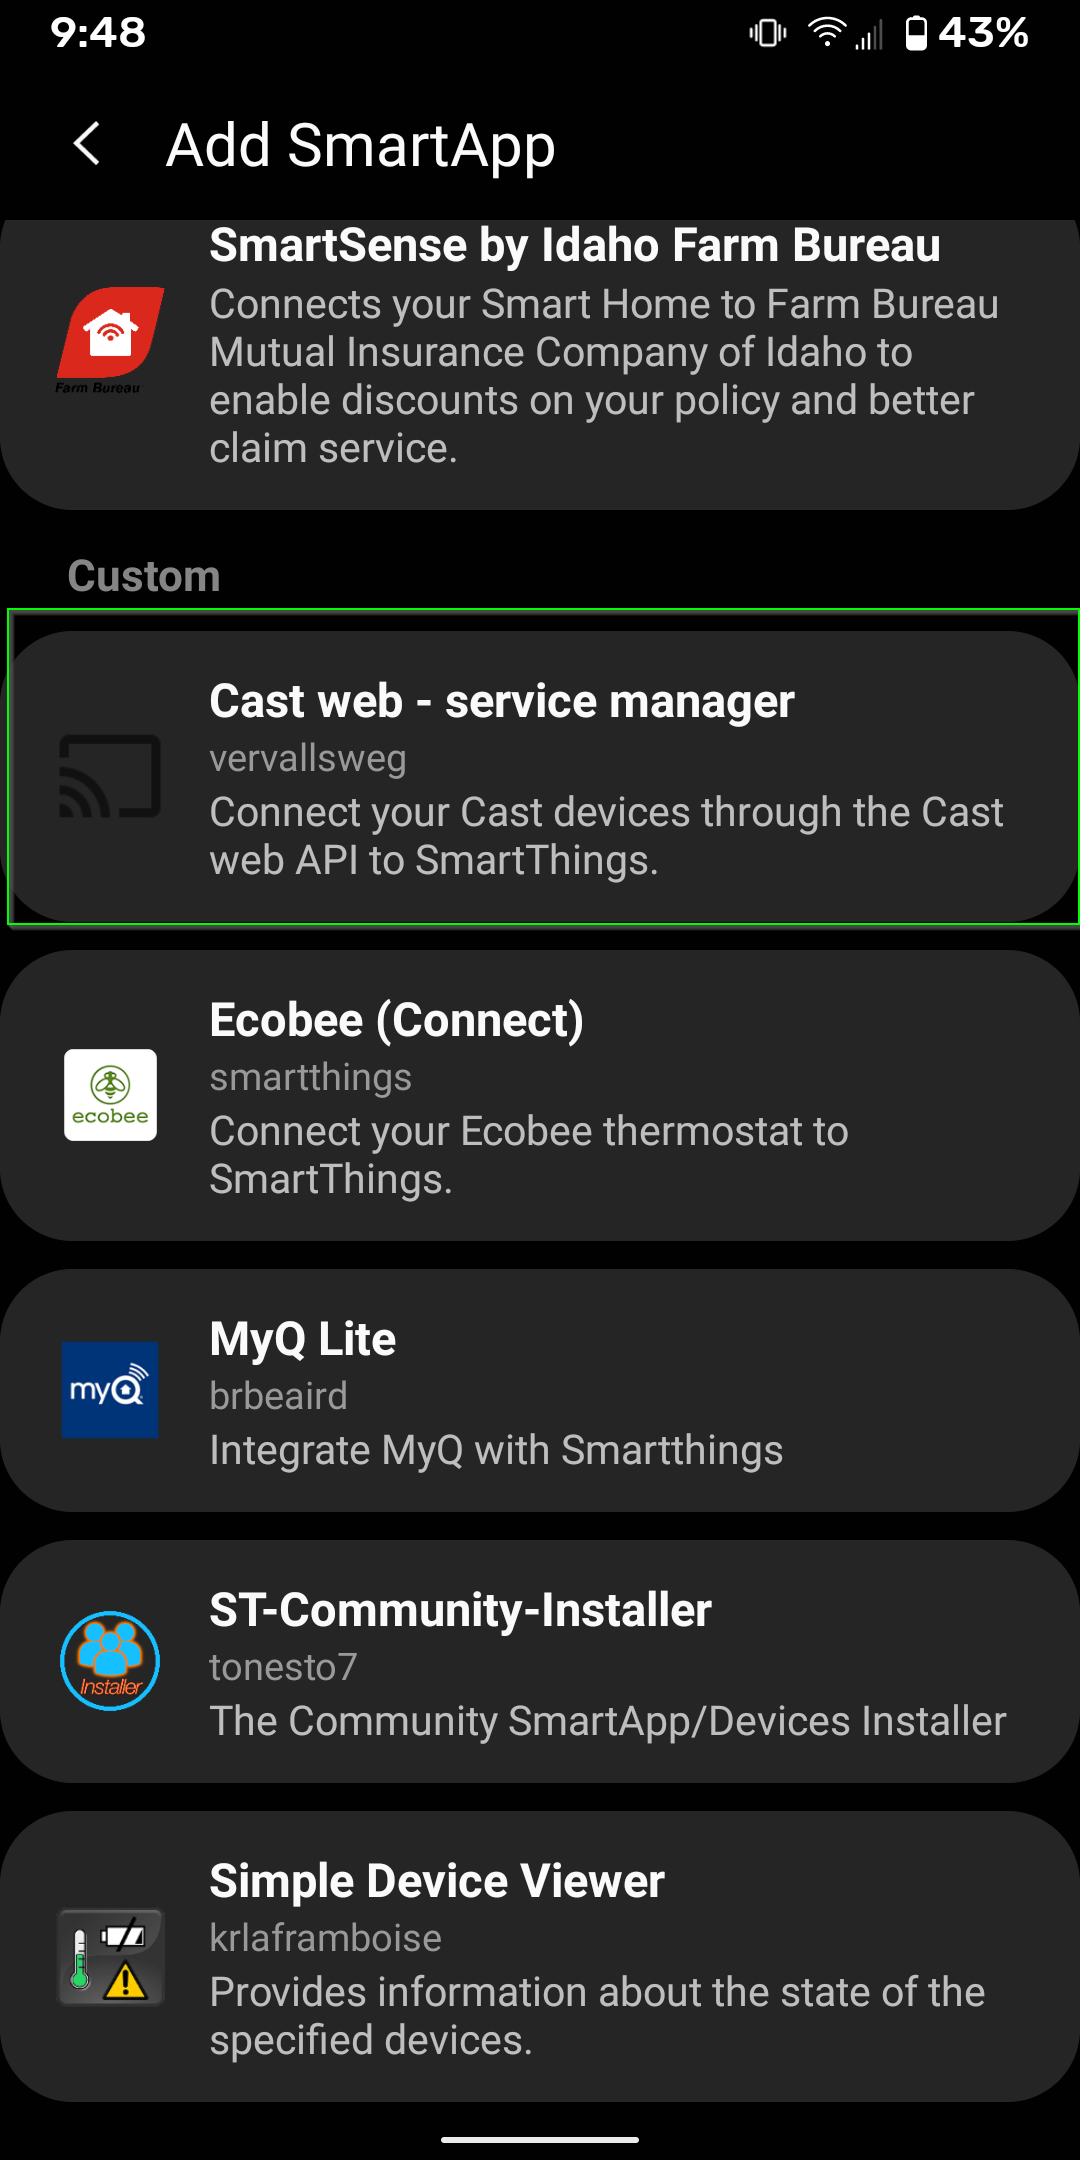
Once the Community Installer is installed, simply open the Community Installer smartapp & search for Webcore to install it.
Once Webcore is installed, click the + icon to add a new smartapp > Webcore.
During the install, you'll need to give your Webcore instance a name and password. Document this somewhere; you'll need it later.
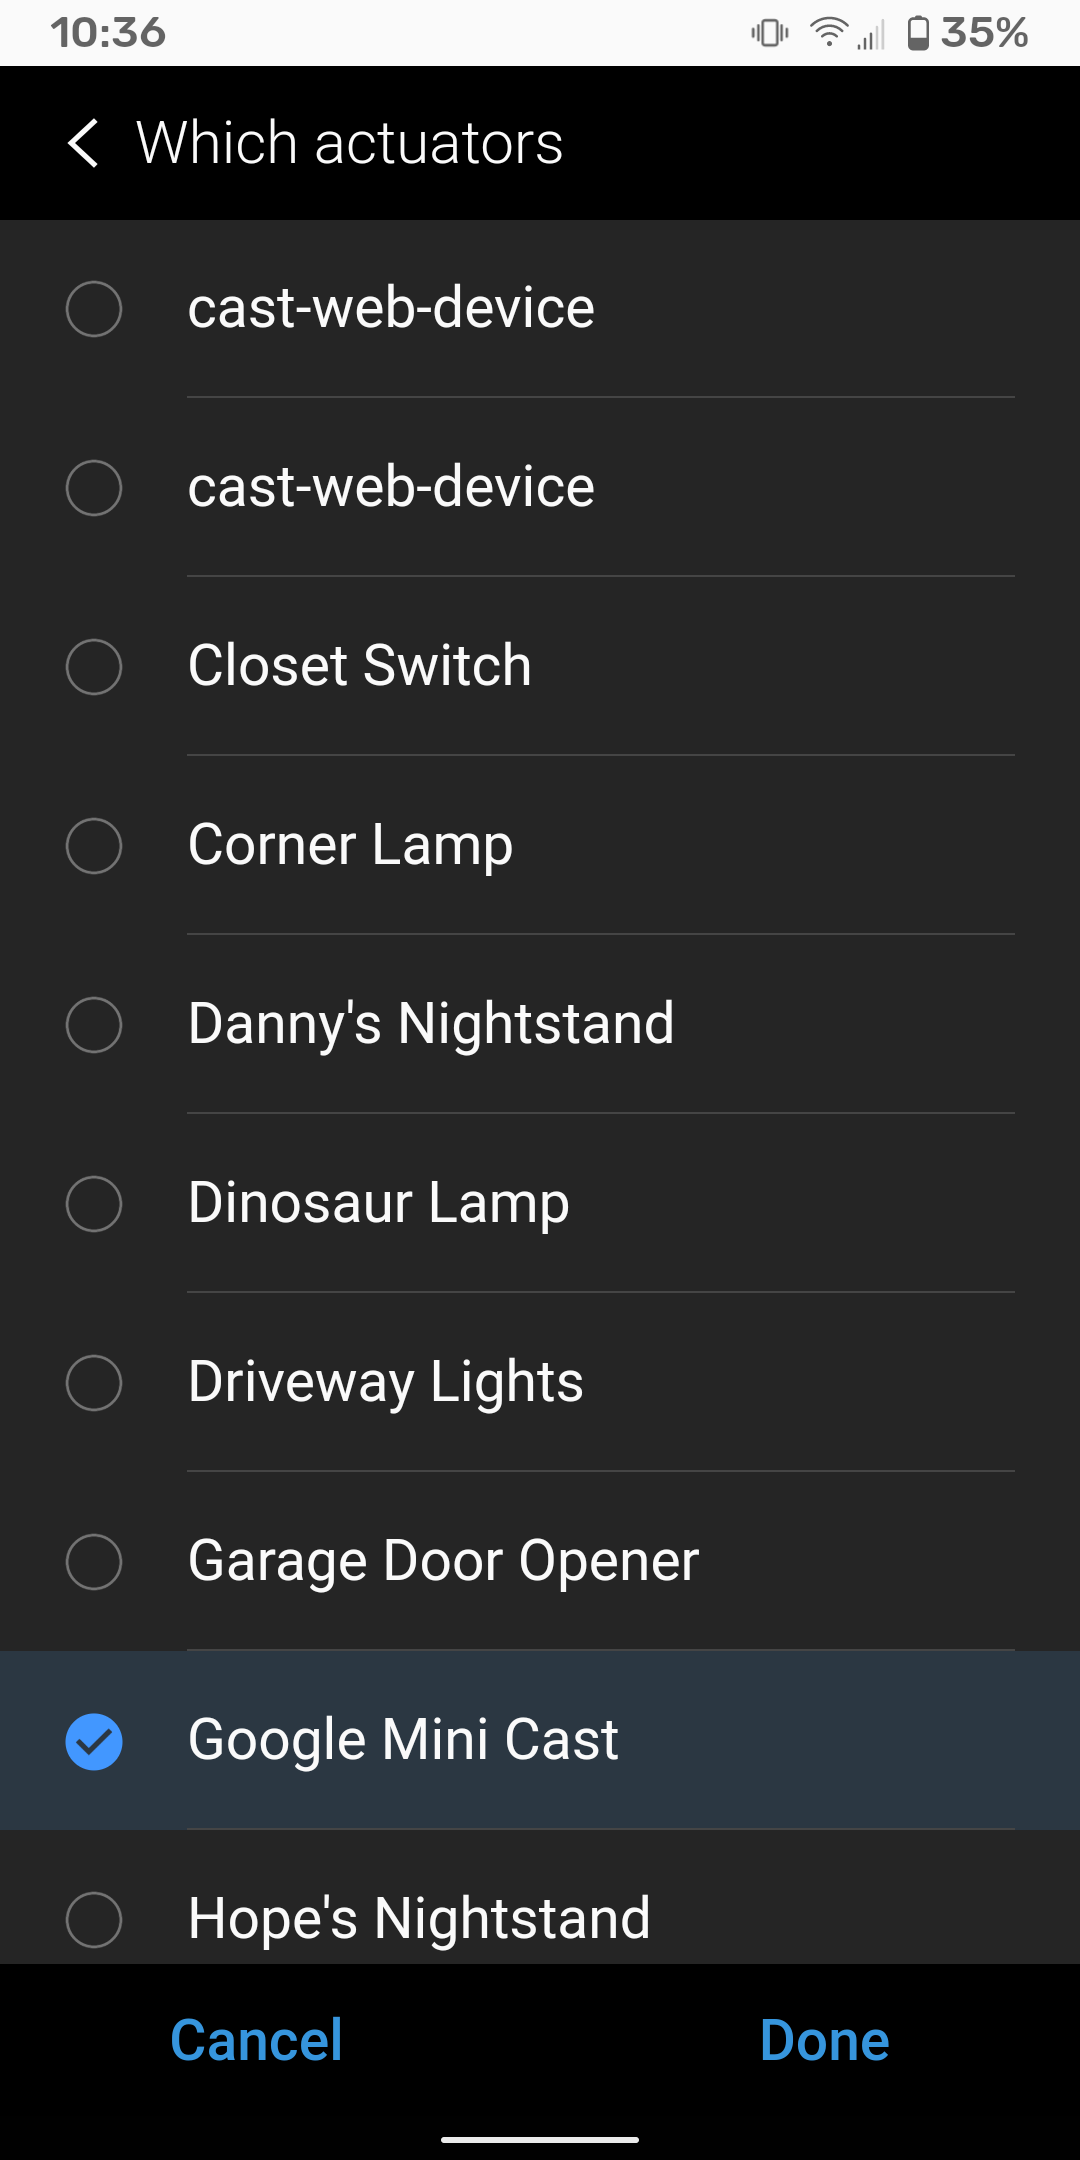
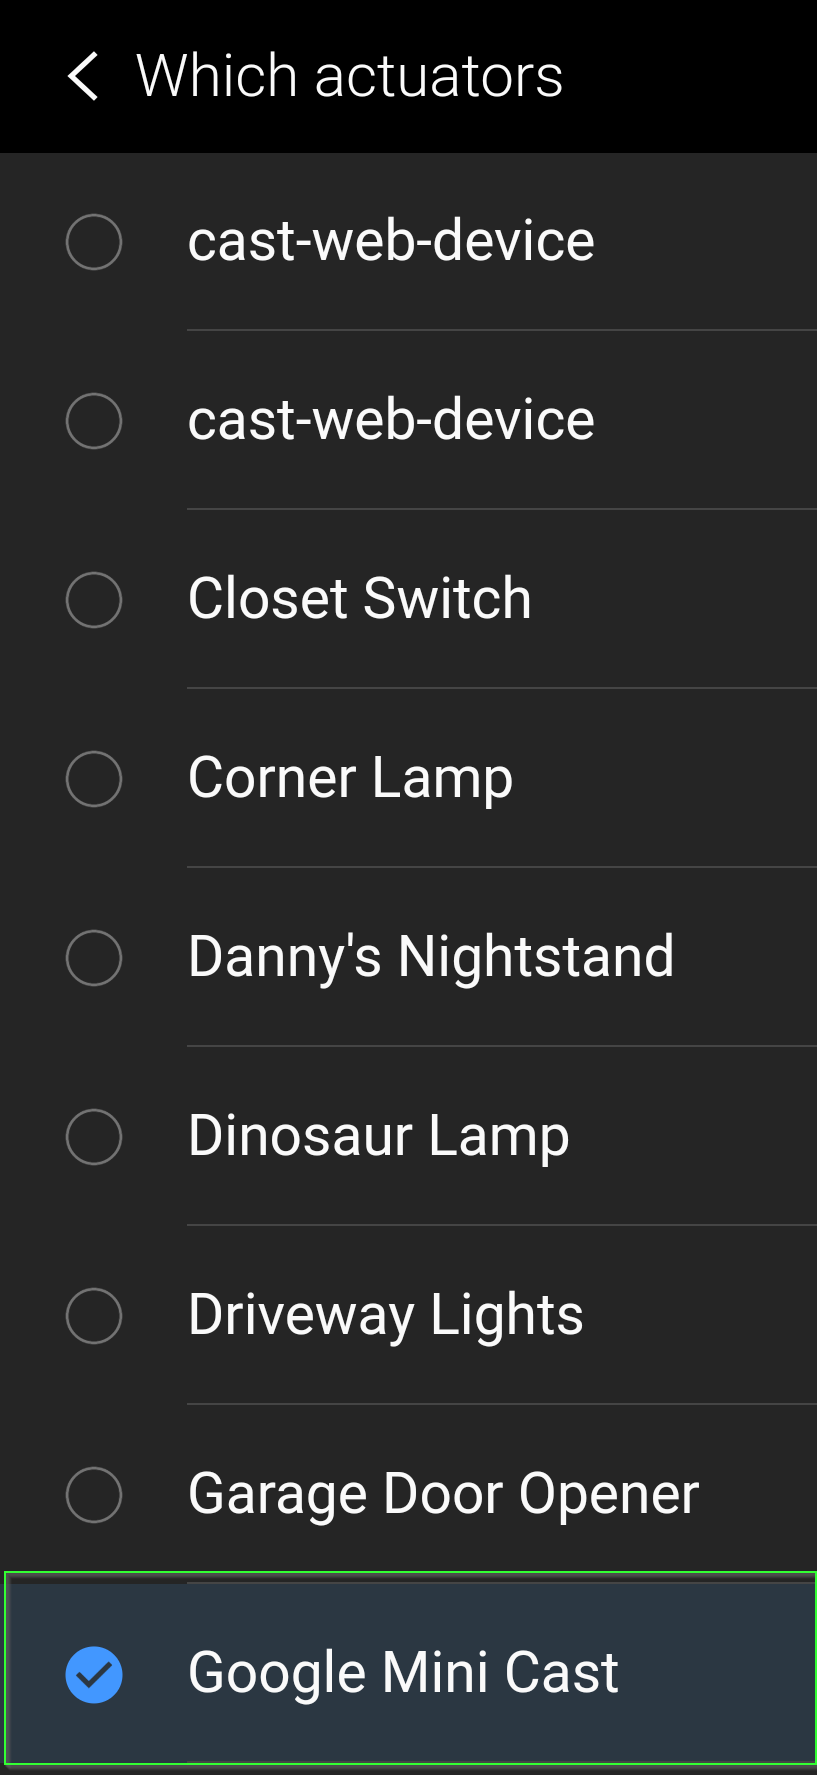
Step 9: Choose Devices to Add to Webcore
Next, you'll need to add devices to Webcore. I recommend only adding the devices you plan on using Webcore with to start.
My Google Mini Cast device is found under Which Actuator? and my button was found under a different section.
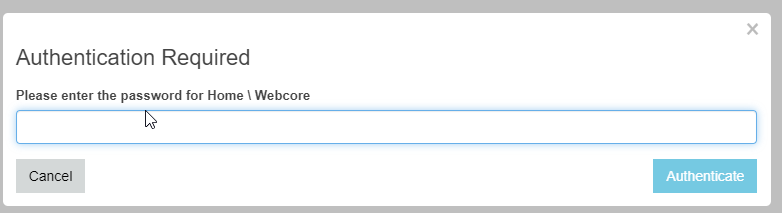
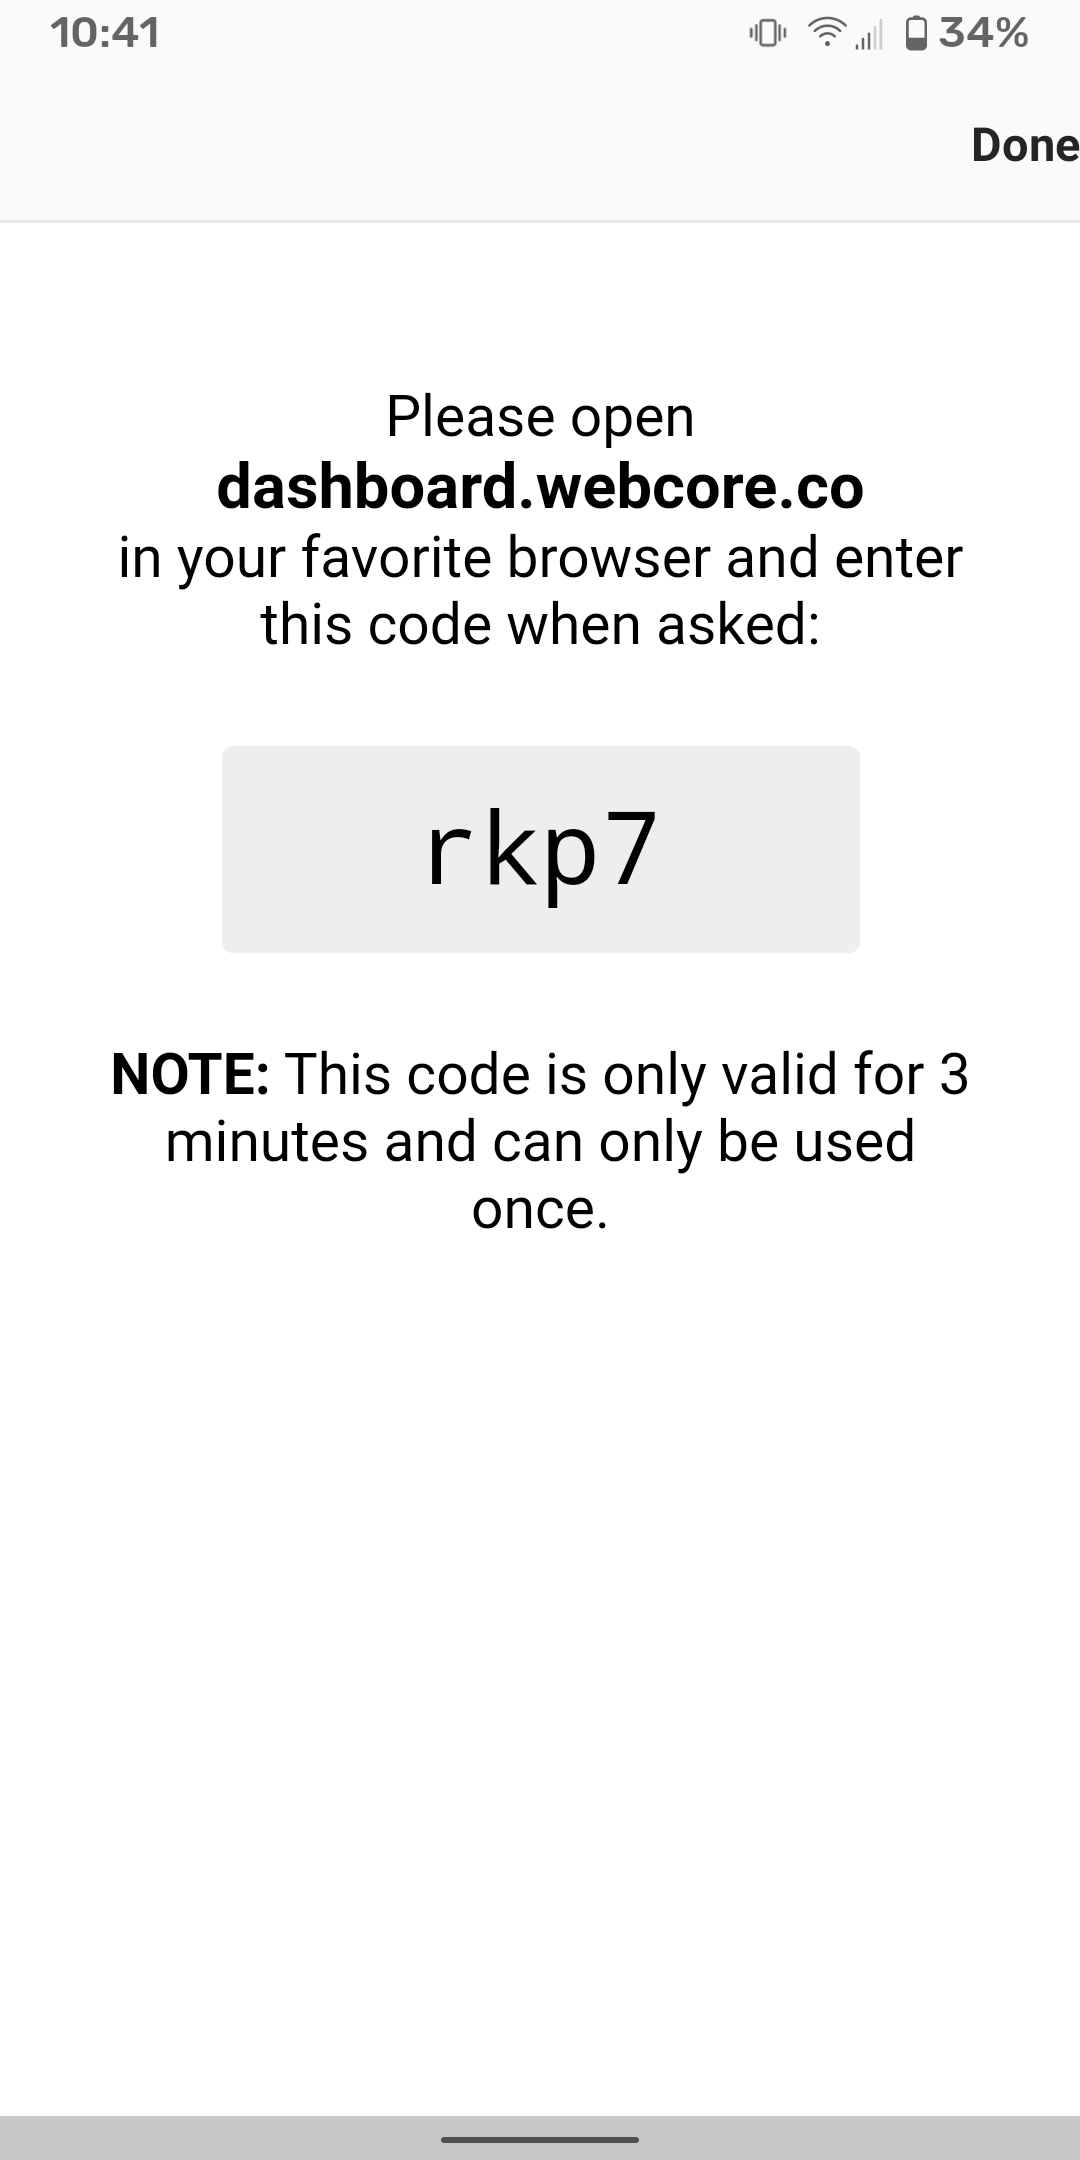
Once you've added all of your devices to Webcore, open the Webcore smartapp once again and register a browser.
Finally, go to https://dashboard.webcore.co and enter the code displayed on your phone. Then enter the password for your dashboard.
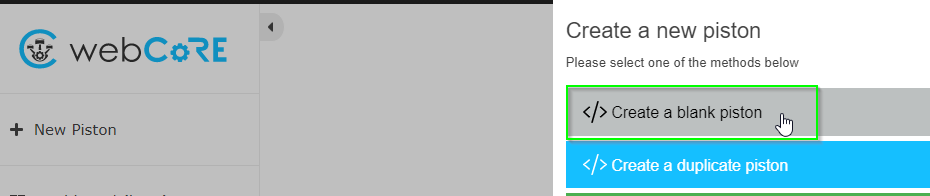
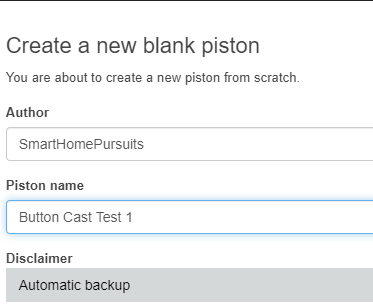
Step 10: Create New Piston
From the Webcore dashboard, create a new piston clicking New Piston > Blank Piston. You'll need to give the piston a name and title.
For this demo, I creating a piston that says "If Office Button is pressed, have a Google Home Mini device speak text"
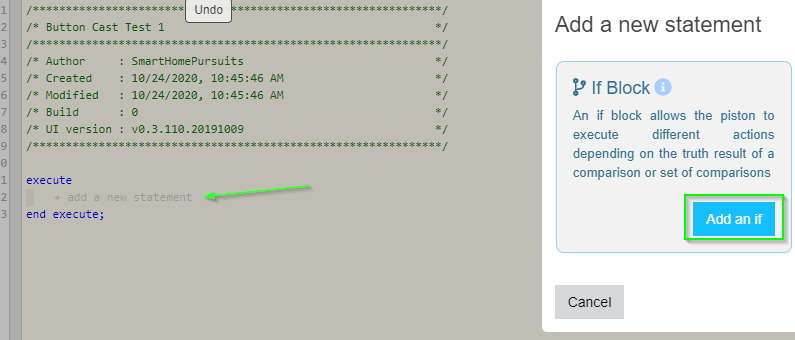
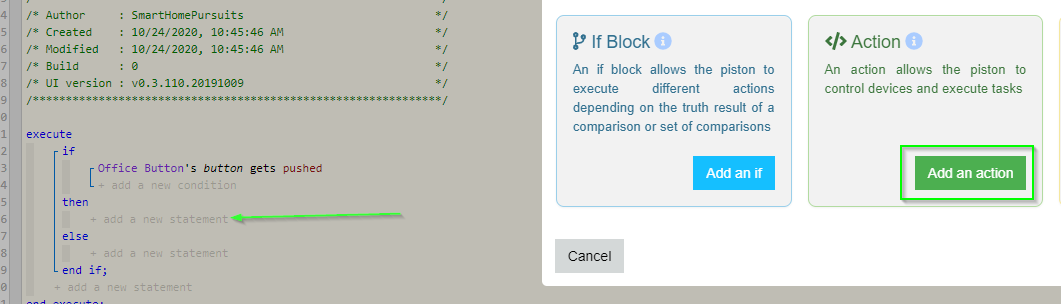
Add IF Statement
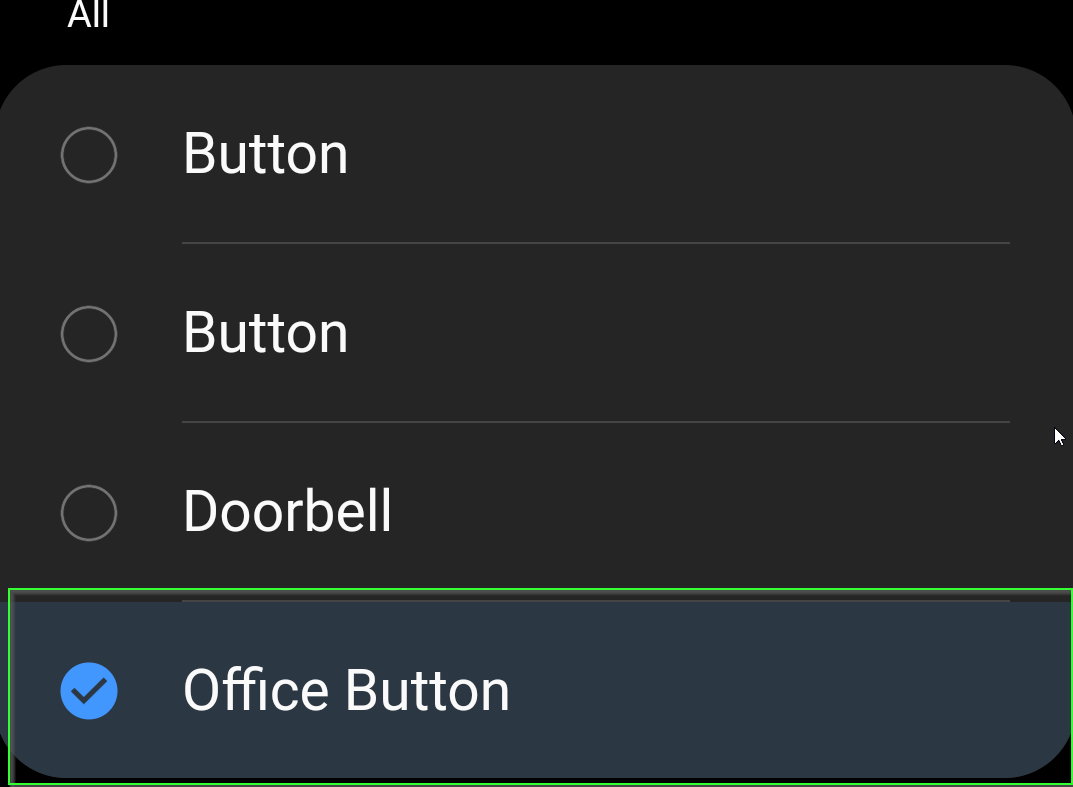
Click Add Statement > Add Condition > add an If:
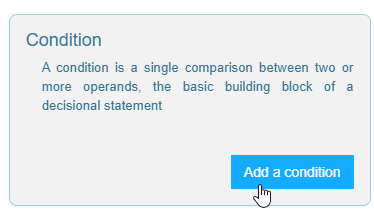
Then click Add a Condition:
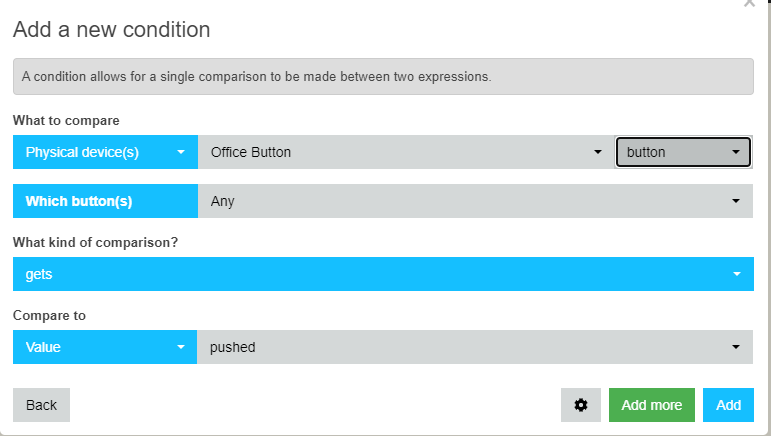
Select your button and then change the dropdown to Button Gets Pushed. It should look exactly like this:
Add THEN Statement
Click add a new statement under the THEN section. Click Add an action.
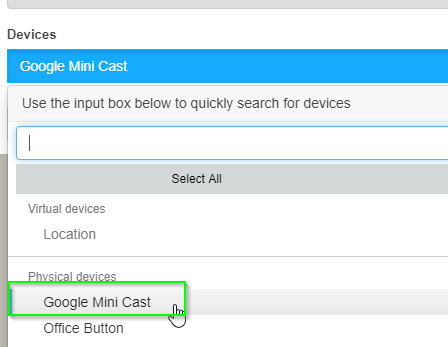
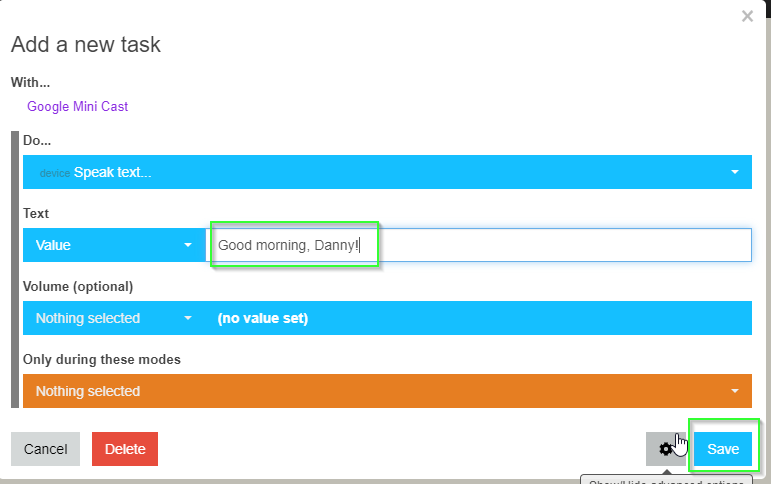
When the next screen pops up, change the location dropdown to your cast device. It should be under physical locations. Once all the devices you want are selected, click Add A Task.
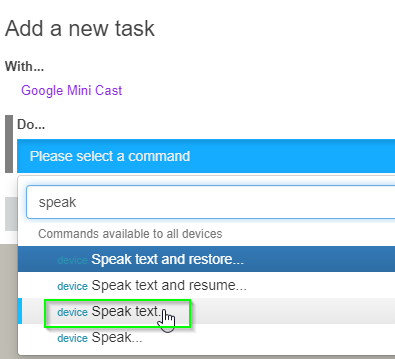
Add Task Screen
On the Add A Task screen, search for "speak" and select the Speak Text option.
Enter a text value. This is whatever you want your Google Home device to speak once the button is pressed.
And finally - press Save and then Save the Piston. You can now press the button and it will speak exactly what you type in!
Text Value tips: Only use lowercase letters and no punctuation.
Wrapping Up
That's it! You can now create an unlimited amount out automations using SmartThings, WebCore, and Google Home. If you think outside the box a little, you can think of TONS of ways to make Google Home devices "speak".
For example, I have a Ring doorbell, so I create an automation that that says "If Doorbell is pressed, then speak "DOORBELL PRESSED".Other fun automations might be:
- If motion detected, then shout BOO.
- If Door opens, then flicker lights on and off.
- If window sensor opens after 10pm, then speak on bedroom Google Mini.
The ideas are literally endless. Hopefully this guide helps you get started!