How To Install Frigate in Home Assistant for Object Detection (pt1)
In this guide, I'll be showing you how to setup Frigate in Home Assistant.
This is the first truly step-by-step Frigate install guide that I've found (other than a 42 minute long EverythingSmartHome video, which is fantastic). So, for those of you who'd prefer to install Frigate by reading a written tutorial instead of a video, here you go!
This is Part 1 of a 3 part guide.
In Part 1 (this guide), I'll show you how to:
- Install Frigate within Home Assistant
- Install the Frigate Home Assistant integration via HACS
- Add your first camera to Frigate
- Create a Lovelace card to display your camera
In Part 2, I'll show you how to:
- Add your first object detection
- Configure detection zones
- Create masks
- Advanced object detection (such as vehicles, dogs, or bicycles)
In Part 3 (postponed), I'll show you how to:
- Create a basic notification when an object is detected
- Create an actionable notification that shows a screenshot
- In the meantime, you can use this Frigate Notification Blueprint
Let's get started!
What is Frigate?
Frigate is an amazing open source piece of software that allows you to detect people and objects to existing cameras in Home Assistant that otherwise doesn't natively support objection detection. It is an alternative to Deepstack and is quickly becoming the defacto integration among Home Assistant users, and for good reason!
One of the main differences (from what I understand) between Frigate and Deepstack is that Frigate uses RTSP(real time streaming protocol) to process objects constantly, while Deepstack only processes things when movement is detected.
Frigate is actively developed and maintained by blackblackshear and works with just about any camera that supports RTSP, making it the ideal choice for anyone wanting to detect objects or people in Home Assistant in real time.
Prerequisites:
Before you get started with this guide, you'll need to make sure you have the following items ready to go.
- Home Assistant installed (I'm running Home Assistant in a VMWare Workstation VM)
- MQTT Server installed (as a Home Assistant addon). Follow the "Install MQTT Broker" and "Create MQTT User Account" section of this guide.
- A camera that supports RTSP (I'm using an Amcrest IP2M-841 1080p Pan/tilt/zoom camera)
Frigate can also be installed in a standalone Docker container since it uses MQTT, but for purposes of this guide, we'll be installing it directly in Home Assistant.
It's important to note that your camera must support RTSP for this frigate integration to work. If your camera doesn't support RTSP, you will either need to purchase a different camera or use a different object detection platform like Deepstack.
Pre-Setup Questions
Can you run Frigate on a raspberry pi?
Technically, you can run Frigate on a raspberry pi, but as with all object detection systems, they are pretty CPU intensive so I don't recommend it. For a single camera with a lower resolution, a pi might be fine, but it's recommended to install Frigate on a more powerful system.
What's the best Frigate camera for Home Assistant?
While I could make an entire guide dedicated to this question, I'm just going to say the best camera under $50 for Home Assistant is the Amcrest IP2M-841 (based on my research in the Home Assistant subreddit and the Home Assistant Community Forums.)
It offers 1080p resolution, pan/tilt functions, supports RTSP, works over wifi but has an ethernet port, and is highly rated on Amazon with over 2,400 ratings and reviews. The only downside is that it isn't PoE powered or rated for outdoor use, but since I plan to use this over wifi, this isn't an issue for me. For an outdoor camera, I use the Amcrest IP5M.
Overall, the best wifi camera for Home Assistant in 2021 for the money is the Amcrest.
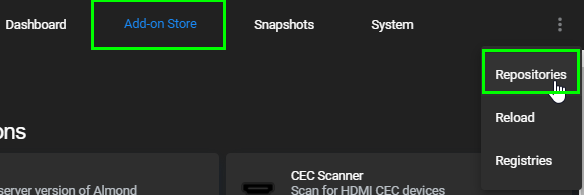
Step 1: Install Frigate NVR Addon
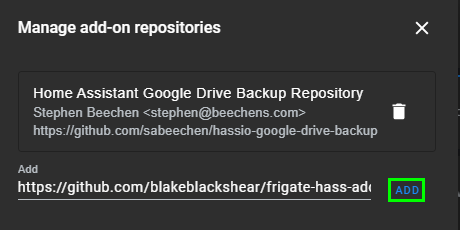
Go to Supervisor > Add-on Store. In the top right corner, click the 3 dots and choose Repositories.
Paste in this link from blakeblackshear's github page. Then click Add. https://github.com/blakeblackshear/frigate-hass-addons
You should now see two new addons:
Step 2: Install Frigate NVR
After clicking Frigate NVR, click Install. It will take a couple minutes to install, so just be patient during this step.
Toggle the Watchdog and Show in Sidebar options after if finishes installing.
Do not start the addon just yet. We first need to create the frigate.yml file.
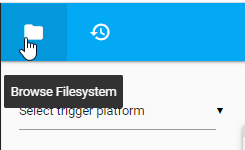
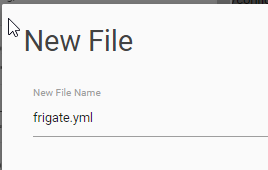
Step 3: Create frigate.yml file
Open File Editor. Make sure you are in the root directory ( /config)
Click the folder in the top left corner.
Create a New File and name it frigate.yml.
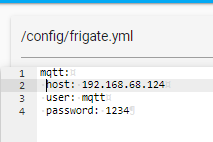
Like I mentioned at the beginning, you will need an MQTT server setup, and this is the part of the guide where you'll need to add your MQTT server details into the config.
A couple things to note about the frigate.yml below:
- If you installed MQTT in Home Assistant, use your Home Assistant IP address for the
host. - For the
camerassection, give your cameras a useful name (driveway_cam) and enter the camera's IP address. - The RTSP path varies depending on your device. The below path is for my Amcrest camera. Since my camera has a username and password, I have to enter that into the RTSP URL as well. If you don't know the RTSP address your camera, just google search RTSP and your camera manufacturer. (i.e - RTSP URL Amcrest)
- You must use the exact width and height for your camera.
- For 1080p, use 1920x1080.
- For 720p, use 1080x720
You can just copy and paste the yaml code below and change out the values.
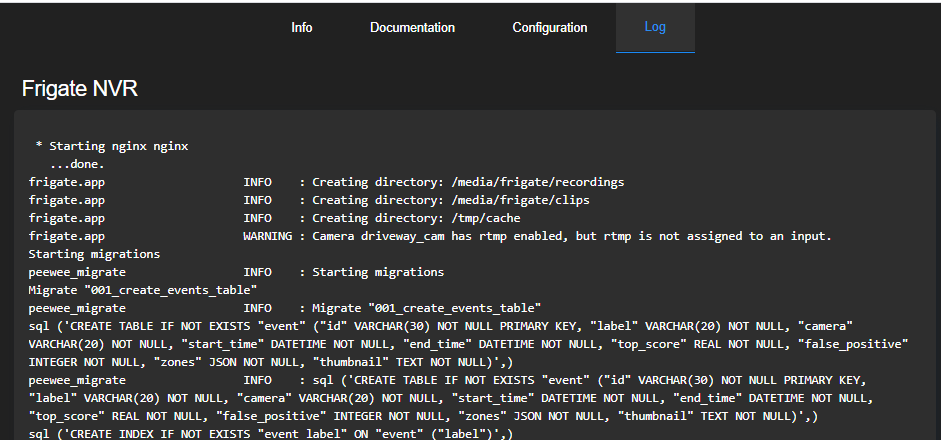
mqtt: host: 192.168.68.124 user: mqtt password: 1234 cameras: driveway_cam: ffmpeg: inputs: - path: rtsp://admin:password@192.168.68.120:554 roles: - detect width: 1920 height: 1080 fps: 5 detectors: cpu1: type: cpu cpu2: type: cpuSave the file. Then, start the Frigate addon from Supervisor.
If all is successful so far, when you click the Log tab you'll see a page full of messages like this:
Step 4: Verify Camera is Working / RTSP Troubleshooting
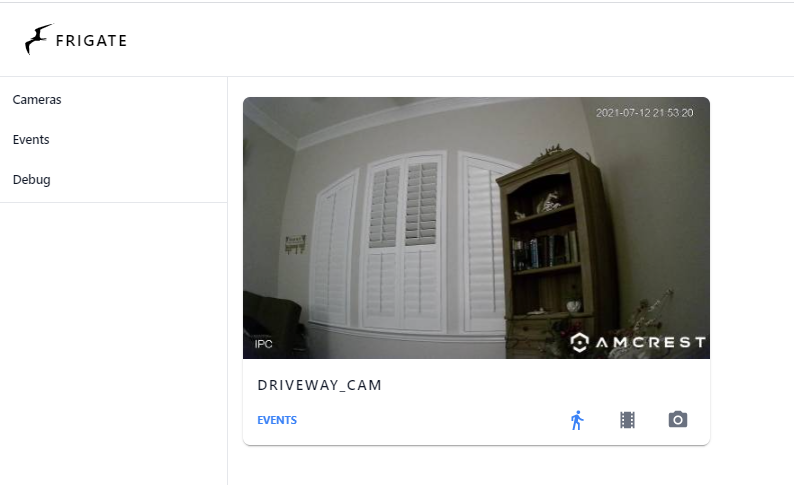
Click the Frigate tab on the left.
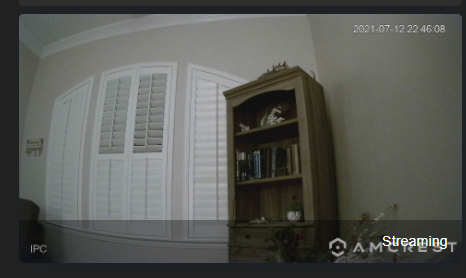
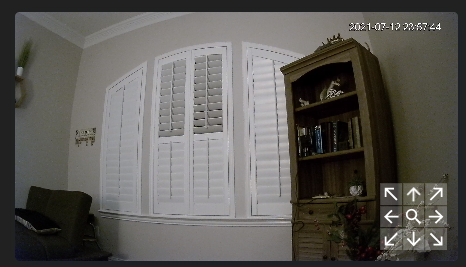
You should now see your camera!
The screen below will only show the last frame detected, however if you click the picture, it will show you the actual real-time livestream (with a slight delay, of course). If the delay seems excessively long, you can log into your camera by typing the camera's IP address into a browser and look for the delay settings.
If you refresh this page, the frame will also update.
If your camera doesn't show up, here's a few things to check.
Frigate Troubleshooting
Camera stuck on loading screen
After starting Frigate, if your camera seems to be stuck loading, then you probably entered the width and height incorrectly. Like I said earlier, it has to be exactly what your camera offers. You can't choose 1080x720 if you have a 1080p camera.
Verify the resolution by googling it or viewing the Amazon listing. Then, stop Frigate, edit the frigate.yml and update the values, and start Frigate once again.
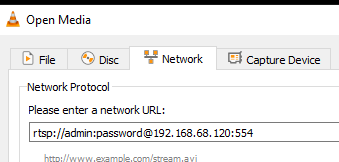
Green Camera Box
If the camera loads but all you see is a green screen where the camera stream should be, then you probably entered the RTSP information in incorrectly.
To verify, download VLC Media Player. Under Media, click Open Network Stream.
Enter your current RTSP url and click Play.
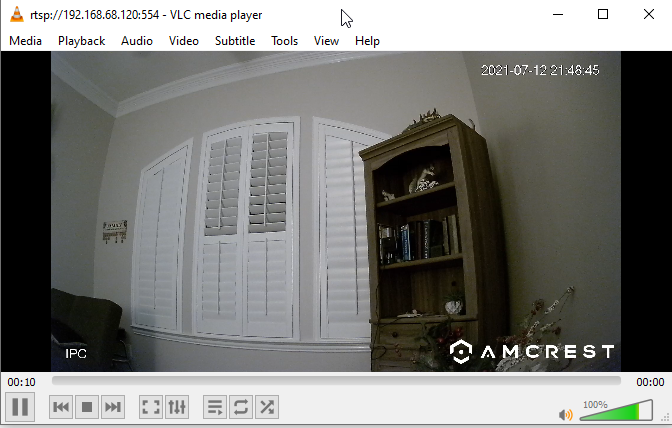
If it works in VLC, then you know it'll also work in Frigate. If it doesn't work in VLC, then you may need to do some more googling to find the correct RTSP URL for your device.
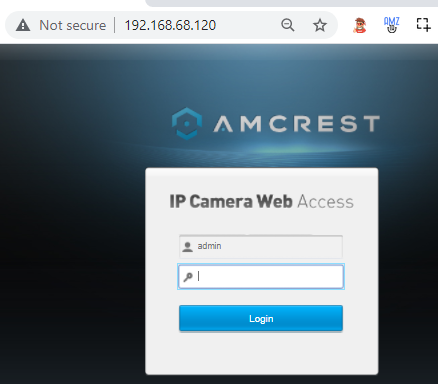
If the VLC box displays a username and password box, that means your camera is password protected. To find the default username/password, start a google search like "Amcrest camera default username and password".
To verify the username and password work, enter the cameras' IP address into a web browser to display the webui and attempt to login. You'll probably want to log into the camera at some point anyway to change the delay, remove the logo, and adjust the camera settings.
Once you verify you can log into the camera, try logging in through the RTSP URL in VLC again. This time it should work.
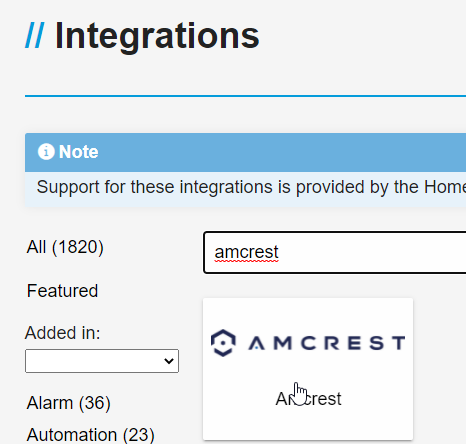
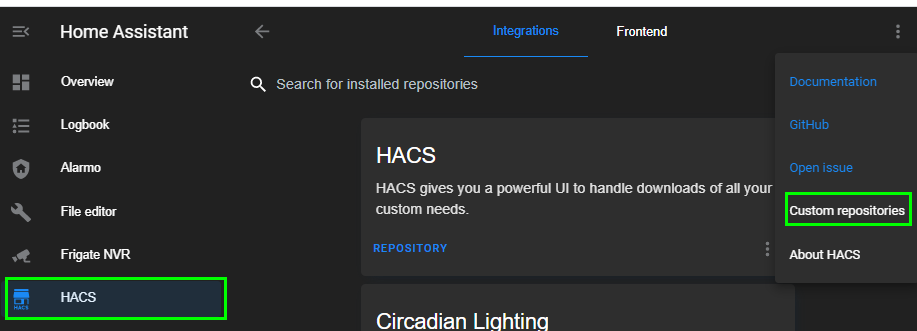
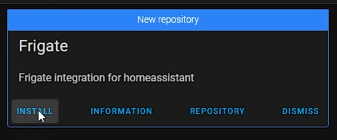
Step 5: Add Frigate Integration via HACS
The next step is to add the Frigate integration via HACS. This will give you a bunch of new entities and options to play around with or add to Lovelace:
Open HACS > Integrations > click the 3 dots in the top right corner > Custom repositories > paste this URL: https://github.com/blakeblackshear/frigate-hass-integration. For the category, choose Integration.
A new integration will pop. Click Install and reboot Home Assistant.
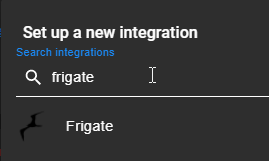
After reboot, go to Configuration > Integrations > Add Integration and search for Frigate.
The host will automatically be populated, so go ahead and click Submit.
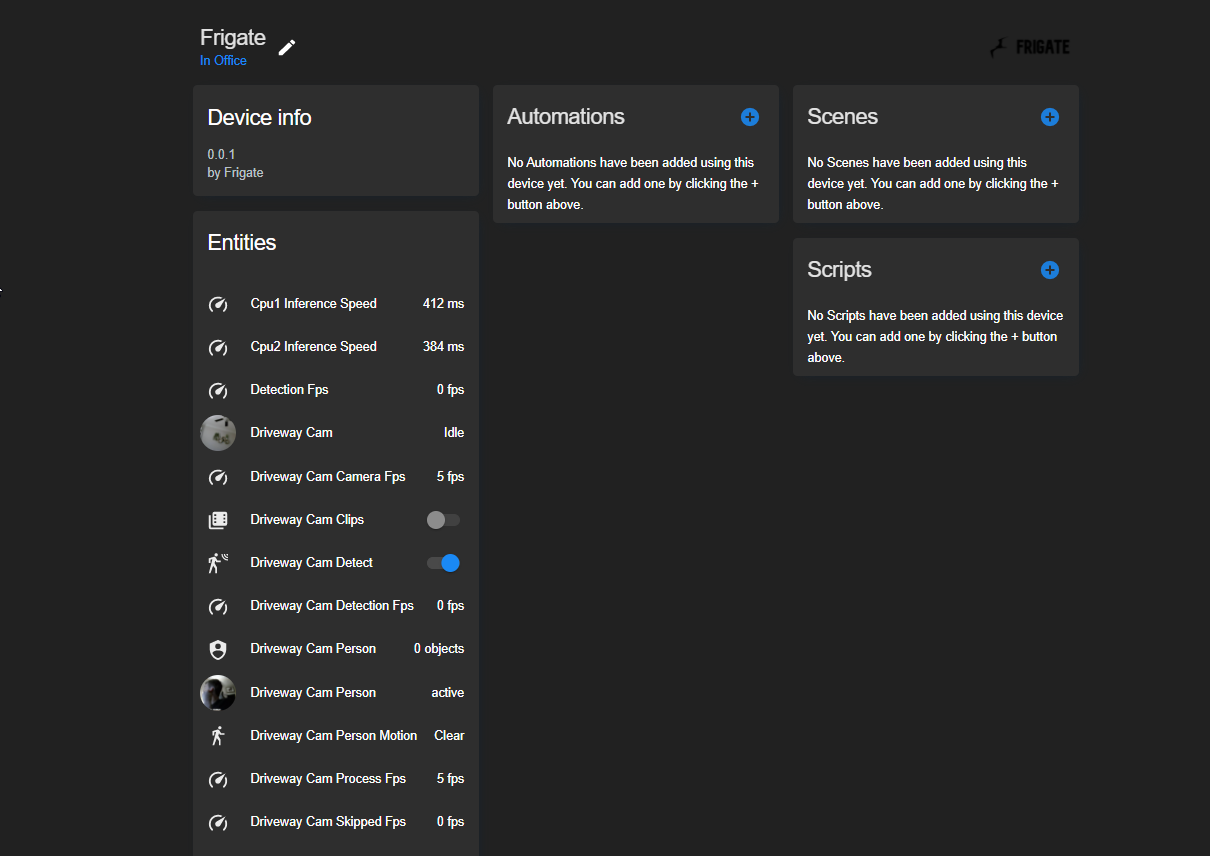
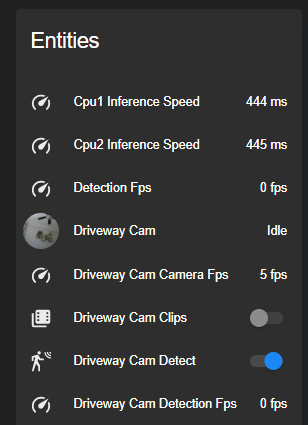
You can now click 1 device to view the full list of Frigate entities created through HACS.
Optional: Add Camera Integration to Lovelace
Now that RTSP is working, you probably want to display the camera in Lovelace. If nothing else, just for testing. Most camera manufacturers have integrations with Home Assistant, so just search the Integrations list and follow the instructions for your camera.
Note: If you're IP camera doesn't have an integration available, you can probably still use the Generic Camera Configuration.
If adding multiple cameras, it's highly recommended that you give each camera a name, as the camera id number will change each time Home Assistant reboots. Once you start adding multiple cameras, it will make managing them much easier as well.
For the Amcrest integration, I just needed to add this to my configuration.yaml file. This will also be different for each manufacturer, so be sure to look through the integration options for your device.
amcrest: - host: 192.168.68.120 username: admin password: password name: Driveway Cam binary_sensors: - motion_detected - crossline_detected - online sensors: - sdcard - ptz_presetHere's what some of the sensors/binary sensors now look like, which means we can add them to a Lovelace card to manage the camera. The PTZ option is especially nice, as I can create a Lovelace Picture card that allows me to pan, tilt, or zoom directly from Lovelace.
To create a camera card, add a Picture Card to Lovelace and choose the camera.driveway_cam entity. There's probably more fancy cards you can create in the Integrations page for you camera.
Wrapping Up
Hopefully this guide helps you add Frigate to Home Assistant! I wrote this as I setup my own instance of it, so it's about as step-by-step as it can get.
Part 2 is now available here, where we get into the fun stuff like advanced object detection, creating detections zones, enabling snapshots and clip recording, and more.
Part 3 is not yet available, but I'll be showing you how to create notifications and how to save snapshots and recordings to a network share.
Let me know in the comments below if this guide helped you!