How To Create WLED Preset Buttons
In this guide, I'm going to show you how to create simple Mushroom card buttons that play a preset you've created in WLED.
Although the official WLED integration automatically creates an input_select with all of your created presets, I don't really want to display ALL of my presets on my Christmas dashboard. For example, anyone uses my FIre tablet to change the effect shouldn't have to scroll through Halloween effects, test effects, or non-Christmas color effects.
So, I decided to create some simple buttons that call specific presets instead. Here's how I did it.
You will need Mushroom Cards integrated into Home Assistant for this one. I also use Vertical Stack to put everything into one column. Full YAML at the end of this guide.
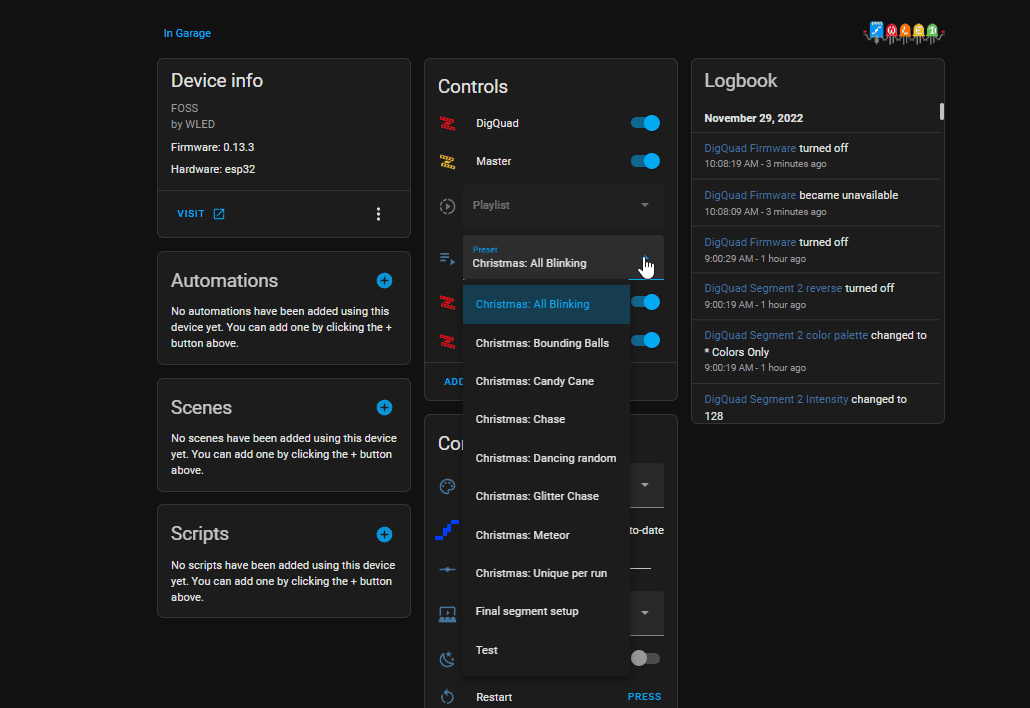
Find WLED Entity Names
When you integrate WLED into Home Assistant, it gives you a bunch of entities. In the Preset dropdown, you'll be able to see them all. As you can see, I have a few test ones that I don't want my users to see/use.
Hint: It really helps to name your presets something easy to understand. I prepended Christmas: before each effect Christmas effect in WLED so I know the difference between normal effects vs. holiday ones. Home Assistant will pull in whatever names you've given your presets in WLED.
Sidenote: If you change WLED names, it won't reflect in Home Assistant until your reboot HA or reload the integration (Settings > Integrations > WLED > Select your WLED controller > 3 dots > Reload.)
My Preset entity name is select.digquad_preset and my DigQuad WLED controller is named light.digquad. We'll need these two to create the buttons.
Create WLED Preset Buttons
Now that you know the entity names, it's time to create the buttons. I'm using Mushroom Entity cards for each button.
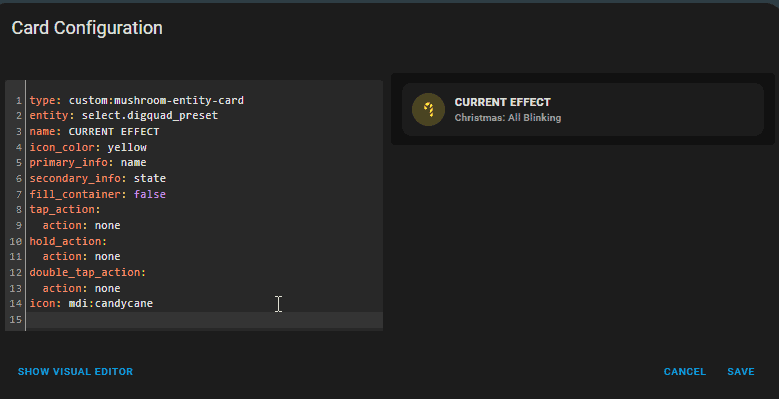
Current Effect button
This one actually isn't a button you can click. I disabled tap actions since I only want my users to see what the current effect is.
type: custom:mushroom-entity-card entity: select.digquad_preset name: CURRENT EFFECT icon_color: yellow primary_info: name secondary_info: state fill_container: false tap_action: action: none hold_action: action: none double_tap_action: action: none icon: mdi:candycaneWLED Visualiser
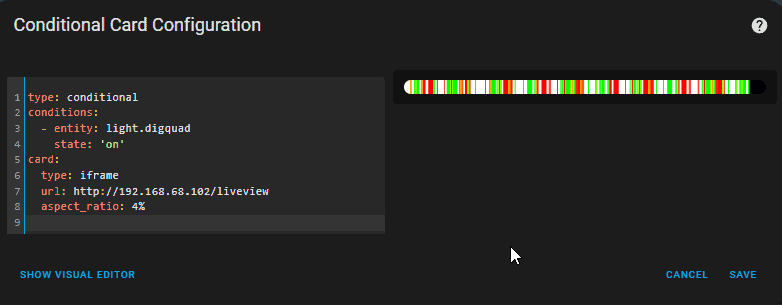
If you'd like to create a card that displays a visual representation of what is currently playing, then add this to a Manual card. Change out the WLED light entity name and IP address of your WLED instance. If you need help, you can reference my How To Add WLED Peek Feature to Home Assistant guide.
This is a conditional card, so it'll only show the light bar when an effect is active.
type: conditional conditions: - entity: light.digquad state: 'on' card: type: iframe url: http://192.168.68.102/liveview aspect_ratio: 4%Mushroom Card buttons to call WLED Presets
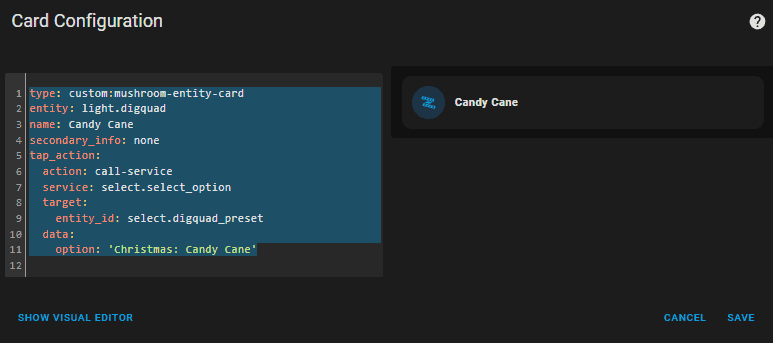
If you'd like to create a few buttons that your users can just click to launch a WLED preset, add this to a Manual card.
Change the entity names in green, and enter the WLED name exactly in the Option: field.
type: custom:mushroom-entity-card entity: light.digquad name: All Blinking secondary_info: none tap_action: action: call-service service: select.select_option target: entity_id: select.digquad_preset data: option: 'Christmas: All Blinking' icon_color: greenAnd another example with a different color icon.
type: custom:mushroom-entity-card entity: light.digquad name: Candy Cane secondary_info: none tap_action: action: call-service service: select.select_option target: entity_id: select.digquad_preset data: option: 'Christmas: Candy Cane'Full YAML
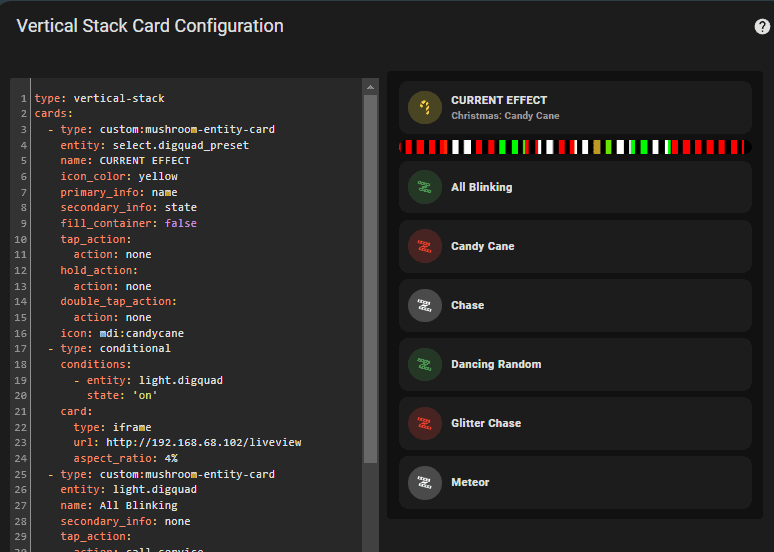
I added all 3 of those to a Vertical Stack so it sits nicely on a dashboard. Here's the full YAML for that. Just copy and paste this into a Manual card and replace the entity names and WLED names in the Option: field.
type: vertical-stack cards: - type: custom:mushroom-entity-card entity: select.digquad_preset name: CURRENT EFFECT icon_color: yellow primary_info: name secondary_info: state fill_container: false tap_action: action: none hold_action: action: none double_tap_action: action: none icon: mdi:candycane - type: conditional conditions: - entity: light.digquad state: 'on' card: type: iframe url: http://192.168.68.102/liveview aspect_ratio: 4% - type: custom:mushroom-entity-card entity: light.digquad name: All Blinking secondary_info: none tap_action: action: call-service service: select.select_option target: entity_id: select.digquad_preset data: option: 'Christmas: All Blinking' icon_color: green - type: custom:mushroom-entity-card entity: light.digquad name: Candy Cane secondary_info: none tap_action: action: call-service service: select.select_option target: entity_id: select.digquad_preset data: option: 'Christmas: Candy Cane' icon_color: red - type: custom:mushroom-entity-card entity: light.digquad name: Chase secondary_info: none tap_action: action: call-service service: select.select_option target: entity_id: select.digquad_preset data: option: 'Christmas: Chase' icon_color: white - type: custom:mushroom-entity-card entity: light.digquad name: Dancing Random secondary_info: none tap_action: action: call-service service: select.select_option target: entity_id: select.digquad_preset data: option: 'Christmas: Dancing random' icon_color: green - type: custom:mushroom-entity-card entity: light.digquad name: Glitter Chase secondary_info: none tap_action: action: call-service service: select.select_option target: entity_id: select.digquad_preset data: option: 'Christmas: Glitter Chase' icon_color: red - type: custom:mushroom-entity-card entity: light.digquad name: Meteor secondary_info: none tap_action: action: call-service service: select.select_option target: entity_id: select.digquad_preset data: option: 'Christmas: Meteor' icon_color: whiteWrapping Up
That's all there is to it. I find it's a lot easier for household members to simply click a WLED preset button instead of having to scroll through the selector provided by the WLED integration. Plus, I can add different color icons for my Christmas presets to give my Christmas dashboard a little more holiday cheer.
Good luck, I hope this quick tutorial helps!