Enable Bitlocker and Set PIN using Powershell or PDQ Deploy
In this guide, I'm going to show you how to enable bitlocker remotely using Powershell/PDQ Deploy. This PDQ Deploy sequence I'm using consists of several "steps" and will enable bitlocker, set a randomized pin code, copy the pincode and recovery key to an IT network share, and wait/reboot the computer several times.
If you don't have PDQ Deploy, you can still take the code from the various steps below and turn it into a Powershell script to use with another RMM tool like SCCM, if you'd like. If you don't have PDQ, there is a free version you can download to accomplish this but the paid version is 100% worth the cost.
I've used this script on hundreds of computers, and it works perfectly everytime. On average, it takes about 7 minutes or less per machine.
What is Bitlocker?
Bitlocker is a built-in full-volume encryption feature that is included in Windows. It supports Windows Vista and higher versions. There are several different ways to configure Bitlocker.
You could turn on Bitlocker manually by right-clicking your C:\ drive and waiting for the encryption process to finish, but that is a very hands-on approach. You will also have to set a Bitlocker pin code, and then document the pin code somewhere secure.
If you work as a sysadmin, IT manager, or in a helpdesk role, then this is a very time-consuming task for each new computer you setup and is prone to human error. For example, if you forget to copy down the PIN code, and a user forgets, they will have to enter in the 48-character recovery code which is not ideal.
Automated Bitlocker Project Scope
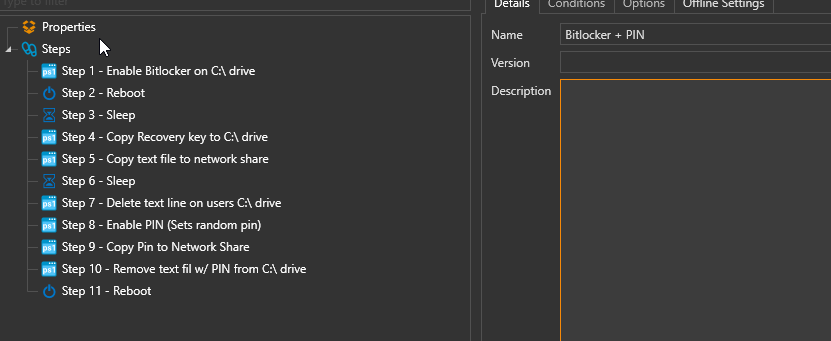
This is truly a hands-off one touch Bitlocker deployment process. Using PDQ Deploy, I run the "Bitlocker + PIN" package, wait a few minutes, and everything is complete.
Here's the steps of everything we'll be doing. The code for each step is below.
If you don't want to recreate this package yourself, I've exported my PDQ package for you. Simply download the .XML below and import into Deploy. Just change out the paths with your own.
Bitlocker + PIN XML: https://smarthomepursuits.com/download/4540/
Prerequisites
The target computer must have a TPM chip that is enabled. Most newer computers already have this and is already enabled within the BIOS.
Optional: You should configure a Group Policy to automatically backup the 48-character Bitlocker recovery key in Active Directory during deployment. This is just another way to backup the recovery key. This GPO adds a new tab to the Computer Object and is viewable from within a domain controller. You cannot store bitlocker PIN's in Active Directory or view the recovery codes from the Active Directory Users & Computers (ADUC) widget.
How It Works
This script will enable bitlocker and set a random PIN code. It will export the recovery key and PIN code as separate text files to the computers C:\ drive temporarily, appended with the computer name like this:
It will then copy both .txt files to a public network share (or a network share that most employees should have access to) The reason I'm not moving it to the IT share just yet is because if I run this script on Janet from Accounting's computer, her user doesn't have access to the IT file share. So, I move it a public share first.
Then, the script will copy from the public share to the IT share and delete it from public share. 100% automated - just run this package against a target machine and it will do everything for you.
It sounds complicated or somewhat of a hacky method, but I promise this works really well and really makes setting up new computers super easy.
Backing Up Bitlocker Recovery Key and PIN to Network Share Risk
There is always a fine line between accepted risk vs. potential reward. Is it secure to backup these codes to an IT network share? If you have tight ACL's in place to where only the IT department can access the network folder where the codes are stored, then I'd say that's pretty secure. I take the same approach for my Export LAPS Passwords script.
Let's take these examples. Let's say a user forgets their pin and you didn't have it backed up or documented correctly. You will have to provide the 48-character pin over the phone. Unfortunately, pin codes can't be changed unless you know the old PIN. (You may be able to set a new one via a separate Powershell script, but I haven't had a need for this) This means the user is now stuck having to enter this ridiculously long code each time their computer reboots.
Or, what happens if you delete the computer object? The recovery code is now lost unless you restore the object from backup or use the Active Directory Recycle Bin. At this point, you're only option is to format the machine and lose all data. Imagine telling that to a remote user; you can imagine how frustrated they would be. Now you'll have to image a brand new machine and ship it to them, wasting hours of your day and productivity lost during shipping.
Automated Bitlocker Encryption Script
There are 13 steps below. I added some wait timers and reboots in between a few steps. I accommodated for slow boot times. We typically deploy core i-5 with 8gb+ of ram and this script has yet to fail on me, so I think the wair timers are pretty reasonable. I recommend creating your package exactly as I have.
If there are any required conditions, I will notate those in the appropriate step. Otherwise, just copy and paste the code into a new step.
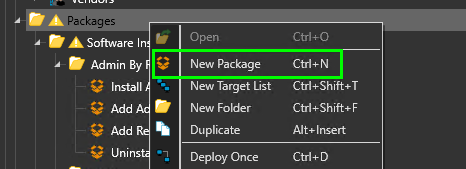
Step 0: Create a PDQ Deploy Package
In your PDQ Deploy appplication, right-click the Packages folder > Create a new package. Name it "Bitlocker + PIN" or something similar.
Step 1: Enable Bitlocker on C:\ Drive
New step > Powershell
Enable-BitLocker -MountPoint "C:" -RecoveryPasswordProtectorStep 2: Reboot PC
New step > Reboot.
Under the Details tab, set to 30 seconds.
Step 3: Sleep
New step > Sleep.
Under the Details tab, set to 60 seconds.
Step 4: Copy 48-character recovery key to C:\ drive
This step will copy the recovery key that was generated during Step 1 and save it to a text file. In a future step, this file will get copied to an IT network share and then deleted from the C:\ drive.
New step > Powershell.
(Get-BitLockerVolume -MountPoint C).KeyProtector.recoverypassword > c:\$env:COMPUTERNAME.txtStep 5: Copy text file to network share
**Change out the destination path with the network location all employees can access.**
New step > Powershell.
Copy-Item "C:\$env:COMPUTERNAME.txt" -Destination "\\PublicShare\folder" -recurseStep 6: Sleep
New step > Sleep.
Set to 30 seconds.
Step 7: Delete Text File from users C:\ drive
New step > Powershell.
Remove-Item c:\$env:COMPUTERNAME.txtStep 8: Enable Bitlocker PIN (Sets random pin)
New Step > Powershell.
$Random = Get-Random -Maximum 1000000 $SecureString = ConvertTo-SecureString "$Random" -AsPlainText -Force Enable-BitLocker -MountPoint "C:" -EncryptionMethod Aes256 -Pin $SecureString -TPMandPinProtector (New-Object System.Management.Automation.PSCredential 'N/A', $securestring).GetNetworkCredential().Password | out-file C:\$env:COMPUTERNAME-PIN.txtStep 9: Copy PIN to Public Network Share
**Change out the paths below.**
New Step > Powershell.
Copy-Item "C:\$env:COMPUTERNAME-PIN.txt" -Destination "\\PublicShare\folder" -recurseStep 10: Delete PIN text file from users C:\ drive
New Step > Powershell.
Remove-Item c:\$env:COMPUTERNAME-PIN.txtStep 11: Sleep
New step > Reboot.
Set Sleep Time to 30 seconds.
Step 12: Move Text files from Public Fileshare to IT Network Share
**Change out the paths below.**
New Step > Powershell
get-childitem "\\PublicShare\folder" *.txt | Copy-Item -destination "\\IT\Bitlocker Keys & PIN" -verbose Remove-Item -Path "\\PublicShare\folder\*" -recurse -ErrorAction IgnoreStep 13: Reboot
New step > Reboot.
Set to 10 seconds.
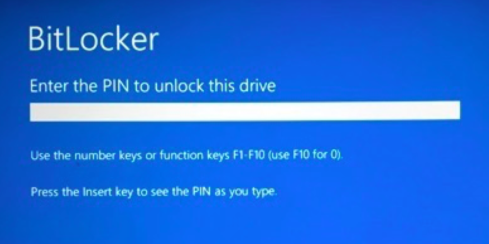
Now that the Bitlocker PIN has been enabled, you will need to physically log into the computer and enter the randomly generated Bitlocker pin, which has now been backed up and stored on your IT file share.
Enabling Pin Codes - Word of Caution
If you are considering a Bitlocker + PIN rollout, I feel like it's necessary to mention that once you add a PIN code to a machine, the user will physically have to enter the PIN after a reboot. If users RDP to their computers from home, then someone at the office would have to enter the pin for them which isn't ideal. To combat this, you might want to create a separate but similar script that just enables PIN codes for laptops but not for desktops, or use Bitlocker Network-Unlock.
Wrapping Up
All in all, this has been a huge time saver for our IT department. We already had the peace of mind knowing that our Bitlocker recovery keys are stored in Active Directory. Now, we have also them backed up as text files in an IT network share, which could be very useful in case your Active Directory is no longer accessible or if your company gets hit with ransomware.
Additonally, each new PC you deploy will now a PIN that is backed up. Since each PIN is randomized during deployment, you don't have to worry about users having the same PIN code or managing a spreadsheet.
I hope this guides helps you out and saves you some time! Let me know in the comments if you've used this guide and it worked out well for you.