How To Use Trigger ID's in Home Assistant
Trigger ID's are a relatively new feature to Home Assistant Automations. Trigger ID's can be used to cut down on the total number of automations you have. However, some of you may not have heard of them or fully understand how powerful they are.
So, what ARE trigger ID's exactly?
Let me give you an example use case, and then I'll dive into how you can start incorporating them into your own automations.
Example Use Case
Let's say you've created an automation to "Turn on the closet lights when motion is detected". You then had to create a 2nd automation to "Turn off closet lights after 5 minutes of no motion".
You've now got 2 automations for a single event - turning on and off the closet.
Now let's say you wanted to create the same automation for your interior garage lights, your pantry, and your laundry room. All of a sudden, you have EIGHT automations!
When it comes to editing one of these automations, you really had to make sure your automations were named appropriately, otherwise you may find yourself clicking into the wrong automation . On top of that, your Automations page will get very cluttered, very quickly.
So, what can do you to reduce the total number of automations? That's where Trigger ID's come in. You can now perform both tasks in a single automation.
Trigger ID Automation 1: Turn On Lights When Motion is Detected, then turn off after 5 minutes
For this first example, I'm going to show you how to create an automation using the Automation GUI editor. For the rest of the examples, I'll post the YAML, but they can be replicated in the GUI by following this example.
- Configuration > Automations & Scenes > Select the Automations tab at the top.
- Click Create Automation and Start with an empty automation.
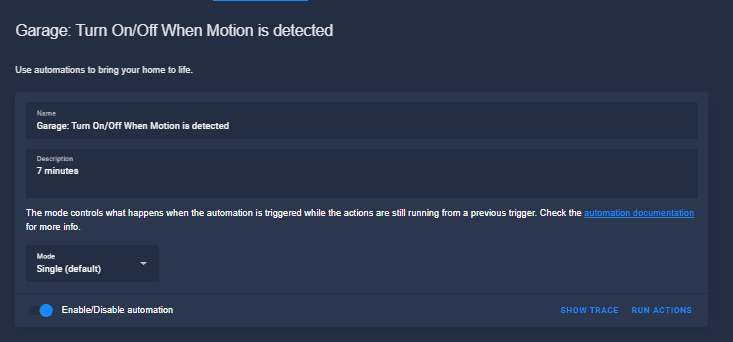
- Give your automation a name like "Turn On/Off Garage Lights When Motion is Detected"
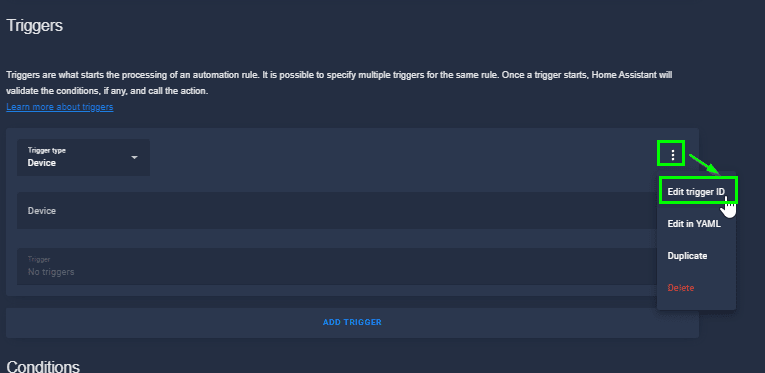
Under the Triggers section, click the 3 dots and then click Edit trigger ID.
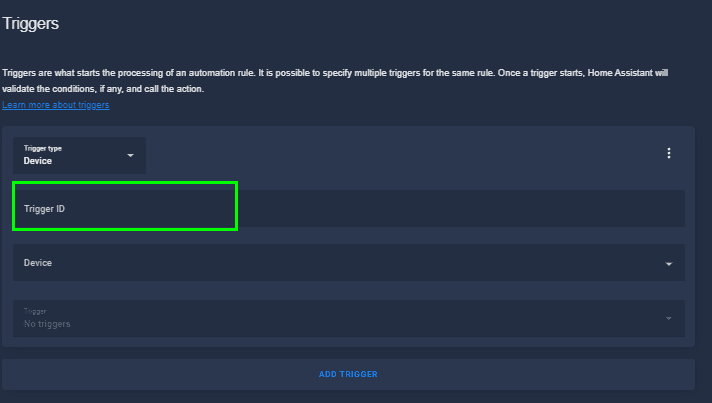
This will bring up a new Trigger ID field, like this:
For this example, I want to turn on the lights when motion is detected, which is a State change (from Off to On). The Trigger ID name is arbitrary, but I like to name my ID's something useful (Motion Detected / Motion Cleared). You'll understand why in a later step.
Create 1 Trigger ID, then click Add Trigger to add a second one. We are adding two because we want two ways this automation can get triggered - either when the motion sensor detects motion, or when it stops detecting motion.
You'll notice in my 2nd trigger ID I have specified 5 minutes - this is the interval in which the 2nd trigger will run (If no motion is detected for 5 minutes, then turn off the lights).
Actions
At this step, we have setup HOW we want the automation to run - either when motion is detected or when motion stops being detected, so the next step to create the logic behind the Actions we want to run.
If Trigger 1 is triggered, do something. If Trigger 2 is triggered, then do something else.
- Under Actions, click Choose.
- Condition Type: Triggered By
- Trigger: Will show you a dropdown of the 2 triggers you created
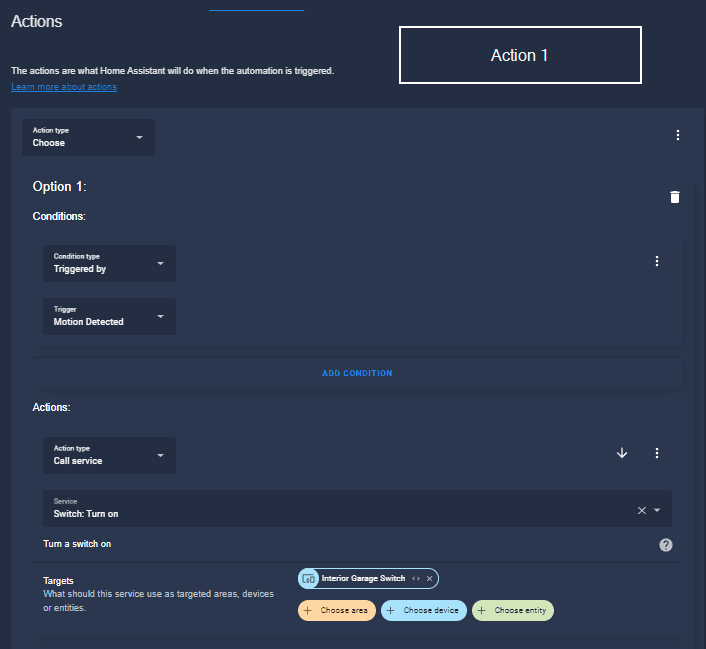
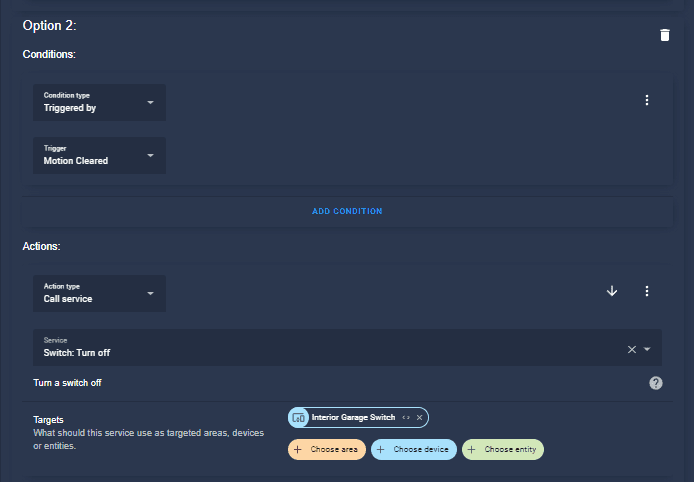
Action 1
For the 1st action, set it up like this:
Then, you need to create a 2nd action. Click Add Option.
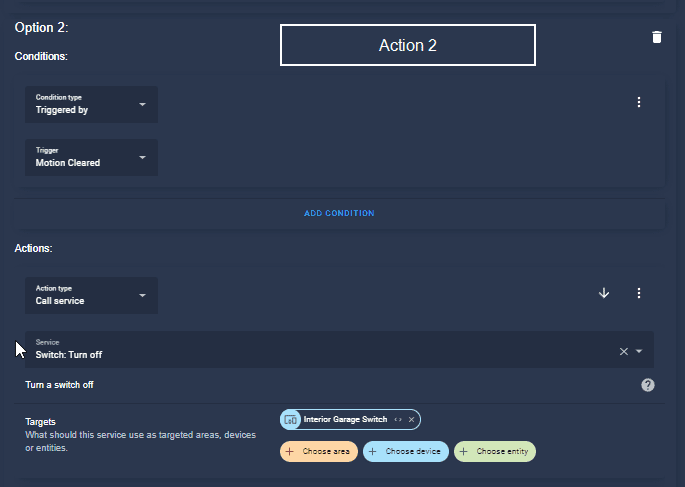
Action 2
Then, perform the same action again - this time choosing the 2nd trigger ID:
Now, if Trigger 1 (Motion Detected) is triggered, it will turn on the light. If Trigger 2 (Motion Cleared) is detected, it will turn the light off after 5 minutes.
For those of you that like to copy/paste YAML into automation, here's the code for it. I added a simple "Notify" service when testing this out, but feel free to remove it if you'd like.
alias: 'Garage: Turn On/Off When Motion is detected' description: 5 minutes trigger: - platform: state entity_id: binary_sensor.motion_sensor_ias_zone id: Motion Detected to: 'on' - platform: state entity_id: binary_sensor.motion_sensor_ias_zone id: Motion Cleared from: 'on' to: 'off' for: hours: 0 minutes: 5 seconds: 0 condition: [] action: - choose: - conditions: - condition: trigger id: Motion Detected sequence: - service: switch.turn_on data: {} target: device_id: cf3b7c9ceaf3590ff9ab3fecaa9834e3 - service: notify.mobile_app_pixel_5_danny data: title: Int Garage Lights on message: Lights on! - conditions: - condition: trigger id: Motion Cleared sequence: - service: switch.turn_off data: {} target: device_id: cf3b7c9ceaf3590ff9ab3fecaa9834e3 - service: notify.mobile_app_pixel_5_danny data: title: Int Garage lights off message: Lights off! default: [] mode: singleTrigger ID Automation #2: Turn On/Off Lights when motion is detected between certain hours only
This one is pretty much the same, except I added a condition that only runs this automation during a specified time of day. (Our dog sleeps in our closet and we don't want this triggered all night whenever he moves around).
alias: 'Master Closet: Turn on.off closet lights during day' description: ' between 6:30am-9pm' trigger: - type: occupied platform: device device_id: 37eef77b6926dced7e9077f426a824e1 entity_id: binary_sensor.hue_motion_occupancy domain: binary_sensor id: Motion Detected - type: not_occupied platform: device device_id: 37eef77b6926dced7e9077f426a824e1 entity_id: binary_sensor.hue_motion_occupancy domain: binary_sensor id: Motion Cleared for: hours: 0 minutes: 0 seconds: 15 condition: - condition: time after: '04:15:00' before: '21:00:00' action: - choose: - conditions: - condition: trigger id: Motion Detected sequence: - service: switch.turn_on data: {} target: device_id: 0fda846f295554b0c1a6226e84eb786e - conditions: - condition: trigger id: Motion Cleared sequence: - service: switch.turn_off data: {} target: device_id: 0fda846f295554b0c1a6226e84eb786e default: [] mode: singleTrigger ID Automation #3: Garage Door Status Notifications
I created a separate Garage Door Status Notifications guide so I can tell if my garage door is closing, closed, opened, or opening. This is useful when trying to open or close it remotely - just to make sure it runs correctly.
alias: 'Garage: Status Notifications' description: '' trigger: - platform: state entity_id: cover.garage_door id: closing from: open to: closing - platform: state entity_id: cover.garage_door id: closed from: closing to: closed - platform: state entity_id: cover.garage_door id: opening from: closed to: opening - platform: state entity_id: cover.garage_door id: open from: opening to: open condition: [] action: - choose: - conditions: - condition: trigger id: opening sequence: - service: notify.mobile_app_pixel_5_danny data: message: Garage door opening... - conditions: - condition: trigger id: open sequence: - service: notify.mobile_app_pixel_5_danny data: message: Garage door open! - conditions: - condition: trigger id: closing sequence: - service: notify.mobile_app_pixel_5_danny data: message: Garage door closing... - conditions: - condition: trigger id: closed sequence: - service: notify.mobile_app_pixel_5_danny data: message: Garage door closed! default: [] mode: singleWrapping Up
Hopefully this guide was simple enough to show you how to setup and use trigger ID's in Home Assistant! Using these has allowed me to cut the total number of automations I have in half, which makes managing them so much easier.