How To Create A Lovelace Restriction Card in Home Assistant
In this guide, I'm going to show you how to add restrictions to Lovelace Cards to Home Assistant. This will prevent unauthorized Home Assistant users from accessing or changing some of your devices.
This Restriction Card is pretty customizable and can be applied to any card of entity. Once setup, a user without access will see a lock icon whenever they attempt to control a device from a Lovelace card. Or, if applying it to an entity in an Entities Card, it will be displayed next to the entity name.
Cards can be unlocked with a pin code or confirmation box. You can also set exclusions for certain users, which is great is you want your kids or guests to see your main dashboard but not necessarily have the ability to control everything.
Let's get started!
How To Restrict Access To A Dashboard or View in Home Assistant
I figured this was important to mention in case anyone finds this guide in Google and is attempting to limit access to entire dashboards.
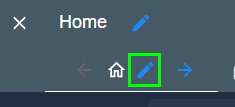
You can already restrict access to specific dashboards and views from within the default Home Assistant settings. Click the 3 dots in the top right corner > edit. Then, click the pencil icon next to one of your dashboards.
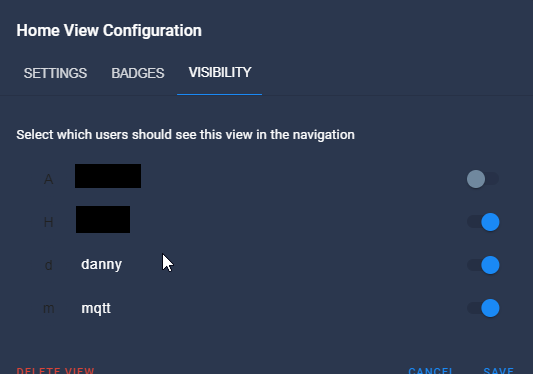
Under the Visibility tab, untoggle any HA user that you don't want seeing or accessing the view.
This integration below is used to further restrict access to devices in a view they do have access to.
Install Restriction Card from HACS
The first step is to obviously have the Home Assistant Community Store (HACS) installed. This can be done manually, but it's much easier to use HACS as it can be installed in one-click.
Then, click your HACS sidebar > Frontend tab > Explore & Add Repositories. Search for "restriction card".
Click it to install, and then click Install this Repository in HACS. Reload the browser when prompted.
Add a restriction to a card
I recommend looking over all the different options and settings available from the github page for further customization.
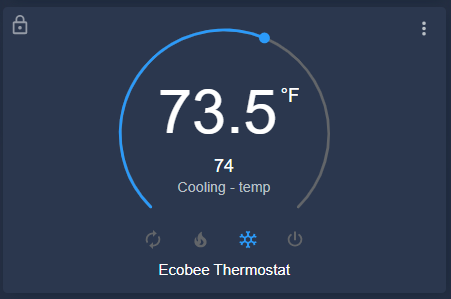
I'm going to put a restriction on my Ecobee Thermostat card for all of my examples below. The last few examples are just basic entities added to an Entities card. Instead of adding the cards like normal, click Add Card > Manual and paste in the code. Then replace the entity with your own.
Unlock Duration: The default duration setting will keep the card "unlocked" for 5 seconds. If you'd like to make it longer you can add a duration: 10 to any of the cards to keep it unlocked for 10 seconds while you adjust the settings. After the duration ends, the card will lock again.
Basic Restriction (no pin or confirmation)
No pin or confirmation is needed to unlock this card. Once clicked, it will unlock it for a duration of 5 seconds (default). This one might be useful to apply to cards that you accidentally press or toggle when swiping on your phone.
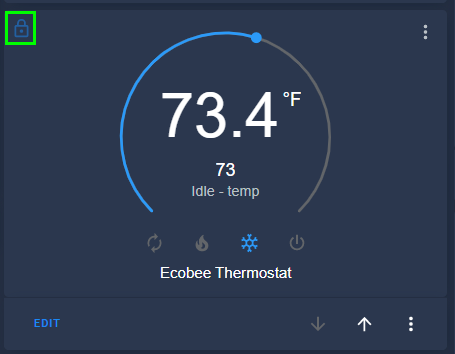
type: custom:restriction-card card: type: thermostat entity: climate.my_ecobeeIt will show a little lock icon in the top left corner so you know which cards have the restriction applied.
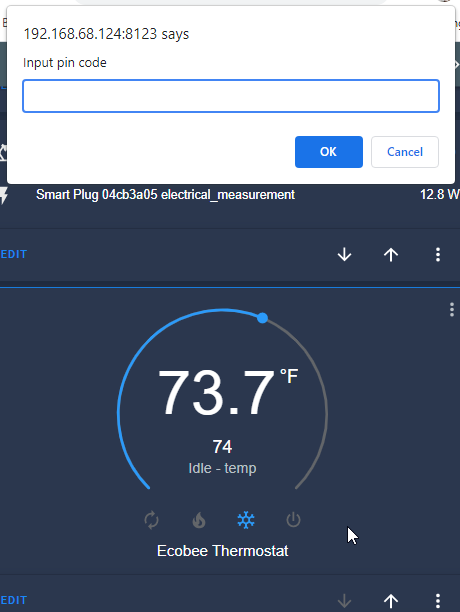
Restriction Card with PIN (All Users)
This card will restrict access until the correct PIN code is entered for all HA users. Whenever anyone clicks the card, a box will popup prompting for the correct pin.
type: custom:restriction-card restrictions: pin: code: 2244 card: type: thermostat entity: climate.my_ecobeeRestriction Card with Confirmation instead of PIN (All Users)
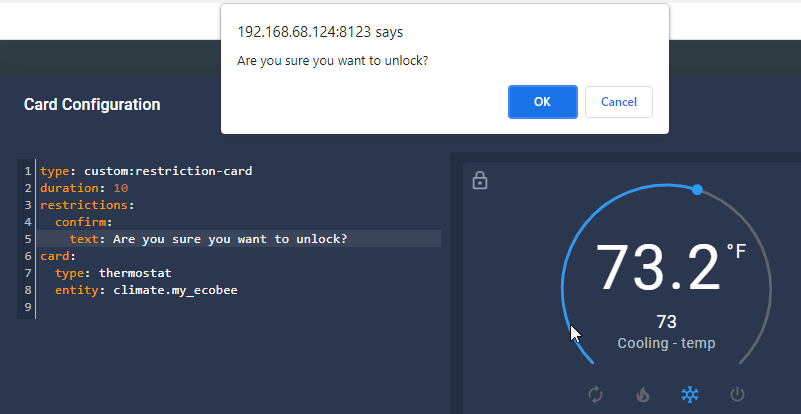
If you'd like the user to just OK instead of entering the pin, your code would look like this.
type: custom:restriction-card duration: 10 restrictions: confirm: text: Are you sure you want to unlock? card: type: thermostat entity: climate.my_ecobeeRestriction Card with PIN (Excluded Users)
If you'd like you exclude yourself from needing to enter a pin, here's the code you'd use.
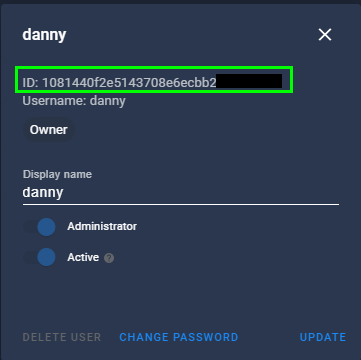
Before you set a user exclusion, you need to locate the User ID from Configuration > Users > click a user. You can't set exclusions by username.
Note: To use the card as an excluded user, you still need to click the card first. The lock will turn from grey(locked) to blue(unlocked) for the duration you set.
type: custom:restriction-card duration: 10 restrictions: pin: code: 2244 exemptions: - user: 1081440f2e5143708e6ec99999999 card: type: thermostat entity: climate.my_ecobeeAdd Restriction to Entities Card (All entities in card)
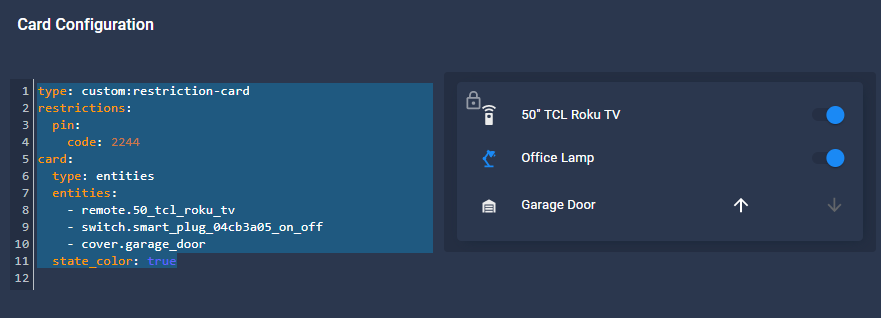
This applies a restriction to all entities in the entire card, not specific devices inside the card. Once the pin is entered or confirmation box is clicked, all entities can be toggled.
type: custom:restriction-card restrictions: pin: code: 2244 card: type: entities entities: - remote.50_tcl_roku_tv - switch.smart_plug_04cb3a05_on_off - cover.garage_door state_color: trueAdd Restriction to Entities Card (Individual entities)
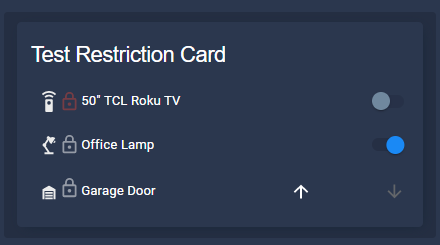
This will allow you set custom restrictions on a per-device basis. For this example, my TV will require a PIN to be entered, my office lamp will require a confirmation, and my garage door has no restriction. You are welcome to set user exclusions on a per-device level as well.
Each device now has it's own lock next to it.
entities: - card: entity: remote.50_tcl_roku_tv type: 'custom:restriction-card' restrictions: pin: code: 2244 row: true - card: entity: switch.smart_plug_04cb3a05_on_off type: 'custom:restriction-card' restrictions: confirm: text: Are you sure you want to unlock? row: true - card: entity: cover.garage_door type: 'custom:restriction-card' row: true show_header_toggle: false title: Test Restriction Card type: entitiesWrapping Up
That's really all there is to installing the Home Assistant Lovelace restriction card! This card is largely going to depend on your needs, which is why I didn't go over all of the different options. But, I wanted to give examples YAML configs for a variety of different cards.
Hopefully this helps you add another layer of security to your dashboards!