Display SSL Expiry Reminders in Home Assistant
In this guide, I'm going to show you how to display the SSL expiration of any domain in Home Assistant. This setup will create a couple sensors which can then be added to a Lovelace card.
If you own several domains, you know how challenging it can be to monitor their SSL certificates. (Especially if you are using LetsEncrypt and don't have them setup to renew automatically.)
To set this up, I read a bunch of Community forums posts until I found something that was super easy. You can literally copy and paste the code into your configuration.yaml file, change the domain name, and the expiration dates will show up!
Note: There is a default Home Assistant integration called Certificate Expiry which will fetch the certificate from your Home Assistant server, but for this tutorial - I want to display when the SSL certs from my other domains.
So if you just looking to monitor Home Assistant, add that integration instead.
Let's get started!
How It Works
The SSL issued date and expiration date is being pulled in from this website: https://crt.sh/
For this example, I'm going to use my site, smarthomepursuits.com. This will create two sensors for me to use: sensor.shp_cert_expiry and sensor.shp_cert_issued. Once these are created, you can add them to any Lovelace card. You can optionally create automations to remind you before they expire (example automation at the end of the tutorial).
If you plan on monitoring several domains/subdomains, you will basically duplicate the two sensors below, change the domain, and give them each a unique sensor name.
Create 2 Sensors
First, you need create two sensors by going to File Editor > configuration.yaml from your HA sidebar. Paste these two into your sensors: codeblock.
- Create a sensor to get SSL issue date
- Create another sensor to start counting down when there is 90 days or less remaining until the renewal date.
- Blue: Enter the domain you wish to monitor the SSL expiry of
- Orange: Unique sensor name for your domain
- Green: The name of your SSL expiry sensor. Make sure to update the sensor name in the 2nd sensor.
Note: I'm using "shp" as the abbreviation for my smarthomepursuits.com site so my sensor names are a little shorter. You can of course change this to whatever you want.
1. SSL Cert Issued Sensor
- platform: rest name: SHP Cert Issued resource: https://crt.sh/?q=smarthomepursuits.com&exclude=expired&output=json&deduplicate=Y scan_interval: 14400 value_template: '{{ value_json[0].not_before }}'2. SSL Cert Expiry
- platform: template sensors: shp_cert_expiry: value_template: '{{ 90 - (( as_timestamp(now()) - as_timestamp(strptime(states.sensor.shp_cert_issued.state, "%Y-%m-%d")) )/ (3600*24)) | round(0) }}' unit_of_measurement: DaysRestart Home Assistant
After adding the two new sensors, restart Home Assistant from Configuration > Server Controls.
You can now find these two sensors under your Entities page.
Add SSL Expiry Sensors to Lovelace Dashboard
Now that the sensors have been created, you can use them to any card you'd like.
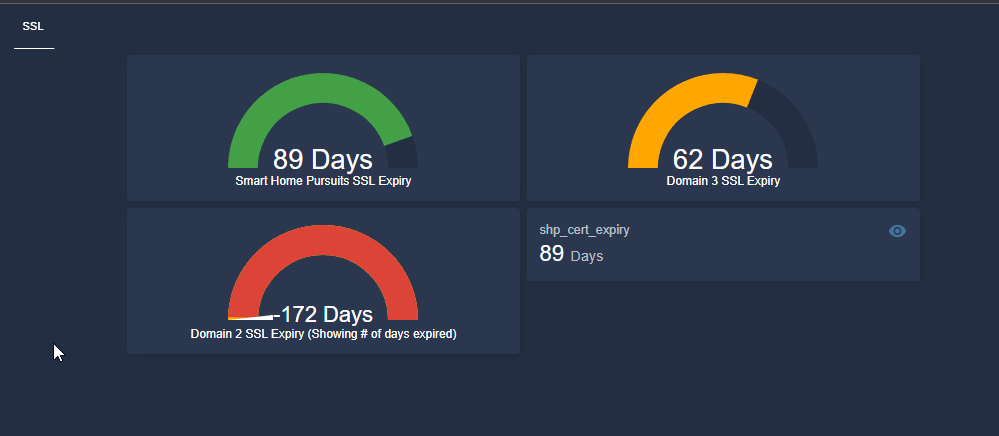
Just for your reference, here's a few different ways you could display them in a dashboard. I've found that visually displaying these in Lovelace is a great way to be reminded everytime you open the app.
Personally, I like using the gauge cards for this. I've added them to a separate "Network" view, but I also added a conditional card to my primary dashboard that only shows up when 0 days are remaining.
Entity Card
Entities Card
Gauge Card
Conditional Card
This card will only displays when there is 0 days remaining. I keep the actual gauge cards that count down the number of days remaining on my Network view, but have this card on my primary dashboard.
type: conditional conditions: - entity: sensor.shp_cert_expiry state: '0' card: type: gauge min: 0 max: 100 entity: sensor.shp_cert_expiryAutomation To Alert When Domain Expires
If you'd like to create an automation using these new sensors, you can do that too. This automation will notify you once the countdown inches closer to being expired, starting when there is 3 days remaining.
You can change the notification service to your phone, a persistent notification, or whatever method you'd like to use.
- alias: "SHP Certificate Expiry Notification" initial_state: true trigger: - platform: numeric_state entity_id: sensor.shp_cert_expiry below: 3 action: - service: notify.home_assistant data_template: title: "SSL Certificate Expire Notification" message: > <b>Today is {{ now().strftime( '%B %d, %Y') }} </b> <br> <br> Domain smarthomepursuits.com ssl certificate expires in {{ states.sensor.shp_cert_expiry.state }} days. <br> <br> data: images: []Wrapping Up
All in all, this is a really simple way to display expiration dates of all of your websites. It works with standard domains as well as subdomains.
This is a great way to view the validity of your SSL certs very quickly to help you stay on top of their renewals.
After setting this up, I'm considering installing Home Assistant at my day job just so I can quickly monitor the 30+ domains we use.
I hope this guide helped you out!


